Protecting your home begins at the top. This complete guide explores how to diagnose, remove, and prevent moss growing on the roof before it leads to stained shingles, hidden leaks, and structural damage. You’ll learn to differentiate moss from algae, choose eco-friendly treatments, set up safe climbing systems, and establish a routine maintenance schedule. Whether you prefer DIY methods or need to know when to call in professionals, our step-by-step approach has you covered.
Key Takeaways
- Inspect your roof quarterly, focusing on shaded valleys and gutter lines to catch moss early.
- Use gentle, biodegradable cleaners (oxygen bleach, vinegar, potassium salts) to avoid shingle damage and protect plants.
- Equip yourself with slip-resistant boots, harnesses, and ladder brackets on slopes above 6:12 for safe removal.
- Trim overhanging branches and clear debris to reduce moisture and sunlight blockage that encourage moss growth.
- Consider zinc or copper strips for long-lasting moss inhibition and integrate them into your annual maintenance routine.
Fast Insights On Roof Moss

Moss loves the cool, damp corners of your roof and it doesn’t stay small forever. Over weeks, it pries up shingle edges, holds onto water and eventually leads to rotting underlayment. Homeowners should watch out for:
- Shaded valleys under overhanging branches where dampness lingers
- Gutters packed full of leaves causing little pools near roof lines
- North- and east-facing slopes that rarely see direct sun
Key Point Early detection stops moss from covering more than 15% of your roof in just a few months.
Immediate Actions You Can Take
- Gently sweep moss off shingles with a soft-bristled brush or a dedicated roof broom
- Treat remaining spots using a gentle, eco-friendly moss cleaner (look for oxygen bleach or potassium salts)
- Check your roof every month during the rainy season so fresh growth never gets out of hand
Mind Safety And Dos And Don’ts
- Slip-resistant shoes and a safety harness are must-haves on slopes over 6:12
- Avoid high-pressure washing—blast-off granules leave shingles unprotected
- Shield shrubs and flower beds with plastic sheeting before spraying cleaners
Quick Takeaway Moss removal requires patience, the right tools and regular follow-ups.
Keep these tips in your back pocket and combine them with simple landscaping tweaks—like pruning branches—to keep moisture off your roof.
Routine Check Plan
- Inspect gutters and valleys each month for debris and moss build-up
- Trim any overhanging branches every season to let sunlight in
- After winter, apply a mild moss inhibitor to vulnerable areas once a year
A concise monthly checklist not only catches moss early but can cut restoration expenses by up to 30%.
Safety Tip Start from the ground—use binoculars to pinpoint trouble zones before climbing up.
By blending quick removal steps with an ongoing maintenance routine, you’ll extend your roof’s lifespan and dodge costly repairs. Grab a soft brush today, clear away small patches, and mark your calendar for a full inspection in two years.
Identifying Moss And Roof Risks
Catching moss growth early can save you serious headaches down the road. A quick roof check tells you when to jump into action rather than waiting for leaks to show up.
Moss often hides in shaded valleys or trapped behind clogged gutters. To the untrained eye, it blends with algae and lichen. Spotting the difference now means fewer repairs later.
Key Moss Versus Algae Clues
- Texture: moss feels velvety, while algae leaves a slimy film.
- Color: deep green clusters point to moss; pale streaks usually signal algae.
- Pattern: moss forms distinct tufts along shaded seams, unlike the random spread of algae.
Roof Risk Hotspots
Shade from overhanging trees can cut direct sunlight by 60%, creating damp pockets. Valleys and gutter lines trap debris, so moisture lingers longer there.
In places drenched by heavy dew or frequent showers, tiny patches explode in size. One Flagstaff homeowner watched a 2-inch moss tuft balloon over eight shingles within weeks—prompting a full inspection before replacement costs soared.
Moss Coverage Comparison
Below is a quick look at how moss spreads under various roof conditions. Use this to gauge when you need immediate action versus basic upkeep.
| Condition | Coverage After 4 Months | Coverage After 2 Years |
|---|---|---|
| Ideal Shade and Debris | 70–80% | >95% |
| Spontaneous Growth | ~15% | ~50% |
| Well-Ventilated Roof | ~5% | ~20% |
You’ll notice shaded, debris-filled valleys go from bare to nearly full coverage in just a few months. That’s the sort of rapid colonization detailed in the research on rapid moss colonization.
Moisture Mapping Tips
- Inspect at dawn when surfaces cool and moisture is most visible.
- Pay special attention to roof eaves and valleys where water gathers beneath shingles.
Inspection Routine Pros Use
- Binocular Survey: Scan from the ground for dark green patches in valleys.
- Soft-Brush Test: Gently scrape a small area—moss resists removal more than algae.
- Moisture Meter Check: Pinpoint damp spots under shingles before damage sets in.
- Gutter Watch: Look for tiny plant fragments signaling upstream moss growth.
- Shingle Edge Review: Lift granules or tears near colonies to spot early wear.
If moss stays under 5% of your roof, a simple brush-off usually does the trick. Once it hits 10%, though, you’ll want targeted treatment—or a professional’s expertise.
Early detection of moss can prevent up to 80% of future repair costs.
Homeowner Stories
In Mesa, one homeowner tackled a 4-inch patch beside a vent using only a plastic trowel and water spray. No regrowth appeared in the following six months.
Contrast that with a Scottsdale case: a moss-packed valley was ignored for a year, letting water seep under shingles. The result? Rotted deck boards and a $900 repair bill.
Warning Signs Of Hidden Moisture
- Dark streaks beneath shingles hint at trapped water.
- Spongy spots on decking reveal ongoing rot.
- Clusters of missing granules near moss point to shingle wear.
Knowing When To Call A Pro
Once moss covers more than 20% of your roof—or if you spot structural damage—it’s time to pause the DIY. Slippery moss and steep pitches increase fall risk. Hiring a licensed roofer like AZ Roof Co ensures the job gets done safely and correctly.
With these checks in hand, your roof stays stronger, lasts longer—and you’ll know exactly when to roll up your sleeves or call in the experts.
Next up, you’ll learn safe, quick DIY removal methods tailored precisely to your roof type and pitch.
Safe DIY Removal For Every Roof
No two roofs behave the same way when it comes to moss removal. Asphalt shingles, tile rooftops, and standing-seam metal panels each require a gentle touch and the right tools. Below, you’ll discover secure ladder setups, eco-friendly cleaning solutions, brushing techniques that follow the roof’s natural angle, and ways to shield your landscaping.
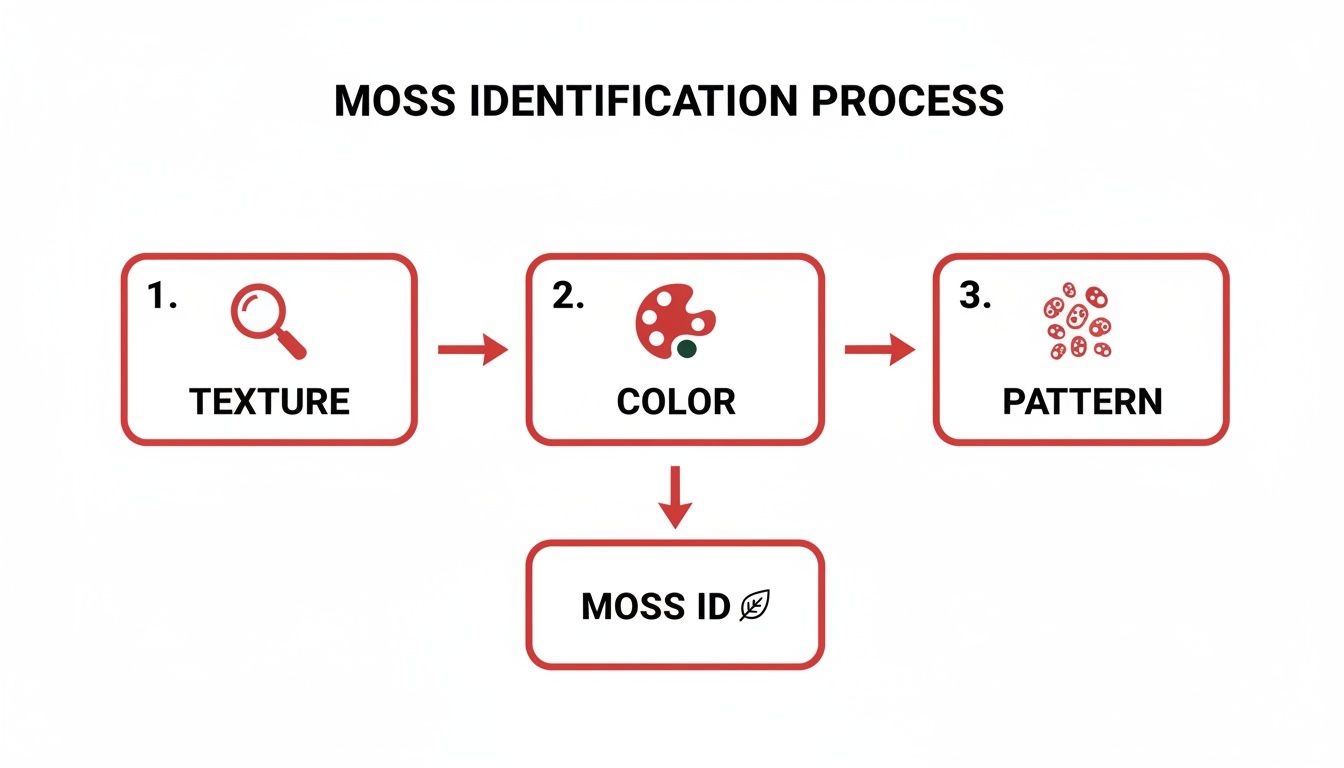
These visual cues—texture variations, subtle color shifts, cluster patterns—make it easy to confirm you’re dealing with moss before grabbing the brush.
Asphalt Shingle Roofs
Shingle granules are your roof’s first line of defense, so you’ll want to avoid any abrasive attack. Secure roof brackets and wear a safety harness to keep both feet—and your tools—steady on the slope.
Mix a biodegradable moss cleaner (sodium percarbonate works well) at the label’s ratios when the weather is dry. A soft-bristled brush will remove growth without stripping away granules.
- Ladder Placement: Tie off at the eaves and rest ladder feet on stable shingles.
- Cleaning Solution: 1 lb of cleaner per 3 gallons of water, applied in manageable segments.
- Work Pattern: Start at the ridge and move down in 10-foot sections for consistent coverage.
- Rinse Technique: Use a low-pressure spray to wash away debris without damaging the shingles.
In Phoenix, one homeowner sprayed each zone from ground level before brushing, protecting both granule adhesion and their back.
Over-enthusiastic pressure washing can strip granules and void your warranty.
Afterwards, let a light rain clear any residue. Circle back in six months to spot any missed patches.
Clay And Concrete Tiles
Tile surfaces are slick and prone to scratching, so a gentle approach is key. Use a brush held at about a 15° angle to lift moss from beneath the glaze without scoring the tile.
Slip-resistant boots are a must. Cover flower beds and shrubs with tarps secured by weights—fallen debris can stain if left unchecked.
- Pre-Inspection: Check around vents and ridge caps for hidden moss buildup.
- Detergent Mix: 10% mild soap to 90% water, applied and left for 20 minutes to loosen roots.
- Brushing Direction: Follow the overlap of each tile to protect edges.
- Rinsing: Spray each row downward to avoid recontamination.
One Tucson resident wrapped their rose bushes in plastic sheeting and enjoyed moss-free tiles for eight months straight.
Standing-Seam Metal Roofs
Metal panels shed water quickly but dent under heavy scrubbing. A soft brush combined with a 0.5% vinegar solution offers a safe, natural remedy.
Hook ladder brackets under the ridge cap and skirt the seams to avoid slip hazards. Work in narrow 2-foot bands from ridge to eave, rinsing each strip before moving on.
- Ladder Brackets: Secure under the ridge cap for maximum stability.
- Chemical Mix: 1 part household vinegar per 200 parts water.
- Soft Washing: If you must power wash, keep pressure under 100 PSI.
- Vent Clearance: Finish with chimneys and vents to protect sealants.
In Scottsdale, two vinegar treatments kept a metal roof spotless for over a year—proof that mild acid solutions can be both safe and effective.
Always review your roof manufacturer’s guidelines to maintain warranty coverage.
Safety Gear And Setup
Before any climb, check that your ladder rests at a 75° angle on firm, level ground. Non-slip boots, gloves, goggles, and a harness rated for fall protection aren’t optional—they’re essential.
- Harness With Tie-Off Straps
- Slip-Resistant Boots With Deep Treads
- Roof Brackets And Ladder Stabilizers
- Chemical-Resistant Gloves And Eye Protection
A Chandler homeowner nearly took a tumble when wet shingles got the best of them. Proper gear keeps you working confidently and reduces accident risk.
Avoid Common Mistakes
It’s easy to rush and end up scraping off granules or scratching glaze beyond repair. Never mix cleaning chemicals—you might trigger a harmful reaction or stain your roof.
- Skip Chlorine Bleach To Protect Warranties
- Don’t Clean On Hot, Sunny Days (chemicals can flash-dry)
- Avoid Work After Rain Or Below 40 °F
- Adhere To PSI Limits To Prevent Material Damage
Wind can be a silent hazard. A gust nearly toppled a Flagstaff homeowner’s ladder—always pause if conditions change.
By following these pointers, you’ll minimize accidents and keep your roof manufacturer happy.
If you want to dive deeper into safe roof cleaning techniques, check our guide on safe roof cleaning methods.
Tip From AZ Roof Co: Installing low-profile ladder brackets can speed up setup and reduce slip risk.
Protect your plants by draping tarps, securing edges with weights, and rinsing foliage after cleaning.
Cover every shrub and flowerbed before you spray to avoid chemical damage.
Extra Tips For Arizona Conditions
Arizona’s sun can bake cleaning solutions too quickly, cutting their effectiveness. Aim for early morning or late afternoon when temps stay below 95 °F.
Heat helps speed moss die-off but can stress roofing materials if chemicals dry too fast. Working in cooler hours lets both your roof and the cleaner do their jobs gently.
Ladder Positioning And Ground Support
Desert soil can be loose or uneven. Use adjustable ladder pads or stakes to anchor your base firmly. Always extend ladders 3 feet above the roofline and tie the top off to prevent sideways movement.
Rinse Water Management
Direct runoff away from your foundation with channeling boards or angled sheeting. Collect and dispose of rinse water responsibly to protect your landscaping and soil.
Post-Cleaning Inspection
Once you’ve rinsed and dried, walk around your home to check gutters and downspouts for clogs. Clear any debris so water flows freely.
Scan the roof with binoculars to spot missed patches before they have a chance to regrow. A quick manual sweep at the three-month mark catches reinfestation early.
Trouble-Free Cleanup Tips
Don’t step on treated areas until they’re fully dry—wet surfaces can be dangerously slick. Coil hoses and store brushes and ladders away from walkways to avoid trips.
- Keep Tools Organized And Out Of High-Traffic Zones
This careful, step-by-step approach can cut moss damage by 50% and give your roof years of extra life.
Preventing Moss Growth With Maintenance

Making your roof unwelcoming to moss starts with a few smart habits. Simple upkeep routines break the moss life cycle and keep shingles in good shape. In the sections below, you’ll find practical tips—from pruning branches to choosing the right coatings—to keep moss off for good.
Trimming And Debris Management
Overhanging limbs cast shade and trap moisture where moss thrives. Prune branches at least 6 feet from the roof edge to let in sunlight and increase airflow. Quarterly cleanups of leaves and pine needles—especially in valleys—prevent damp clumps from forming.
- Improved drainage stops water from pooling
- Reduced shade cuts moss colonization by over 50%
Gutter Cleaning And Inspection
If gutters fill with debris, water backs up near the roof and feeds moss patches. Aim for a gutter clearing every six months and consider guards to intercept leaves before they settle. Be sure to inspect downspouts and seals to catch leaks early.
- Clear blockages with a leaf blower or hand trowel
- Rinse the gutters using a garden hose to ensure smooth flow
- Repair rust spots or seal cracks as soon as they appear
Never let organic buildup sit longer than three months—you’ll risk hidden moss taking hold.
Installing Zinc And Copper Strips
A simple strip of metal along the ridge can make all the difference. When rainwater washes over zinc or copper strips spaced every 3–4 feet, ions wash down and inhibit moss spores. Once properly fastened, these strips can last for decades with almost zero upkeep.
Comparing Moss Resistant Coatings
Roof paints and sealants infused with metal granules form a slick barrier that moss struggles to grip. Products featuring copper particles have been shown to slash regrowth by 40% in humid settings. Always double-check your roof warranty—some coatings can void coverage if not applied as directed.
In Germany alone, installers covered about 7.84 million square meters of new green roofs in 2020, underscoring moss’s value in eco-friendly designs. For more on green roofing, see the EPA Heat Islands Green Roof Research.
Creating A Maintenance Calendar
A clear schedule keeps minor spots from turning into major headaches. Track trimming, debris removal, and inspections on a dedicated calendar. Download our detailed Roof Maintenance Checklist for a month-by-month and seasonal plan.
In one Phoenix backyard, a homeowner who followed this routine cut moss re-growth by 50% in just one year.
- Spring: Prune trees and remove winter debris
- Summer: Inspect gutters and refresh coatings
- Fall: Wash roof valleys after autumn rains
- Winter: Perform a visual check with binoculars and plan next cycle
Case Study From Humid Backyards
In Tucson, installing gutter guards and sticking to a biannual cleaning schedule reduced moss spread by 60%. Early detection during roof checks kept patches from growing larger than four shingles wide.
Consistent upkeep cuts regrowth in half and extends your roof’s lifespan.
Checking Warranty And Material Notes
Not all roofs have the same rules when it comes to maintenance. Keep detailed records—photos, dates, and receipts—of every pruning, wash, and inspection. Before adding strips or coatings, review manufacturer guidelines so you don’t accidentally void your warranty.
Adapting To Arizona Climate
Arizona’s intense sun can dry out moss but can also cause coatings to flash-dry if applied mid-day. Schedule any roof work for mornings or late afternoons, when temperatures are under 95°F. Reflective roof paints can drop surface temperatures by up to 20°F, further discouraging moisture buildup.
Product Selection Tips
Your choice of materials matters just as much as the maintenance routine. Look for:
- Coatings specifically labeled for roof surfaces, with clear prep and cure instructions
- Metal strips with rubber washers to prevent leaks around fasteners
- Products backed by at least a 10-year performance warranty
| Product Type | Cost per Foot | Lifespan | Maintenance |
|---|---|---|---|
| Zinc Strips | ~$1.50 | 20–30 years | Low |
| Copper Strips | ~$2.00 | 30–40 years | Low |
| Moss Resistant Coating | $0.25–$0.75/sq ft | 5–10 years | Medium |
Implement these strategies year-round, and you’ll keep moss at bay—saving on repairs and extending the life of your roof.
When To Hire Pros And Budget For Moss Removal
Moss creeping across your shingles might look harmless at first glance, but once it clumps into large patches—especially on steep or multi-story roofs—you’re flirting with hidden damage and serious fall risks.
If you spot only a few green specks, tackling them yourself makes sense. However, when your roof’s pitch climbs past 6:12 (that’s roughly a 25° incline) or you live above the second floor, bringing in the experts is the smarter move.
Assessing Roof Complexity
Not all roofs are created equal. While a single-story asphalt shingle home might handle a weekend scrub, slate or clay tiles demand precision and training you probably don’t get from a YouTube video.
AZ Roof Co crews show up with harness systems, toe boards, and scaffolding designed for stability. They know exactly how to protect vulnerable shingles—and your safety.
Industry Safety Insight
Rooftop work accounts for over 30% of all fall-related construction fatalities. A licensed team significantly lowers that risk.
Pros bring more than just ladders:
- Verified insurance and workers’ compensation to protect your property
- Service guarantees covering accidental damage and moss regrowth
- Professional-grade cleaning equipment that minimizes shingle abrasion
Cost Breakdown And Budgeting
Getting a clear picture of expenses is half the battle. Most roof cleaning services run between $0.20 and $0.70 per square foot, while targeted chemical treatments usually land around $150–$250 per treatment zone. Preventive measures—like zinc or copper strips—start at about $10 per roll.
Here’s a quick comparison of popular moss removal and prevention services to help you budget effectively:
Moss Removal Cost Comparison
| Service Type | Cost Range | Frequency |
|---|---|---|
| Manual Brushing | $0.20–$0.40/sq ft | Annual/Biannual |
| Chemical Treatment | $150–$250 per zone | Every 2–3 Years |
| High-Pressure Washing | $0.50–$0.70/sq ft | As Needed |
| Zinc/Copper Strip Install | $10–$50 per roll | One-Time/Refill |
This breakdown shows why a 2,000 sq ft roof can range from $400 to $1,400 for routine cleaning and treatments.
Want a full evaluation first? Check out our detailed Roof Inspection Service guide to see how early detection prevents expensive repairs.
Verifying Contractor Credentials
Before anyone steps foot on your tiles, make sure they’re fully licensed and insured in Arizona. A few minutes spent on due diligence can save you thousands later.
What To Ask For:
- Confirmation of Arizona Registrar of Contractors license number
- Proof of general liability and workers’ comp, with your property named as additional insured
- At least three references who’ve had similar roofs serviced
Carefully read their service agreement. Look for clauses on chemical runoff, cleanup protocols, and length of moss-regrowth warranties. Aim for at least 12 months of coverage.
In Arizona’s intense heat, schedule work in early mornings or late afternoons so cleaners stay active on the surface longer.
Finally, factor moss removal into your annual home-maintenance budget. Even setting aside $200 a year helps cover small touch-ups before those green patches become big problems. Start lining up your service date roughly six weeks before our monsoon season—your roof will thank you.
Frequently Asked Questions
Roof moss often sparks practical questions—everything from spotting that first fuzzy patch to safely removing it yourself. I’ve seen homeowners wrestle with slippery slopes and wonder if it’s time to call in a pro.
Key Takeaways
• Moss feels velvety with tuft patterns; algae is slimy, lichen crusty.
• Use oxygen bleach, potassium salts or a vinegar solution safe for plants and pets.
• Inspect the roof every three months, especially after seasonal storms.
• DIY beyond a 6:12 pitch or on multi-story homes carries high risk.
Common Roof Moss Queries
How Can You Tell Moss From Lichen?
When you brush gently, moss stays cushioned and springy while lichen remains hard and flaky. I like to target shaded valleys—scrape a small spot and you’ll see which one resists removal.
Which Non-Toxic Cleaners Work Around Pets And Plants?
I mix 1 lb of sodium percarbonate into 3 gallons of water or a 0.5% vinegar solution, then shield nearby shrubs and rinse well. This approach is pet-friendly and won’t scorch foliage.
What Inspection Schedule Catches Growth Early?
I check shady roof sections quarterly, plus after monsoon storms. From the ground I scope with binoculars, then finish with a soft-bristle brush in hotspots.
When Does DIY Removal Become Too Risky?
Pitch steeper than 6:12, multi-story homes, or slate and clay tiles are clear warning signs. Slips can void warranties and lead to serious injuries—sometimes it’s smarter to hire a licensed roofer.
Where Can You Find Detailed Protocols And Checklists?
AZ Roof Co offers a free roof inspection and personalized step-by-step checklists. You’ll find everything you need at AZ Roof Co.
How Quickly Will Moss Come Back After Removal?
Expect small patches to reappear in 12–18 months without preventive strips. Installing zinc or copper strips often extends that window to 3–5 years.
What Are Ballpark Costs For Professional Moss Removal?
Typical rates run $0.20–$0.70 per sq ft for manual cleaning. A full treatment, including preventive metal strips, usually lands between $600–$1,500 for a 2,000 sq ft roof.

