Discovering a water stain on your ceiling is a sinking feeling every homeowner dreads. It’s a clear signal that your roof, the primary shield for your home, has a breach. While the immediate urge is to panic, the best course of action is to start with a calm, thorough assessment. A small hole, if caught early, can often be a manageable DIY project, saving you from a much costlier professional repair down the line.
This guide will walk you through the essential steps, from safely identifying the source of the leak to performing a durable, weatherproof repair on various common roof types.
Key Takeaways
- Safety First: Always begin your inspection from inside the attic. This is the safest way to pinpoint the leak's origin before you even think about getting on a ladder.
- Know Your Limits: A single missing shingle or a small puncture might be a perfect DIY job. Widespread damage, soft spots in the decking, or issues with a steeply pitched roof are clear signs to call a professional.
- Preparation is Everything: A successful, long-lasting patch depends on a clean, dry, and solid surface. Rushing the prep work is the single biggest mistake you can make.
- Use the Right Materials: The repair method and materials must match your specific roof type—asphalt, metal, tile, and flat roofs each require a unique approach for a durable seal.
That feeling you get when you see a water stain on your ceiling—it's a mix of dread and frustration. It’s an unmistakable sign that your roof, the first line of defense for your entire home, has been compromised. While your first instinct might be to rush into action, the best thing you can do is take a deep breath and start with a solid assessment.
This initial investigation isn’t about fixing anything just yet; it’s about gathering facts. Where exactly is the water getting in? How big is the problem? Answering these questions will tell you if you're looking at a simple puncture or a symptom of a much bigger issue.
You’re not alone in this. Roof repairs are a massive part of homeownership. The global roofing market is expected to hit USD 132,514.5 million in 2025, which shows just how common these problems are. In North America alone, homeowners spent a staggering $463 billion on renovations in the first quarter of 2024, and you can bet a good chunk of that went to essential fixes like this.
Assessing the Damage Safely
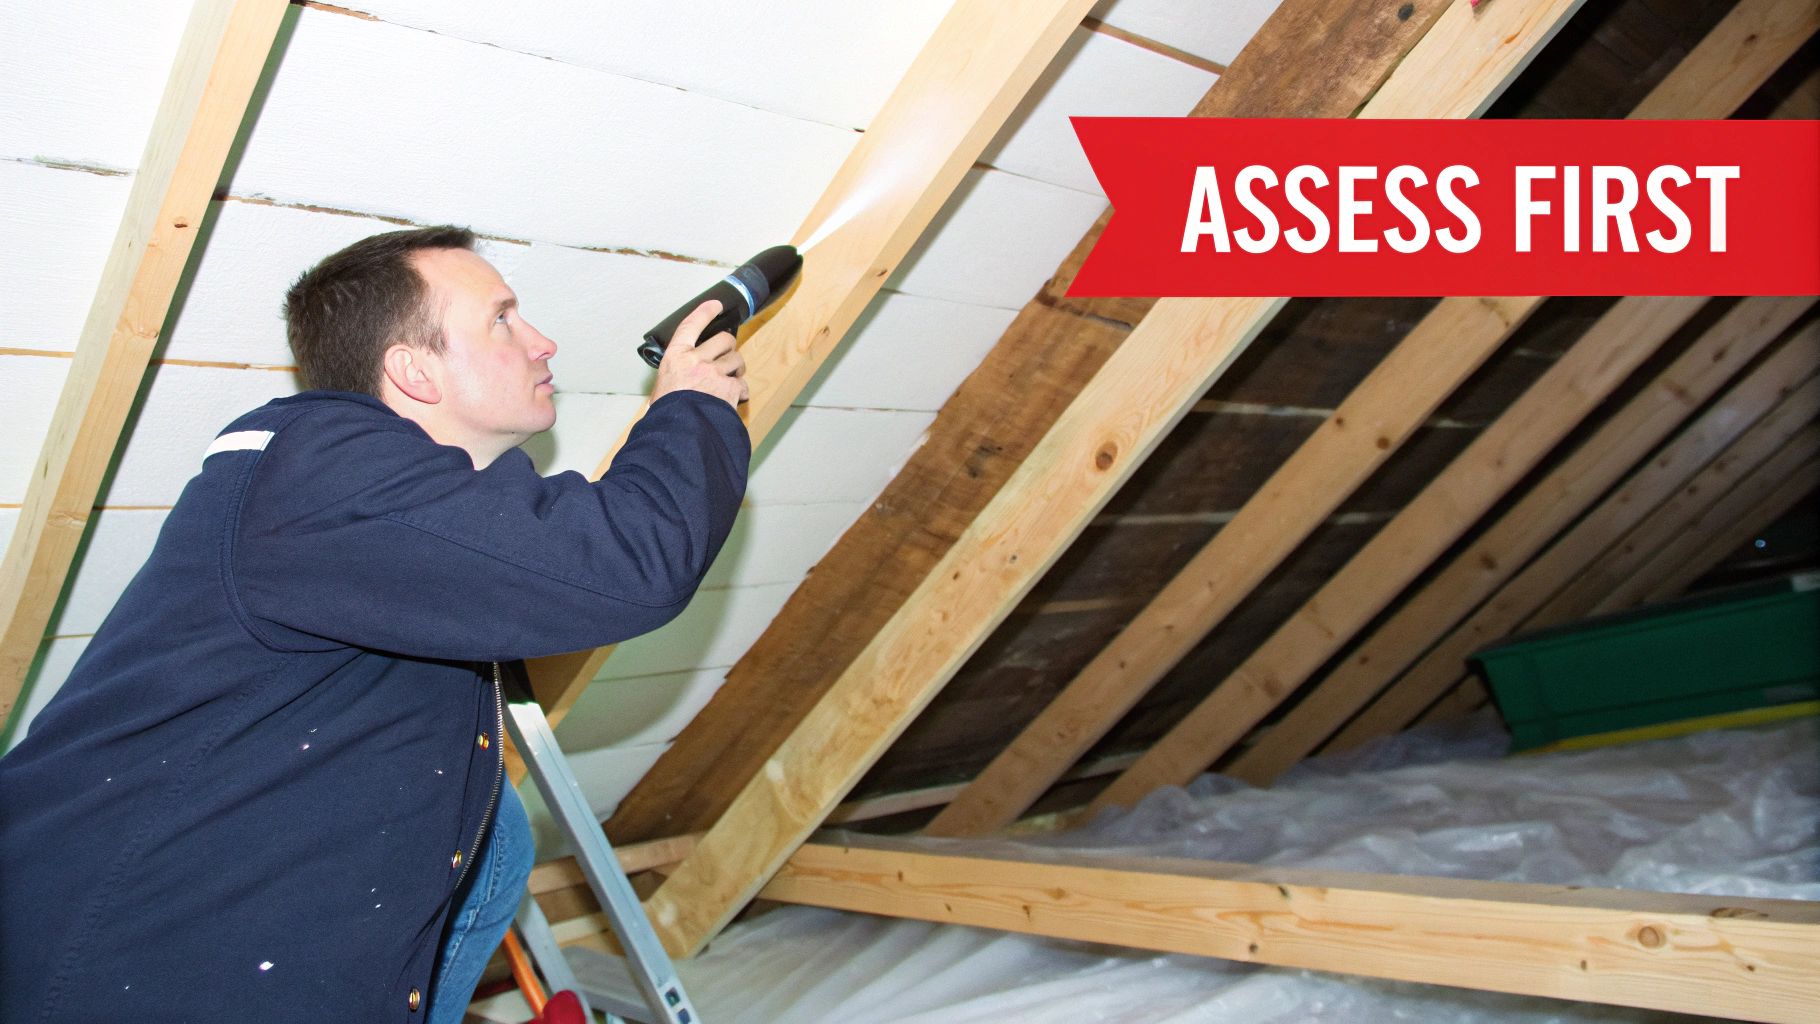
Before you even think about getting on a ladder, your inspection should start from the safest place possible: inside your house.
Grab a powerful flashlight and head up to the attic on a sunny day. This is the best time to spot your culprit. Look for the telltale signs:
- Damp or compressed insulation
- Dark water stains on the wood of the roof decking
- Pinpricks of daylight shining through
Keep in mind that water is sneaky. It can run along rafters or decking for a good distance before it finally drips down. This means the stain on your ceiling is often not directly under the actual hole in the roof. You'll have to play detective and trace the water trail back to its highest point to pinpoint the real source. This legwork is what makes for a successful, long-lasting repair. For more urgent situations, it helps to know the basics of emergency roof repair.
Key Takeaway: Don't start by climbing the ladder. The most critical first step is a safe assessment from your attic. Finding the leak's origin from below makes your work on the roof far more accurate and efficient.
Roof Repair Triage: Should You DIY or Call a Pro?
Once you have a handle on the leak's location and size, it's time for a judgment call. This quick guide can help you decide whether to grab your tools or your phone.
| Scenario | DIY Potential | When to Call a Pro |
|---|---|---|
| A single missing or cracked shingle | High. This is often a straightforward replacement. | If the decking underneath is soft, rotted, or water-damaged. |
| Small puncture (<1 inch) in a flat roof | Medium. Can be patched with roofing cement/sealant. | If there are multiple punctures or large blisters forming. |
| Damage around vents or flashing | Low. Flashing is a common leak source and tricky. | Almost always. Improper flashing repair can make leaks worse. |
| Multiple leaks or widespread damage | Very Low. This indicates a systemic problem. | Immediately. This could point to the end of your roof's life. |
| Steeply pitched or multi-story roof | Low to None. Safety is the top priority here. | Any time you feel unsafe or lack proper safety equipment. |
Ultimately, your safety and the long-term integrity of your roof depend on this honest assessment. A small, manageable fix is one thing, but bigger problems are best left to experienced professionals.
Getting Your Toolkit and Safety Gear in Order
Before you even think about setting foot on a ladder, a successful roof repair starts on the ground. Trying to fix a hole without the right gear is a recipe for disaster—it's not just inefficient, it's downright dangerous. Gathering everything you need first saves you from making risky trips up and down while you're in the middle of the job.
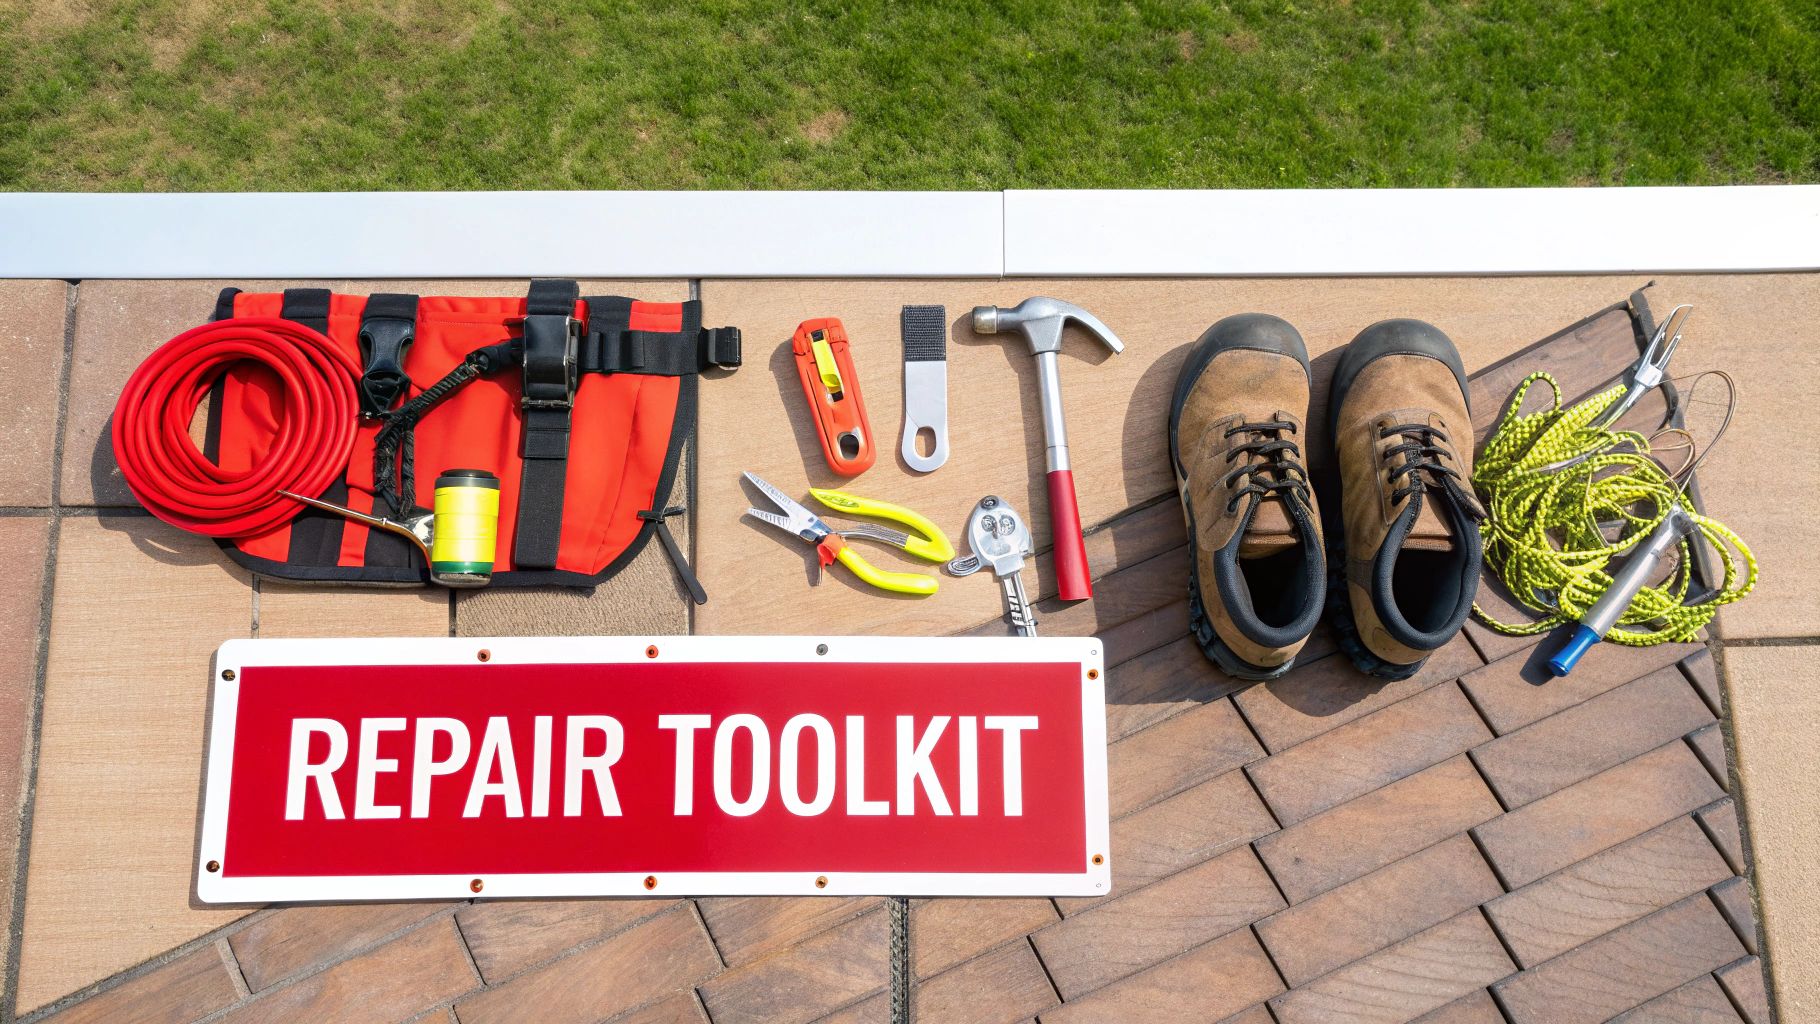
I always tell people to think about this in two buckets: the stuff that keeps you safe, and the stuff that actually fixes the roof. You can't skimp on either. One keeps you from falling, and the other keeps the rain out.
Your Safety-First Checklist
Let's be clear: working at height is inherently dangerous. Falls are the biggest risk by a long shot, so your personal protective equipment (PPE) is non-negotiable. It's your first line of defense.
- A Solid Extension Ladder: Make sure it's rated for the job and tall enough to extend at least three feet above the edge of the roof. Always place it on firm, level ground.
- Fall Protection Harness: If your roof has any kind of real pitch, you need a harness tethered to a solid anchor point. This one piece of equipment can literally save your life.
- High-Grip Footwear: Your best bet is a pair of soft-soled work boots. They give you the traction you need to feel secure on shingles or other roofing surfaces.
- Work Gloves and Safety Glasses: Simple but essential. You'll be dealing with sharp materials and potentially dripping sealant, so protect your hands and eyes.
The Tools for the Job
Once you've got your safety covered, it's time to assemble the tools that will get the repair done right. Having everything within arm's reach makes the entire process go smoother and prevents you from trying to make do with the wrong tool for the task.
- Pry Bar or Flat Bar: You'll need this to gently lift shingles without cracking them.
- Claw Hammer: For pulling out old roofing nails and driving in new ones.
- Utility Knife: A sharp knife is a must. Bring extra blades for clean, precise cuts on shingles, underlayment, and flashing.
- Caulking Gun: The only way to apply roofing cement or sealant cleanly and effectively.
- Tape Measure: Don't eyeball it. Accurate measurements are crucial for cutting your patch materials to the perfect size.
- Chalk Line: This is your best friend for snapping straight lines when you need to cut out a section of damaged decking or get your new shingles perfectly aligned.
A good tool belt or even just a sturdy bucket can be a lifesaver. It keeps your hands free and your tools close, so you aren't constantly shifting your weight or reaching awkwardly. The less you have to move around up there, the better.
Picking the Right Repair Materials
The best tools in the world won't matter if your materials are wrong. A good patch is only as strong as the products you use, so your goal should be to match the existing roof materials as closely as possible for a lasting, weatherproof fix.
What you'll need to buy really depends on your specific roof, but here’s a general shopping list to get you started:
- Replacement Shingles or Patching Material: Find a match for the color and style of your existing roof. If you have a metal or flat roof, you'll need the corresponding patch material.
- Roofing Cement or Urethane Sealant: This is the glue that holds it all together and makes it waterproof. Don't cheap out—get a high-quality, all-weather sealant.
- Roofing Nails: Always use galvanized nails. They need to be long enough to bite firmly into the roof decking, but not so long that they poke all the way through the other side.
- Flashing: If the hole is near a vent pipe, chimney, or in a roof valley, you'll probably need to replace the flashing to ensure water is channeled away correctly.
- Underlayment or Tar Paper: This is your secondary water barrier. You’ll need a piece large enough to cover any exposed wood decking before you put the new shingles on.
Getting all these items sorted out before you start is the first real step toward a successful repair that will protect your home and stand up to whatever Mother Nature throws at it.
Finding the Source and Prepping the Damaged Area
That dark stain blooming on your ceiling is always a gut-sinking sight. But don't assume the leak is directly above it. Water is sneaky; it can find its way under a shingle, travel down a rafter, and only decide to drip into your living room several feet away. Finding the real entry point takes a bit of detective work before you can even think about patching the hole.
Your First Stop: The Attic
Forget climbing onto the roof just yet. Your investigation starts inside, up in the attic. Grab a good flashlight, head up there on a bright day, and kill the lights. Now, scan the underside of the roof deck. You're looking for little pinpricks of daylight shining through—those are your most obvious culprits.
If you don't see any light, look for the water's trail. You'll often find dark stains, water marks, or even damp spots on the wood. Water runs downhill, so trace these marks upward to their highest point. That's almost always where your leak is originating.
Pinpointing the Hole on the Rooftop
Once you have a general idea of the location from your attic search, it's time to get on the roof safely. Most leaks happen where something breaks the plane of the roof, creating a seam that can fail over time.
Zero in on these common trouble spots:
- Flashing: Check the metal strips around chimneys, skylights, and vents. Look for cracks, rust, or sealant that's pulled away from the edges.
- Roof Vents: The rubber boots around plumbing pipes are notorious for failing. Years of sun exposure make them brittle and cracked.
- Valleys: These are the channels where two roof planes meet. Debris loves to pile up here, causing water to dam up and seep under the shingles.
- Shingles: Scan for any shingles that are obviously cracked, curled up at the edges, missing, or have lost their granules (they'll look smooth and black).
If you're still stumped, grab a garden hose and a helper. Have them run water over a small section of the roof you suspect is the problem area while you watch from the attic. It won't take long for the drip to appear. Of course, for a truly comprehensive look, scheduling a professional roof inspection service can uncover issues you might miss.
Getting the Area Ready for a Lasting Repair
You’ve found the spot—great. Now comes the most critical part. Proper preparation is what makes a patch last for years instead of just a few months. Rushing this is the biggest mistake people make. Your goal is a clean, dry, and solid surface for the new materials to adhere to.
Start by gently prying up the damaged shingles and any others you need to move to get clear access. A flat pry bar is your best friend here. Slide it carefully under the shingle's edge to pop the nails without breaking the surrounding shingles. Use the claw of your hammer to pull out the old nails completely.
With the shingles gone, check the wood sheathing underneath. If it feels soft, spongy, or looks rotted, it must be replaced. There's no way around this. Patching over rotten wood is pointless; the problem will just come back, and it will be worse.
Pro Tip: Never, ever apply new sealant or shingles to a surface that is wet, dirty, or covered in old debris. The repair is guaranteed to fail. Take the time to make sure the area is bone-dry and spotless.
This prep work is everything. It's why the US roofing contractors' market is expected to hit $59.2 billion in 2024, with the average repair running about $1,150. People pay for it to be done right because skipping these steps can turn a simple fix into a massive $11,500 roof replacement. As you can see from statistics on RoofLink.com, taking your time on prep isn't just a suggestion—it's a sound investment.
Practical Repair Methods for Different Roof Types
Every roof speaks a different language. A fix that works for an asphalt shingle will fail miserably on a metal panel, and patching a tile roof is a whole different ballgame from sealing a flat one. Knowing the right approach for your specific roof type is the key to a repair that actually lasts, saving you from much bigger headaches down the road.
Here, we'll get into the nitty-gritty, hands-on methods for the most common residential roofs. I'll walk you through the proper techniques for each material, giving you the kind of real-world advice you need to create a durable, weatherproof seal.
Before you touch any patching material, though, the prep work is always the same.
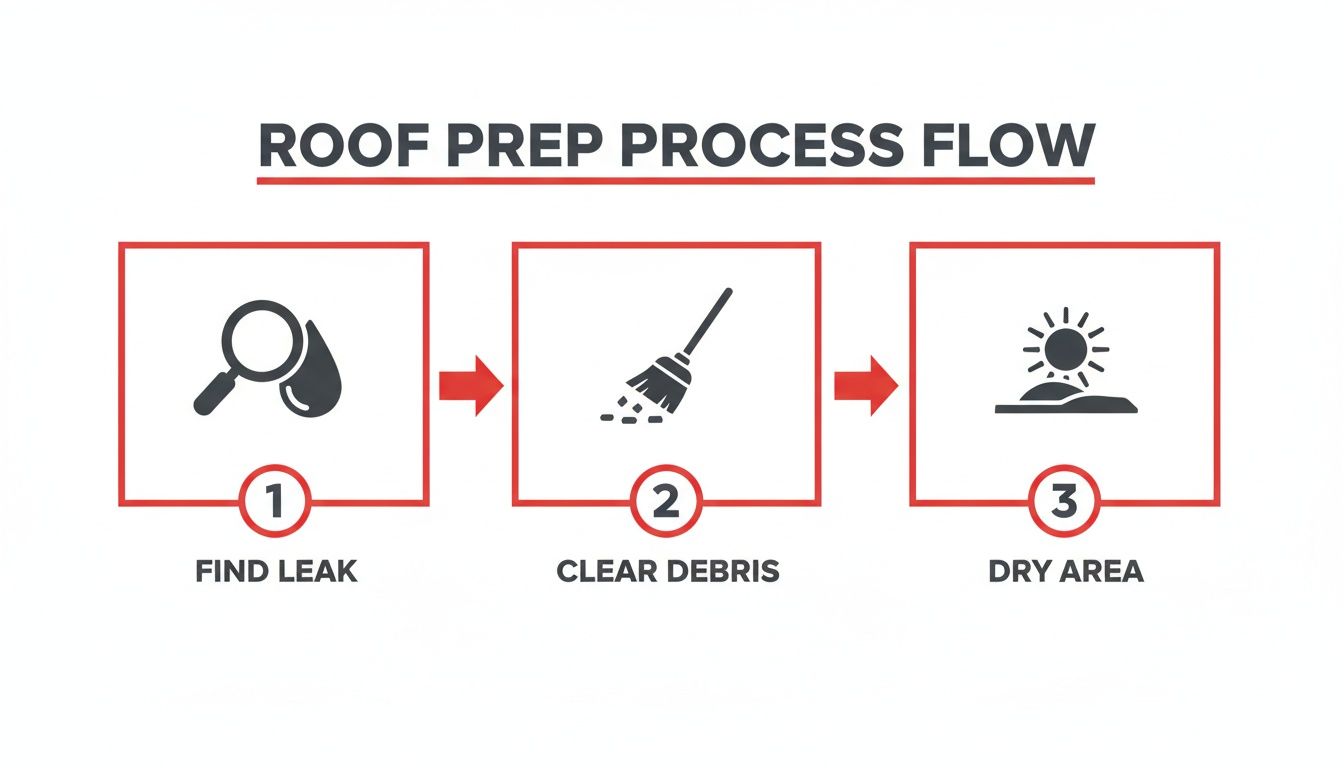
As you can see, a successful repair always starts with finding the true source of the leak, clearing away all debris, and making absolutely sure the surface is bone-dry before you start.
To make things easier, here’s a quick-reference table outlining the basic materials you'll need for each type of roof we're covering.
Patching Materials by Roof Type
| Roof Type | Primary Patch Material | Key Sealant | Common Tools Needed |
|---|---|---|---|
| Asphalt Shingle | Matching Replacement Shingle | Roofing Cement/Sealant | Pry Bar, Hammer, Galvanized Nails |
| Metal | Matching Sheet Metal | Urethane-Based Sealant | Wire Brush, Tin Snips, Screws |
| Clay/Concrete Tile | Matching Replacement Tile | High-Grade Roofing Adhesive | Hammer, Chisel, Pry Bar |
| Flat (EPDM/TPO) | Compatible Patching Kit | Lap Sealant/Caulk | Utility Knife, Primer, Hand Roller |
This table should give you a solid shopping list before you head to the hardware store. Now, let’s get into the specific techniques for each one.
Patching the Most Common Roof: Asphalt Shingles
With 75% of North American homes covered in asphalt shingles, this is the repair most people will eventually face. The good news? It's often the most straightforward DIY fix if you’re patient and methodical.
The main goal is to swap out the damaged shingle without wrecking its neighbors. Start by grabbing a flat pry bar and gently working it under the shingle directly above the damaged one to break its tar seal. This gives you the clearance you need to get to the nails holding the bad shingle in place.
Once that top shingle is loose, you can carefully pull out the nails from the damaged shingle beneath it. With the nails gone, the old shingle should slide right out.
Now, slide the new shingle into position, making sure its top edge lines up perfectly with the ones next to it. Fasten it with four galvanized roofing nails—place one about an inch in from each side, then space the other two evenly between them. The last, and most critical, step is to apply a good dab of roofing cement under the tabs of the shingle above to reseal it to your new shingle.
Expert Tip: In colder weather, asphalt shingles get brittle and can crack if you look at them wrong. If you’re working on a chilly day, use a hair dryer to gently warm the shingles you need to lift. It makes them way more pliable and dramatically cuts the risk of causing more damage.
Sealing a Hole in a Metal Roof
Metal roofs are tough as nails, but punctures can still happen from falling branches or creeping rust. Repairing a hole here requires a different strategy because metal expands and contracts so much with temperature changes. A rigid, inflexible patch is doomed to fail.
First, the area around the hole needs to be spotless. Use a good cleaner to get rid of any dirt or algae, then rinse it and let it dry completely. Next, take a wire brush and scuff up the surface of the metal where the patch will sit. This gives the sealant something to really bite into.
Cut a patch from a matching piece of sheet metal, ensuring it overlaps the hole by at least two inches on all sides. It's a good practice to round the corners of the patch—this helps prevent them from catching debris or getting lifted by ice.
Apply a generous bead of a color-matched urethane sealant around the hole itself. Press your metal patch firmly into the sealant until you see it ooze out from all the edges. That ooze is your confirmation of a complete, gap-free seal. To finish it off, secure the patch with pan-head sheet metal screws, using ones just long enough to go through the patch and the roof panel, but not deep into the decking below.
Carefully Replacing a Cracked Roof Tile
Tile roofs, whether they're clay or concrete, look fantastic but are surprisingly brittle. The key to this repair is patience and a delicate touch. You absolutely cannot rush this job. One wrong move can crack an adjacent tile, turning a simple fix into a much bigger project.
Start by carefully breaking the cracked tile into smaller pieces with a hammer and removing them. You have to be precise to avoid hitting the surrounding tiles. Underneath, you'll find a nail holding the top of the tile in place; use a pry bar and hammer to cut or pull that nail out.
Now, slide your new tile into position. You won't be able to nail this one down like the original. Instead, you'll secure it with a high-quality roofing adhesive. Gently lift the overlapping tile above it just enough to apply a generous amount of adhesive to the top portion of the new tile's underside. Press it firmly into place, making sure it sits perfectly flush with its neighbors.
Applying a Durable Patch to a Flat Roof
Flat roofs, typically covered in materials like EPDM (rubber) or modified bitumen, demand a patch that creates a totally seamless, waterproof membrane. Even a pinhole-sized gap can let a shocking amount of water in.
After a thorough cleaning and drying of the damaged area, you'll need to apply a primer specifically designed for your roofing material. Don't skip this step—it’s essential for ensuring the patch adhesive can form a permanent bond.
Next, cut a piece of the correct patching material so it extends at least three to four inches beyond the hole in every direction. Rounding the corners of the patch is a pro move here, too, as it helps prevent the edges from peeling up over time.
Apply the recommended adhesive or peel off the backing, then press the patch down firmly. Use a small hand roller and work from the center of the patch outwards, pushing out every last air bubble. You're aiming for perfect, even contact between the patch and the roof surface. To lock it all down, apply a bead of compatible lap sealant around the entire perimeter of the patch.
This focus on material-specific repairs is part of a massive industry. The global roofing market hit an incredible $296.21 billion in 2024 and is on track to reach $306 billion in 2025, a trend fueled by the constant need for repairs on aging homes. With US home renovations reaching $463 billion in Q1 2024, fixing small holes is a key activity for homeowners—it can turn a potential $11,500 roof replacement into a much more manageable $1,150 average repair. You can explore more of these market trends in a detailed report from The Business Research Company.
Ensuring a Watertight Finish and Preventing Future Leaks
Getting the hole covered is a big win, but we're not quite at the finish line. The final seal is what really makes the difference between a temporary patch and a permanent, professional-grade repair. This is where you create a truly impenetrable barrier that will stand up to whatever Mother Nature throws at it, keeping you off that ladder for years to come.
Think of it this way: you’ve just moved from playing defense to playing offense. A little proactive work now saves you from a world of headaches later.
Creating the Perfect Seal
With your new patch or shingle securely in place, it's time for the final waterproofing. This means getting hands-on with roofing cement or a quality sealant to create a seamless, watertight bond.
Grab a putty knife and apply a thin, even coat of roofing cement under the edges of any shingles you had to lift. The trick is to "feather" it out, spreading it smoothly so there are no thick globs. This creates a gentle slope that encourages water to flow right over the repair instead of getting caught on a hard edge and trying to seep underneath.
Key Insight: Less is more when it comes to roofing cement. It’s a common rookie mistake to slather it on thick, but a massive glob is actually more likely to crack and fail over time. A thin, well-feathered layer creates a much stronger and more durable seal.
Don't forget the nail heads! Put a small dab of sealant right over the top of any exposed nails. This tiny step is one of the single most effective ways to stop future leaks, as water loves to find its way in through failing nail seals.
Shifting to Proactive Roof Maintenance
Now that you've seen what it takes to patch a hole, the best strategy is to avoid having to do it again. You can catch most problems before they turn into full-blown emergencies with a simple inspection every now and then. The best part? You can do most of this from the safety of the ground.
Once or twice a year, maybe in the spring and fall, just grab a pair of binoculars and take a slow walk around your house, scanning the roof.
Here’s a quick checklist of what to keep an eye on:
- Missing or Damaged Shingles: Look for anything that looks out of place—shingles that are cracked, curling up at the edges, or just plain missing.
- Flashing Issues: Pay close attention to the metal strips around your chimney, vents, and skylights. Are they rusted? Pulling away from the roof? That’s a leak waiting to happen.
- Debris Buildup: Roof valleys are notorious for collecting leaves and pine needles. This debris acts like a dam, trapping water and forcing it under your shingles.
- Gutter Health: If your gutters are clogged and overflowing, that water has to go somewhere. Often, it backs up and rots the roof decking right at the edge.
A well-sealed roof does more than just keep the rain out; it protects your home from serious moisture-related problems. Understanding the hidden dangers of mould really drives home how critical a solid repair is.
This kind of proactive mindset doesn't just add years to the life of your roof; it protects the entire structure of your home. For a deeper dive, our guide on choosing the right roof leak repair sealant has everything you need to pick the best products for both emergency fixes and ongoing maintenance.
Frequently Asked Questions (FAQs)
Jumping into a roof repair project yourself is a great way to save money and take control, but let's be honest—it brings up a lot of questions. Getting solid answers is the key to doing the job right and, more importantly, safely. We've pulled together some of the most common questions we hear from homeowners to give you the straightforward advice you need.
How long will a DIY roof patch last?
A properly executed DIY patch can be a long-term solution, not just a temporary fix. If you replace a damaged asphalt shingle correctly, it can last for many years. For metal or flat roofs, a patch applied with the right primers and sealants can easily last 5-10 years. The durability depends entirely on the quality of your prep work, using the right materials for your roof type, and ensuring a perfect seal. A quick slap of roofing cement, however, should be considered a short-term fix.
Can I repair my roof in the rain?
No, you should never attempt to repair a roof in the rain or when the surface is wet. It is extremely dangerous, as roof surfaces become incredibly slick, dramatically increasing the risk of a serious fall. Furthermore, sealants and adhesives will not bond correctly to a damp surface, which means the repair is guaranteed to fail and may even trap moisture, leading to rot.
What are signs that a small hole is part of a bigger problem?
A small leak can sometimes be a symptom of a larger, systemic issue. Be on the lookout for these red flags:
- Spongy or soft spots when you carefully walk on the roof, indicating rotted decking underneath.
- Large amounts of shingle granules (which look like coarse sand) in your gutters.
- Water stains appearing in multiple locations inside your home.
- Widespread curling, cracking, or missing shingles across the roof.
If you notice any of these, it's time to call a professional for a comprehensive inspection.
What is the average cost of a professional roof repair?
The cost can vary significantly based on your location, roof material, and the extent of the damage. However, for a minor repair on a standard asphalt shingle roof (like replacing a few shingles or sealing flashing), you can generally expect to pay between $150 and $450. Repairs on more specialized materials like tile, slate, or metal typically start around $400 and can exceed $1,000. If the roofer discovers underlying damage to the wood sheathing, the cost will increase.

