After a severe storm barrels through, the sight of your damaged roof can be overwhelming. The path forward involves filing a storm damage roof insurance claim, a process that can feel complex and intimidating. This guide is designed to demystify the steps, from the critical moments after the storm to negotiating a fair settlement with your insurer. Understanding how to document damage, communicate with adjusters, and choose the right contractor will empower you to navigate the claim successfully and restore your home's most important protector.
Key Takeaways
- Act Fast and Safely: Your immediate priorities are ensuring your family's safety, preventing further damage with temporary fixes (like tarping), and thoroughly documenting everything with photos and notes.
- Documentation is Your Power: Build a strong case with detailed, time-stamped photos of all damage—not just on the roof but on gutters, siding, and A/C units. A written log of the storm's timeline and observed damage is crucial.
- Be Proactive with the Adjuster: Don't be a passive observer during the inspection. Walk the property with the adjuster, pointing out every piece of damage you've documented to ensure it's included in their report.
- Understand Your Settlement: Know the difference between Actual Cash Value (ACV) and Replacement Cost Value (RCV). Your first check will be for ACV (minus your deductible), and the rest (depreciation) is released after the work is completed and invoiced.
- Don't Accept a Lowball Offer: Claim denials and low offers are common. Be prepared to formally appeal their decision using your documentation and a contractor's estimate as evidence. If necessary, consider hiring a public adjuster to fight on your behalf.
Your Immediate Post-Storm Action Plan
That moment right after a big storm passes is always a bit disorienting. It's easy to feel overwhelmed, but what you do in these first few hours is absolutely critical—not just for your family's safety, but for setting your insurance claim up for success. The key is to focus on safety first, then shift to carefully documenting the damage and stopping things from getting any worse. A fast, smart response really paves the way for a less painful claims process.
This quick visual breaks down the three most important things you need to do right after a storm.
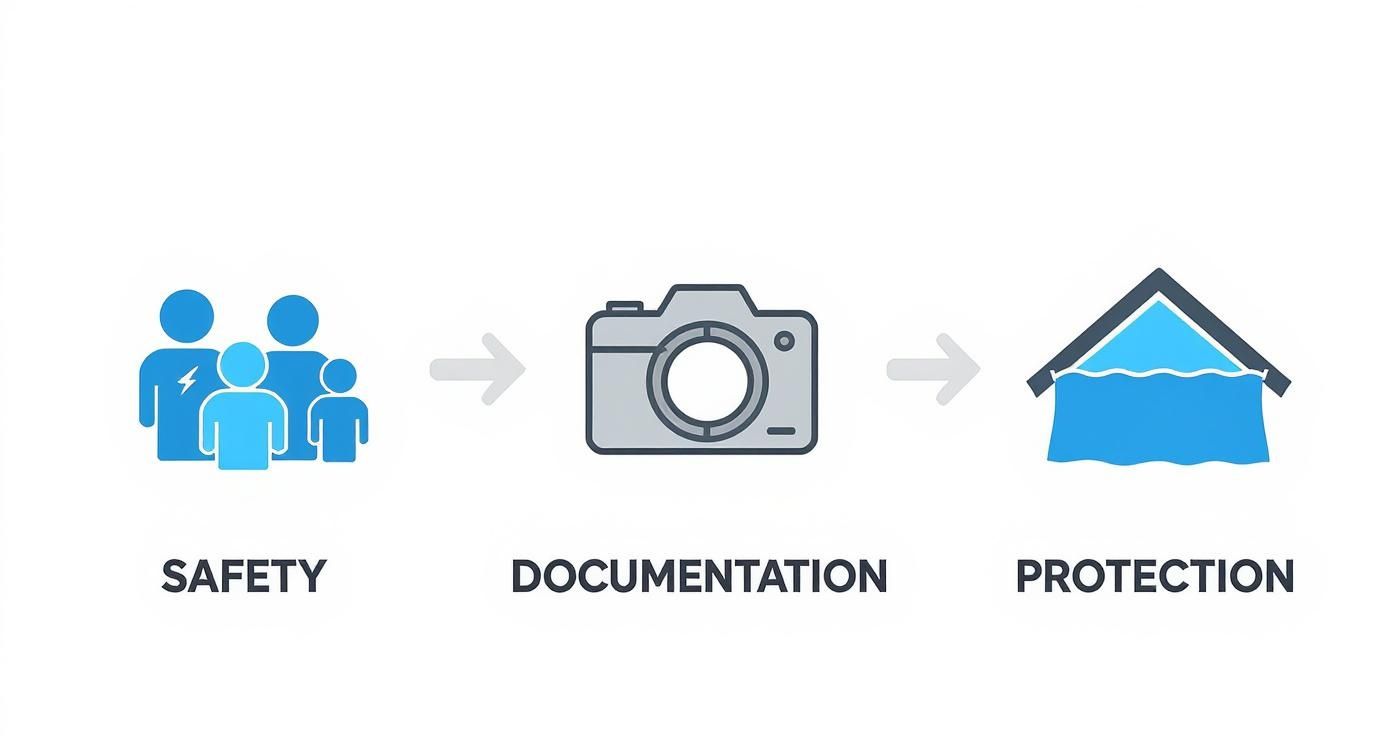
Think of it as your order of operations: keep everyone safe, gather your evidence, and then protect your home from any more damage.
When the storm clears, your first instinct might be to check the roof, but it's crucial to follow a safe and methodical process. This checklist breaks down the immediate actions you should take to secure your property and lay the groundwork for a successful insurance claim.
Immediate Storm Damage Response Checklist
| Priority | Action Item | Reason |
|---|---|---|
| High | Confirm Family Safety | Check on everyone in the household. Your first responsibility is to ensure no one is injured. |
| High | Identify Immediate Hazards | Look for downed power lines, gas leaks, or unstable trees. Evacuate if necessary. |
| Medium | Inspect Your Home's Interior | Check for water stains on ceilings or walls, which are telltale signs of roof leaks. |
| Medium | Take "Before" Photos | Photograph any interior damage before you move anything or start any temporary fixes. |
| Medium | Perform Temporary Mitigations | Place buckets under leaks and move valuables out of the way to prevent further damage. |
| Low | Conduct a Safe Ground-Level Exterior Check | Walk around your property to spot obvious damage like missing shingles or fallen branches. Do not get on the roof. |
Following these steps in order helps you manage a chaotic situation effectively, ensuring you don't miss anything important while keeping everyone out of harm's way.
Prioritize Safety Above All Else
Before you even glance at your roof, make sure everyone in your house is okay. Your next move is to scan for immediate dangers—things like downed power lines, broken windows, or any part of the house that looks like it might not be stable.
If you catch a whiff of gas or spot any frayed electrical wires, get everyone out immediately and call your utility company. Seriously, don't try to be a hero and climb up on a wet, slippery, and potentially weak roof. Your safety is paramount. A professional can handle the inspection once everything is secure.
Protect Your Property From Further Harm
Once you're sure the area is safe, your next job is to stop the damage from spreading. Water pouring into your home from a compromised roof can cause a domino effect of problems—ruined drywall, shorted-out electrical systems, and eventually, mold.
Most insurance policies actually require you to do this. It's often called the "duty to mitigate," meaning you have to take reasonable steps to prevent the situation from escalating.
A Word of Caution: If you have a gaping hole in your roof and don't bother to cover it with a tarp, your insurer could argue that any subsequent water damage isn't their responsibility. It's a small detail that can have a big impact on your claim.
This doesn't mean you need to start a full-blown construction project. We're talking about temporary, common-sense fixes. If you're dealing with a serious situation, it's worth understanding what qualifies for emergency roof repair and how to approach it.
Here are a few simple things you can do right away:
- Place buckets or containers under any active drips to catch the water.
- Move furniture, electronics, and other valuables away from the affected areas.
- If you can do it safely, cover the damaged part of the roof with a waterproof tarp and make sure it's fastened down securely.
Why Is It So Hard to Get a Roof Claim Approved These Days?
If you've filed a roof insurance claim for storm damage before, you might be in for a surprise this time around. The process feels tougher, more nitpicky, and frankly, a lot more adversarial. You're not imagining it. Over the last decade, the entire insurance industry has shifted, and homeowners are the ones feeling the pinch.

At the end of the day, insurance companies are businesses managing financial risk. When claim payouts start climbing at an alarming rate, they have to tighten the reins to protect their bottom line. For you, that means higher premiums, more stringent rules, and a claim process that's under a microscope.
Severe Weather Is Putting a Financial Squeeze on Insurers
The real driver behind this change is the relentless increase in severe weather. We’re seeing more intense storms, especially hail and high-wind events, that are causing damage on a scale the insurance industry has never dealt with before. This isn't a temporary spike; it's the new normal, and it's reshaping your homeowners policy.
Think about it: wind and hail damage is now the single biggest reason for homeowners insurance claims, accounting for nearly 50% of them across the United States. From 2018 to 2022, it was the top cause of insured home losses, responsible for a whopping 42% of all claims.
The financial bleeding has been massive. In one recent year alone, convective storms cost insurers an eye-watering $58 billion in the U.S., with hail being the main culprit. You can discover more data about these roofing industry trends to see just how significant this is.
When that much money is flowing out, insurers have no choice but to be more defensive. They're going to examine every claim with a fine-toothed comb to make sure they aren't paying for damage caused by old age or poor maintenance instead of a specific storm.
What This All Means for Your Roof Claim
Knowing this background is critical because it explains why the process feels like such an uphill battle. Your insurance provider isn't just trying to give you a hard time for the sake of it; they're operating under intense financial pressure.
This new reality means you have to be more prepared than ever before. An adjuster will be actively looking for reasons to attribute the damage to something other than the storm.
The Bottom Line: Gone are the days of a simple phone call and a quick approval. Insurers are playing defense, and the burden of proof is now squarely on your shoulders to build an airtight case for your storm damage.
Your documentation has to be perfect, your evidence has to be compelling, and you need to know what you're doing.
How Insurance Companies Have Responded
To cope with this flood of claims, insurers have made some key changes you'll almost certainly run into:
- More Scrutinized Inspections: Adjusters are now highly trained to spot the difference between legitimate storm damage and simple wear and tear. They're looking closer at every single shingle.
- Tighter Policy Language: Your policy documents are being rewritten with more specific exclusions. For example, many now have clauses limiting coverage for "cosmetic" damage to metal roofing or only agreeing to repair a small section instead of a full replacement.
- Pre-emptive Technology: It's common for insurers to use drones and satellite imagery to get a baseline of your roof's condition before a storm ever hits. They'll use these "before" pictures to dispute "after" claims.
- Sky-High Deductibles: In areas prone to storms, many policies now include separate—and much higher—deductibles just for wind and hail damage.
Successfully navigating a storm damage roof insurance claim today is all about being proactive and meticulous. Once you understand the financial pressures the industry is under, you can anticipate the roadblocks and build a claim that's strong enough to get approved.
How to Document Damage for a Stronger Claim
When you're staring down a storm damage roof insurance claim, the evidence you gather is your single most powerful tool. You have to think like you're building a case—the more undeniable proof you have, the less wiggle room you give your insurance company to argue. Just snapping a few photos from the ground isn’t going to cut it anymore.
Your job is to put together a comprehensive file that tells the full story of the damage. This documentation is your leverage. It turns a simple request into a well-supported argument that an adjuster can't just brush aside. It proves the damage was sudden and a direct result of the storm, not just old age or poor maintenance.
Go Beyond Basic Photography
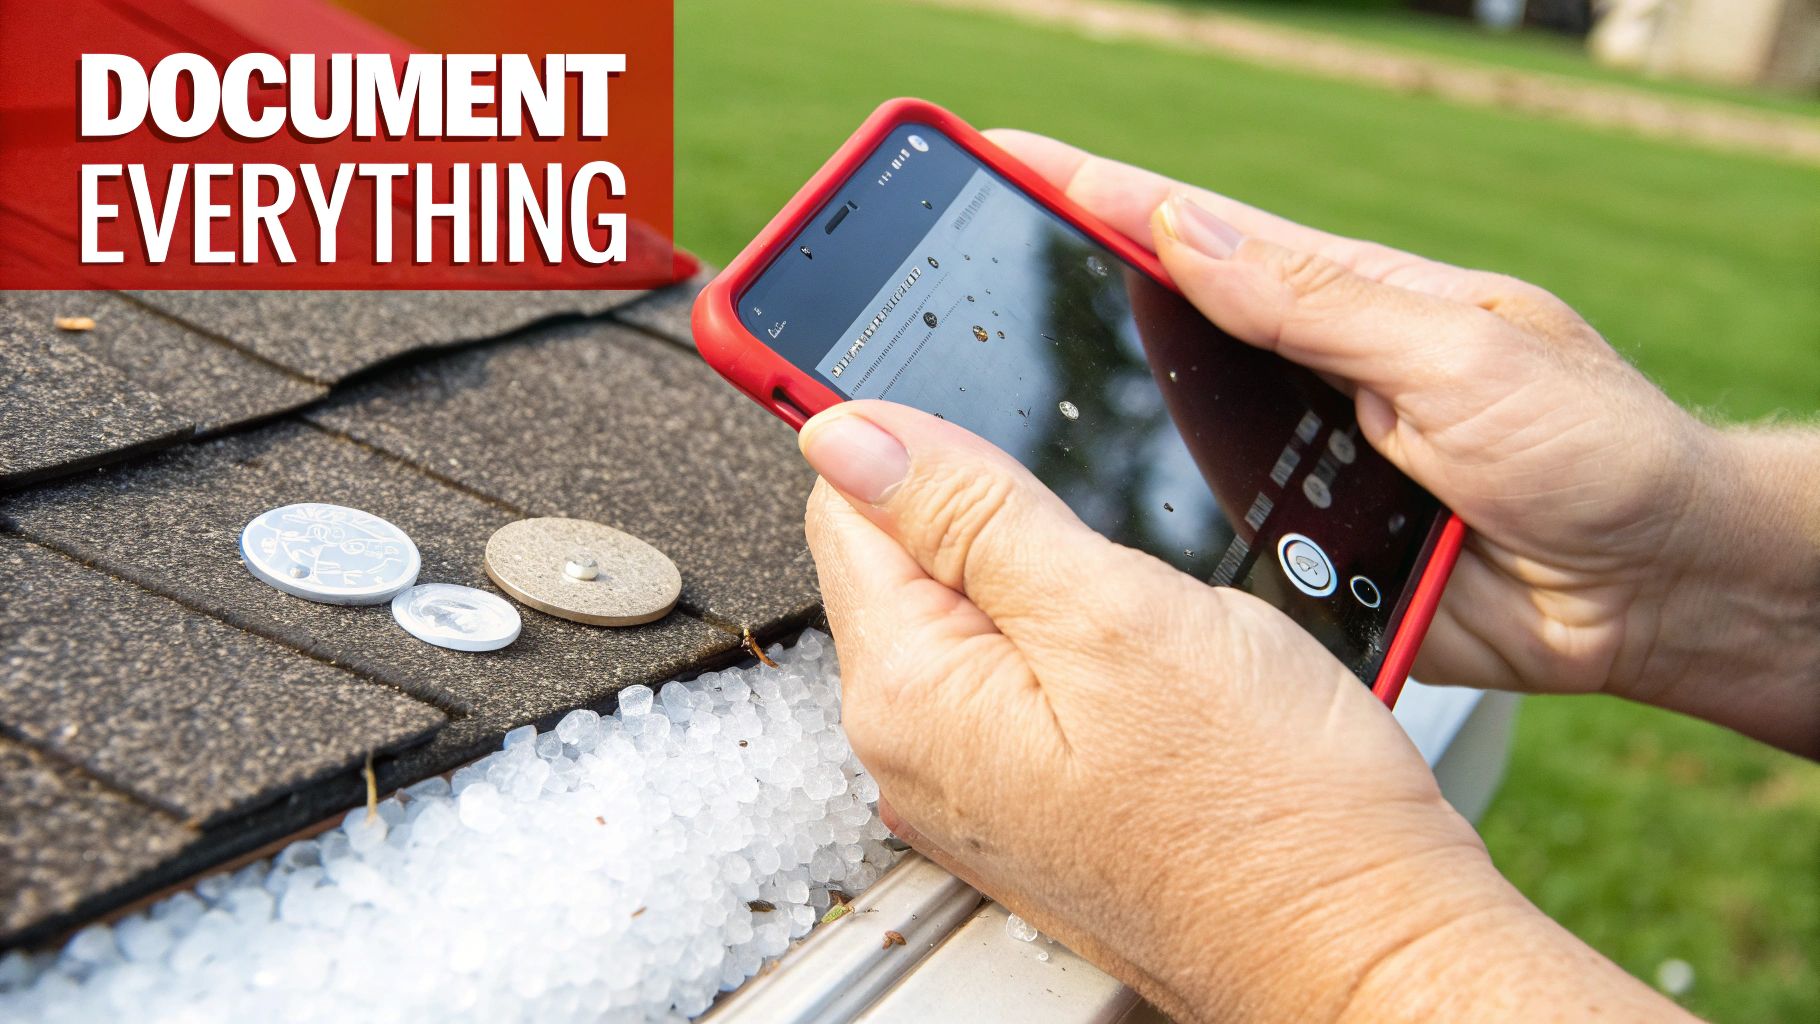
An insurance adjuster is trained to look for specific things, and your photos need to speak their language. Vague, blurry, or far-away shots are practically worthless. To build an irrefutable record, you need to capture the details with both precision and context.
Start with the big picture. Take photos from all four sides of your house to establish a baseline of the property's condition right after the storm. From there, you'll want to zoom in, moving methodically from one damaged area to the next.
Here are the money shots you absolutely need to get:
- Hail Impact Photos: Grab a quarter or a small ruler and place it right next to the hail dents on your shingles, gutters, and siding. This gives an instant, undeniable sense of scale that an adjuster immediately understands.
- Lifted or Missing Shingles: Get close-ups of any shingles that are creased, curled up, or gone altogether. If you can, try to capture the exposed underlayment peeking through from underneath.
- Flashing and Vents: Pay close attention to the metal bits—the flashing around your chimney, skylights, and roof vents. Photograph any dents, dings, or places where the sealant has been cracked or pulled away.
- Gutters and Downspouts: Document every dent and divot. Make sure to get pictures of any sections that have been pulled loose from the fascia board.
- Granule Loss: This one is huge. Look for a pile-up of tiny, sand-like shingle granules in your gutters or on the ground where your downspouts empty. A photo of this is powerful proof that the storm literally beat the life out of your shingles.
Pro Tip: Turn on the time-stamp feature in your phone's camera settings. Most phones embed this data automatically, but having a visible date and time on the photo itself creates a rock-solid timeline that directly links the damage to the storm.
Create a Detailed Damage Log
Photos are your primary evidence, but a written log is the narrative that ties it all together. This doesn't have to be anything fancy—a simple notebook or a note on your phone works just fine. This log will become your bible when you’re on the phone with your adjuster.
Your log should include:
- Date and Time of the Storm: Pinpoint the exact date and the approximate time the bad weather rolled through.
- Specific Observations: Write down what you saw, heard, and found. For example: "Large, quarter-sized hail fell for about 15 minutes." or "High winds snapped a large branch off the oak tree, which hit the back slope of the roof."
- Interior Damage Notes: As soon as you see them, log any new water stains on the ceiling, drips coming into the attic, or damp spots near windows. Note the exact room and the time you first spotted it.
This step-by-step approach is especially critical for hail damage, which can be tricky to spot at first glance. Keeping a detailed record helps you understand how to spot hail damage on your roof and explain it clearly.
Don't Forget the Surrounding Property
A storm doesn't just hit your roof in a perfect little circle. Documenting the "collateral damage" around your property helps paint a convincing picture of the storm's true intensity.
Take a walk around your yard and snap photos of anything that took a beating:
- Dented air conditioning units
- Damaged fences or sheds
- Torn or punctured window screens
- Broken tree limbs on the ground
This collection of evidence makes it much harder for an insurer to claim the roof damage was isolated or pre-existing. It shows that a major weather event hit your entire property. By being this thorough, you stop being a passive victim and become an active, prepared advocate for your home.
Dealing with the Claim and the Adjuster
All that careful documentation you did? This is where it really comes into play. Kicking off your storm damage roof insurance claim starts with a phone call, and your prep work is what sets the tone for everything that follows. The goal here is to be organized, clear, and professional right from the start.
This first call and the adjuster meeting that comes next are easily the most important parts of the whole process. How you navigate these conversations can make or break your claim, turning a stressful situation into a productive one.
Making That First Call to Your Insurer
Before you pick up the phone, get your paperwork in order. Having everything right in front of you means you won't be fumbling for information, and you can provide all the details accurately. This is your first step to getting the claim started on the right foot.
Have this info at your fingertips:
- Your Policy Number: They'll ask for this first.
- The Date of the Storm: Pinpoint the exact date the damage happened.
- Your Damage Log: Use your notes to clearly and concisely explain what you've found.
- A Quick Summary: Have a short, factual description ready. Something like, "A major hailstorm on May 15th did a number on my roof, gutters, and A/C unit."
Stay calm on the call and just stick to the facts you’ve written down. The person on the other end is simply there to record the initial details. They’ll give you a claim number—write it down immediately and keep it somewhere safe. You'll need it for every conversation from here on out.
Getting Ready for the Adjuster's Visit
After you file, the insurance company sends an adjuster to inspect the damage in person. This meeting is your chance to walk them through everything. Remember, the adjuster is there to evaluate the damage from the insurance company's perspective, which often means looking for ways to minimize the payout. Your job is to be an active guide, not just a bystander.
Think of it like you're giving a tour of your property, and you're the expert. Walk the property with the adjuster. Point out the specific spots you photographed and reference your damage log. Don't just assume they’ll spot everything on their own—they’re often on a tight schedule and can easily miss smaller but still significant issues.
Your presence during the inspection is non-negotiable. By physically pointing out hail dings on vents, creased shingles from wind, and the granule loss collecting in your gutters, you make sure the adjuster documents every single detail that supports your storm damage roof insurance claim.
It also helps to get familiar with a typical insurance claim timeline. Knowing what to expect and how long things might take can help you manage the process and have more productive conversations with your adjuster.
What to Expect and How to Stay Ahead
Insurance adjusters are pros, but they're also people. After a big storm hits an area, they are slammed with appointments. They have a specific protocol they follow to assess damage, and if you understand it, you can communicate a lot more effectively.
Here are a few things to keep in mind about how they work:
- They Hunt for a Pattern: Adjusters are trained to look for a consistent pattern of damage across an entire roof slope. If one section is beat up but another looks fine, they might start questioning the cause. This is exactly why documenting collateral damage—to your fence, A/C unit, or windows—is so critical. It proves the storm’s impact was widespread.
- They Separate Wear-and-Tear from Storm Damage: This is probably the biggest point of contention in most claims. An adjuster will look for signs of an aging roof, like brittle shingles, and might try to blame the damage on pre-existing conditions. Your time-stamped photos and detailed log are your best tools to counter this.
- They Measure a "Test Square": It's standard practice for an adjuster to mark out a 10×10 foot square on a few different parts of your roof. Inside that square, they count the number of hail impacts. Most insurers have a threshold (often 8-10 hits per square) that must be met to approve a full replacement. You need to be right there watching where they draw these squares and how they count.
When you’re prepared, present, and proactive, the adjuster meeting stops being an intimidating interrogation and becomes a straightforward review of the facts.
Making Sense of Your Settlement and Finding the Right Contractor
Once the adjuster has assessed the damage, the next thing you'll receive is their official report and settlement offer. This document can be a bit overwhelming, often filled with industry jargon that feels like a foreign language. But getting a handle on what it all means is absolutely critical—it determines the money you'll get for repairs and how it will be paid out.
https://www.youtube.com/embed/HniduurLA4k
Your settlement isn't just one big check. It's usually broken down into a few key figures, and understanding the difference between them will give you the control you need to manage your repair budget and make sure you get every dollar you're entitled to.
Translating the Insurance Paperwork
When you look at your adjuster’s report, you'll see two terms that matter a lot: Actual Cash Value (ACV) and Replacement Cost Value (RCV). The difference between them is huge.
-
Actual Cash Value (ACV): This isn't what your roof was worth when it was new; it's what it's worth today. The insurance company calculates this by figuring out the full replacement cost and then subtracting a certain amount for age and wear. The first check you get is almost always for the ACV, minus your deductible.
-
Replacement Cost Value (RCV): This is the total amount it will cost to replace your roof with a brand-new one of similar quality at today's prices, with no deduction for its age. Most homeowner policies are RCV policies, but you don't get this full amount right away.
That amount subtracted for age and wear? That’s called depreciation. You can think of it as the money the insurance company holds back until you prove the work has actually been done. Once your contractor finishes the job and you send in the final invoice, the insurer will release that depreciation amount in a second check.
Choosing Your Roofing Contractor Wisely
With that first check in hand, your next big job is to find a contractor you can trust. This is where you need to be careful. After a big storm, your neighborhood will be crawling with contractors, and frankly, not all of them are legitimate. You have to be on the lookout for "storm chasers"—those out-of-town outfits that show up, do shoddy work, and are gone before the next rainfall.
A reputable, local contractor will have a real office, carry the right licensing and insurance for your state, and will never pressure you into signing a contract on the spot. They should be more than willing to give you references and show you examples of their work right in your community.
The cost of insurance claims from severe weather has skyrocketed. In a recent year, these claims hit nearly $31 billion, a staggering 30% jump from just two years earlier. That kind of financial pressure means insurance companies are scrutinizing repairs more than ever, which makes the quality of your contractor's work absolutely non-negotiable.
Getting Estimates and Making Your Decision
Your goal here is to find a solid contractor who can do the job right for the amount your insurance company has laid out in their "scope of work." I always recommend getting at least three detailed estimates from different local roofers.
When you're comparing bids, make sure each one includes:
- A complete, line-by-line breakdown of all material and labor costs.
- The specific brands and types of shingles, underlayment, and other materials they plan to use.
- A clear project timeline from start to finish.
- Proof that they have both liability insurance and worker's compensation.
Picking the right professional is easily the most important decision you'll make in this entire process. For a much deeper look, our guide on how to choose a roofing contractor has a ton of great advice. It’s also a good idea to learn how to choose a general contractor you can actually trust for any other repairs you might need.
Once you’ve made your choice, give them a copy of your adjuster's report. This ensures their final estimate lines up perfectly with what the insurance company has already approved.
What to Do If Your Claim Is Denied or Underpaid
It’s a gut-wrenching moment: you open the letter from your insurance company only to find a denial or a settlement offer that won't even cover the shingles, let alone the labor. It feels like a slap in the face. But this is not the end of the road; it's just the start of the negotiation.
A lowball offer or an outright denial on your storm damage roof insurance claim is incredibly common. You have to remember what's happening on their end.

Insurance companies are staring down staggering financial risks. As severe weather gets more frequent and intense, their payouts are skyrocketing. In just the first half of a recent year, severe storms led to a whopping $44 billion in insured losses in the U.S. alone. This kind of pressure means adjusters are often trained to be conservative, sometimes to the point of being just plain wrong. You can read more about these catastrophic losses and see the bigger picture.
Figure Out Exactly Why They Said No
Your first move is to get the reason for their decision in writing. Don't accept a vague phone call explanation. They are legally required to provide a specific, documented reason for denying or underpaying your claim.
I've seen it all, but denials usually boil down to a few common arguments:
- Pre-existing Damage: They'll say your roof was already in bad shape before the storm hit.
- Improper Maintenance: This is a classic. They argue that normal wear and tear is the real problem, not the hail or wind.
- Not Enough Proof: The adjuster might claim you haven't sufficiently linked the roof damage to one specific storm.
- Cosmetic vs. Functional: This is a big one with hail. They’ll admit there are dents but argue they are purely “cosmetic” and don't compromise the roof's function.
Time to Build Your Case and Fight Back
Once you have their official reason, you can build your counter-argument. That folder of photos, the detailed damage log you kept, and the professional estimates from your roofer? They just became your most powerful tools.
It's time to write a formal letter of appeal.
Don't just complain; dismantle their argument. Address each reason for the denial point-by-point. Use your dated photos to prove the damage is new. Use your contractor's written assessment to counter their claims of "wear and tear."
If they still won't budge after your appeal, it's time to bring in a heavy hitter. This is the point where you should seriously consider hiring a public adjuster.
Unlike the company adjuster who works for the insurer, a public adjuster works for you. They are licensed professionals who will reassess the damage from your perspective, dig into the fine print of your policy, and take over the negotiation. They typically work for a small percentage of the final settlement, which means they're motivated to get you the maximum possible payout. This single step can completely level the playing field and is often the key to getting the fair payment you’re entitled to.
Frequently Asked Questions About Roof Insurance Claims
Can an insurance company drop you for a roof claim?
While it's not common for an insurer to drop you after a single, legitimate storm damage claim, it is possible. If a homeowner has a history of multiple claims in a short period, the insurer may see them as high-risk and choose not to renew their policy. Additionally, after a catastrophic storm that causes widespread damage, some insurers may decide to reduce their overall exposure in that region, leading to non-renewals for many policyholders, regardless of their individual claim history.
Should I call a roofer before my insurance company?
Yes, absolutely. Calling a reputable local roofer for an inspection before you file a claim is a smart strategic move. A professional roofer can provide a thorough damage assessment, give you a detailed estimate for repairs, and help you determine if the cost will exceed your deductible. This expert opinion strengthens your position and provides crucial evidence when you do contact your insurer, ensuring you're filing a claim that is both necessary and well-documented from the start.
How do I prove my roof was damaged in a storm?
Proving storm damage requires thorough and timely documentation. Start by taking numerous time-stamped photos and videos of the damage immediately after the storm, both from the ground and, if safe, closer up. Capture hail impacts next to a coin for scale, show lifted or missing shingles, and document damage to gutters, siding, and A/C units. Create a written log detailing the date and time of the storm and your observations. A professional report from a trusted roofing contractor will serve as expert third-party validation, solidifying your case.
How long does a homeowner have to file a claim for a new roof?
The timeframe for filing a storm damage roof insurance claim varies by state and insurance policy, but it is typically between six months to two years from the date of the storm. It is critical to review your policy documents or contact your insurance agent to understand the specific statute of limitations that applies to you. Waiting too long can jeopardize your claim, as it becomes more difficult to prove the damage was caused by a specific weather event and not by subsequent wear and tear. Acting promptly is always the best course of action.

