After a hailstorm passes, the last thing you want is for hidden damage on your roof to turn into a major leak down the road. But how can you tell if your roof took a hit? The good news is that you don't need to be a roofing expert to do an initial check. The first clues often aren't on the roof at all, but on the ground around your home—on things like your gutters, siding, and air conditioning unit.
Learning to identify these tell-tale signs of hail is your first line of defense. This guide will walk you through a safe, step-by-step process for assessing your property, distinguishing hail damage from normal wear and tear on different roof types, and documenting your findings to build a solid insurance claim. By knowing what to look for, you can act quickly to protect your home's value and prevent small issues from becoming expensive disasters.
Key Takeaways
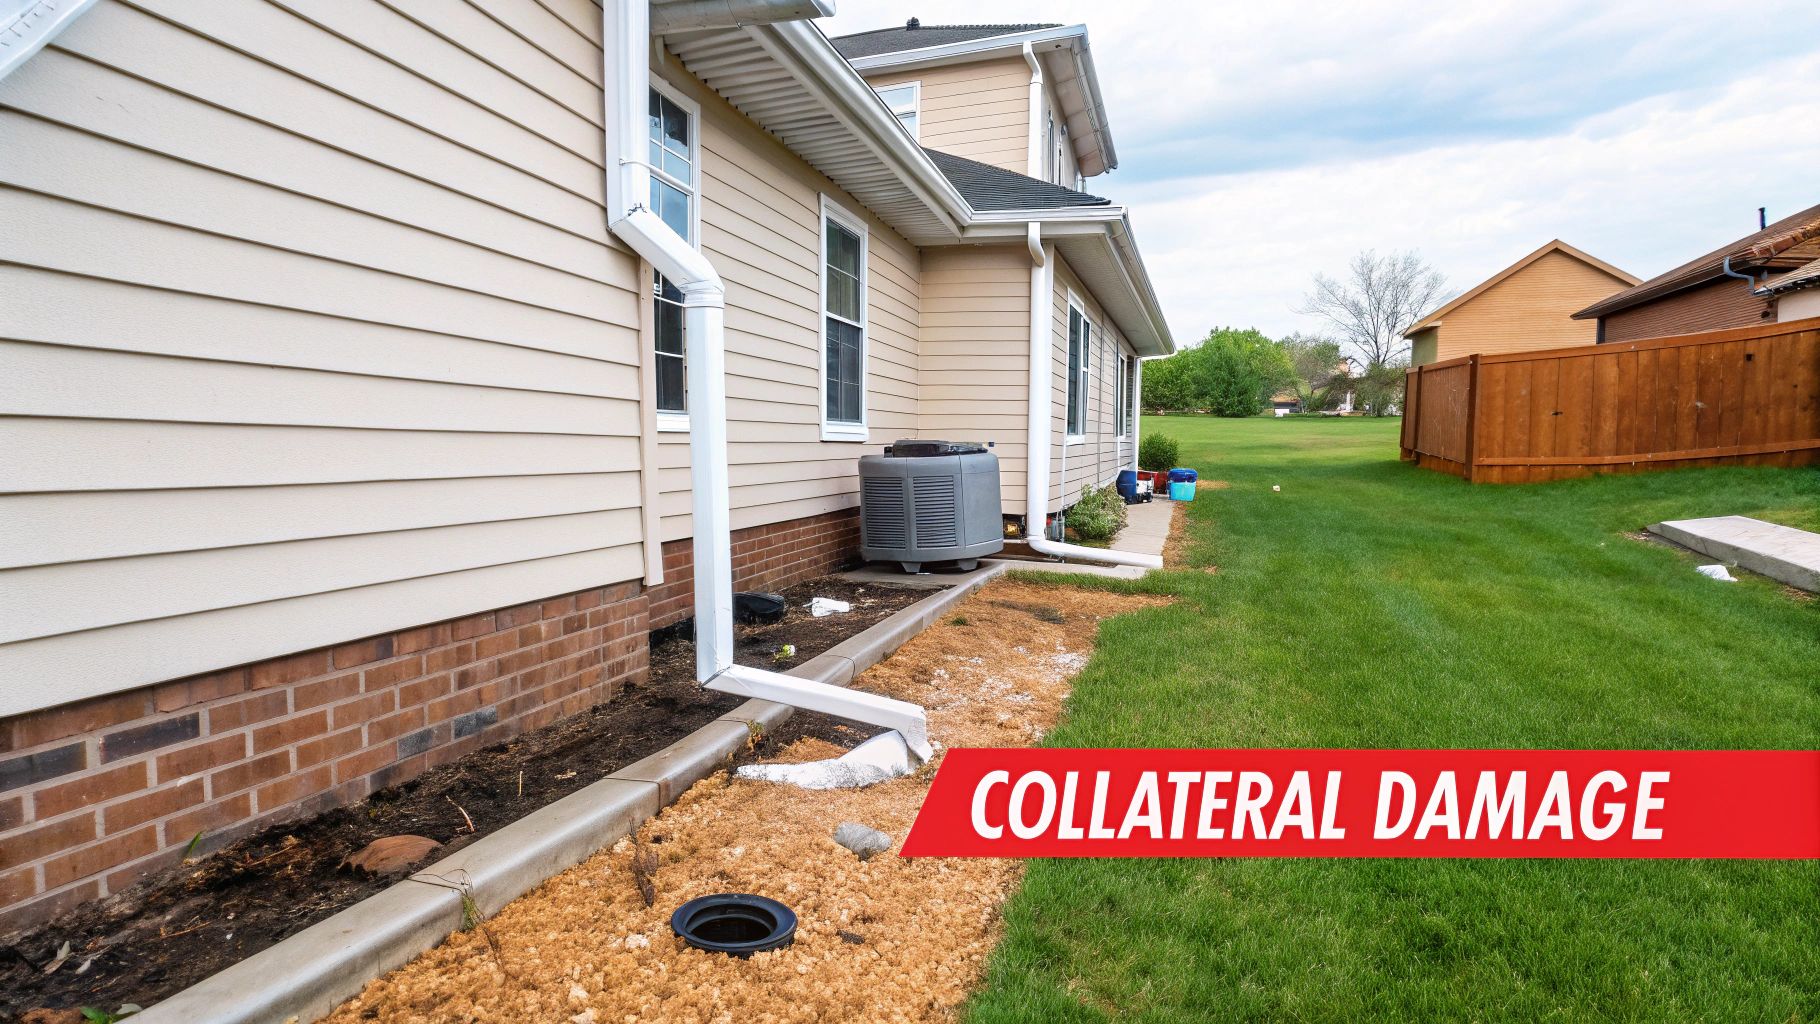
- Start on the Ground: Before climbing a ladder, inspect for "collateral damage" like dents on gutters, dings on siding, and marks on A/C units. This is the safest and often most convincing initial evidence.
- Know the Signs on Shingles: Look for random, dark spots where protective granules have been knocked off. A true hail hit often feels soft or "spongy" to the touch, like a bruise.
- Document Everything: Take clear photos and videos of all damage. Use a coin for scale in close-up shots and create a detailed log of the storm date and your findings to build a strong insurance claim.
- Don't Delay: Most insurance policies have a strict time limit (often one year) for filing a hail claim. Prompt action is crucial to ensure your repairs are covered.
What to Look for After a Hailstorm
When a hailstorm rolls through, your first thought is probably, "Is my roof okay?" That's completely understandable, but the best place to start your inspection is actually on the ground. A careful walk around your home can reveal a surprising amount about the storm's severity and give you a solid idea of whether you need to call in a professional.
These storms are no small matter. In just one year, the U.S. can see over 3,700 hail events. That puts nearly one in ten properties in the crosshairs. With an estimated 12.6 million properties facing a high risk of hail damage, the potential cost for roof replacements skyrockets to an incredible $189.5 billion. The numbers really put the threat into perspective.
Start With a Ground-Level Assessment
Before you even think about getting on the roof, check out the more accessible parts of your home's exterior. Think of these as your ground-level witnesses; they'll tell you the story of what your roof likely went through.
Here’s a quick checklist of where to look first:
- Gutters and Downspouts: These are usually made of soft aluminum, which dents very easily. Look for a random pattern of dings and pockmarks.
- Siding and Window Screens: Scan your siding for any new chips, cracks, or holes. Don't forget to check window screens for small tears and the metal frames for dents.
- Air Conditioning Unit: The delicate metal fins on your AC unit are like a magnet for hail. If they look beat up, it's a strong sign the hail was significant.
- Deck or Patio: Any painted or stained wood surfaces can also show damage. Look for fresh chips or splintered spots where hailstones made impact.
Finding damage in these areas gives you a much stronger case when you call your insurance adjuster. In fact, many of these issues are considered some of the top warning signs of roof damage you can't afford to miss.
Distinguishing Storm Damage From Normal Aging
One of the trickiest parts of a post-storm inspection is telling new hail damage apart from the normal wear and tear that happens over time. It's a common mistake, but there are some clear differences to look for.
This quick table can help you spot the difference between fresh storm damage and an aging roof.
Hail Damage vs Normal Wear and Tear
| Symptom | Likely Hail Damage | Likely Normal Wear/Aging |
|---|---|---|
| Bruised Shingles | Random, circular marks with a soft or "spongy" feel. | Not typically present. |
| Granule Loss | Bald spots in a random pattern; granules found in gutters. | Uniform loss across the whole roof surface; cracking. |
| Dents/Dings | Visible on metal components like vents, flashing, and gutters. | General weathering, possibly some discoloration or rust. |
| Cracked Shingles | Sharp, random cracks often associated with a dark impact mark. | Straight, uniform cracks along the edges as shingles dry out. |
Knowing these distinctions is key. Hail damage is typically random and concentrated, while age-related issues tend to be more uniform and widespread.
Key Takeaway: The story of a hailstorm isn't just written on your shingles. A thorough ground-level inspection of your gutters, siding, and other exterior features provides the safest—and often most convincing—initial proof of hail damage. This collateral damage is exactly what you need to justify a professional roof inspection.
Finding Hail Damage on Different Roof Types
Hail doesn't play fair. The way it damages a roof is completely different depending on the material it hits. What looks like a clear sign of trouble on an asphalt shingle roof can be invisible on a metal one, and tile roofs have their own unique tells. Let's walk through what to look for on the most common roofing materials so you know exactly what you're seeing.
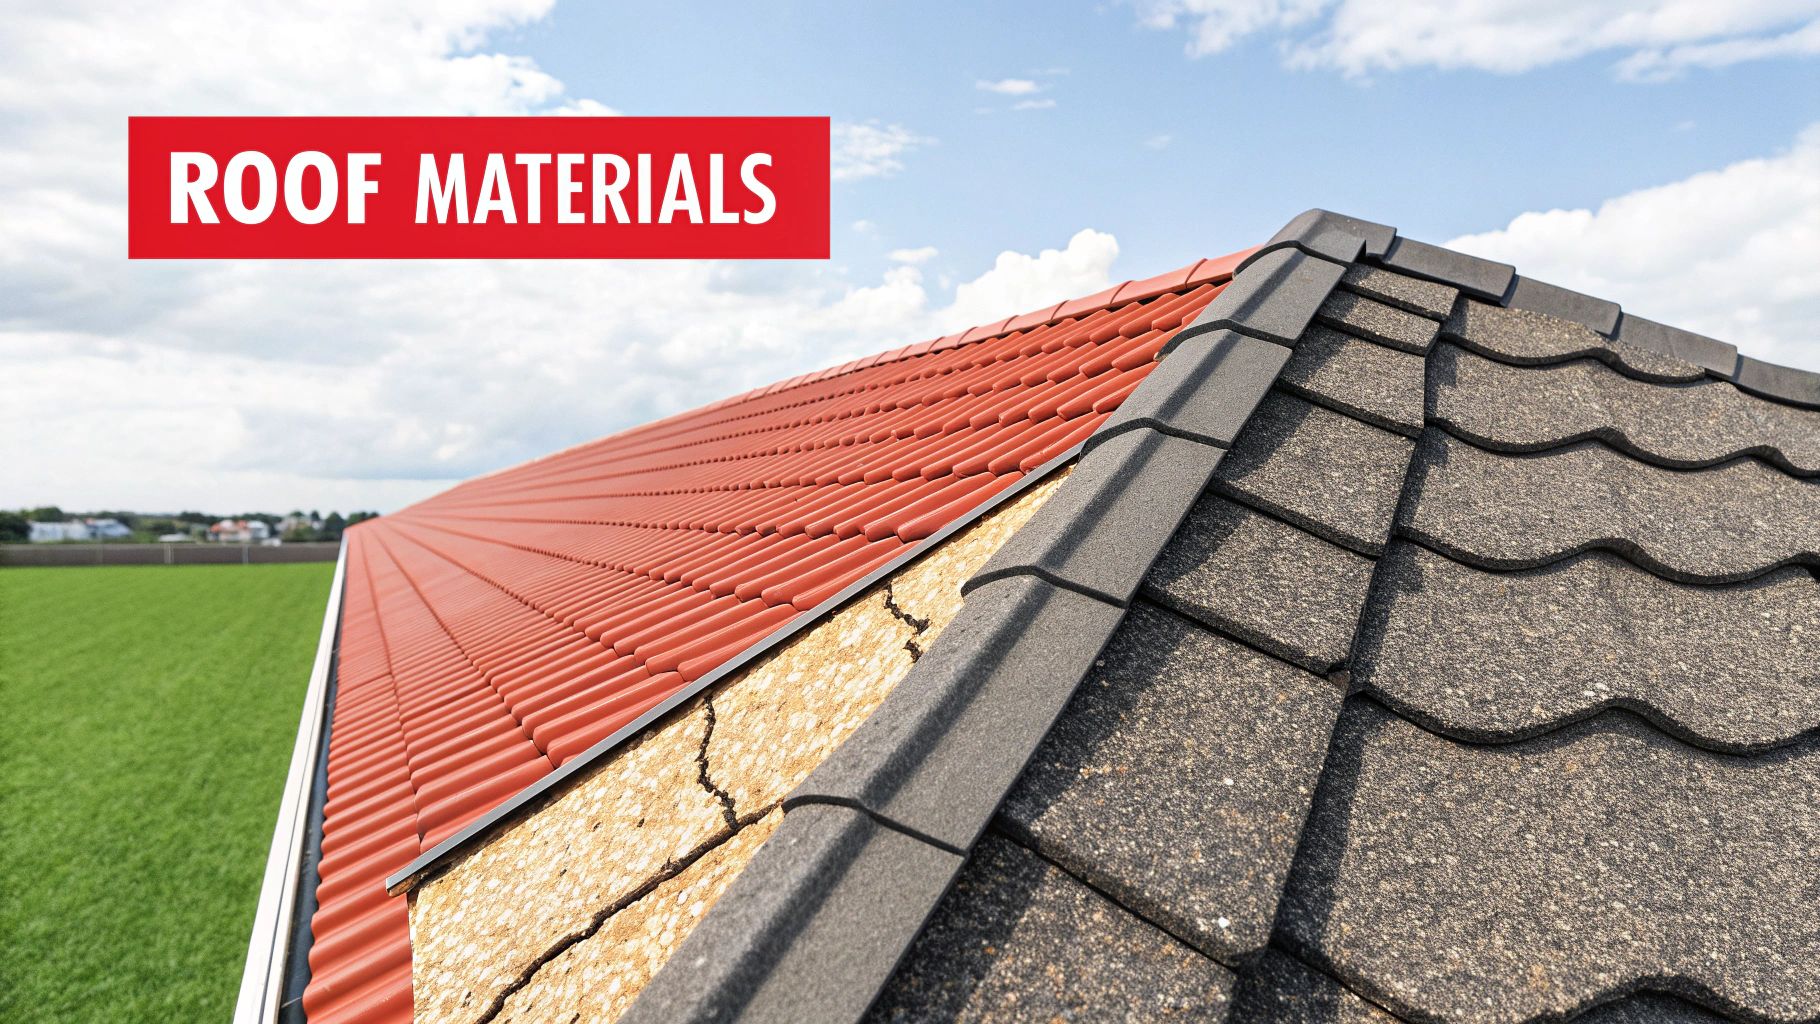
Identifying Damage on Asphalt Shingles
Asphalt shingles are by far the most common roof you'll see, and they show hail damage in a very distinct way. A hailstone doesn't just chip the surface; it actually "bruises" the shingle.
- Look for dark spots: These are the classic signs. You'll see circular marks where hailstones have knocked the protective granules clean off, exposing the dark asphalt layer underneath.
- Feel for softness: A true hail hit often leaves the spot feeling soft and spongy, kind of like a bruise on an apple. This tells you the shingle's internal mat has been fractured.
- Check your gutters for granules: After a storm, look for a buildup of black, sand-like granules in your gutters and at the bottom of your downspouts. This is the protective layer that hail has stripped away.
Shingles come in different styles, and getting a better handle on understanding architectural shingles can help you know what you’re looking at on your own roof.
How Hail Affects Metal Roofs
Metal roofs are tough, but they aren't hail-proof. The damage here is usually cosmetic at first—dings and dents—but these can lead to bigger issues down the road. The real trick is that these dents can be extremely hard to spot.
You often need the right light to see them. Try looking at your roof in the early morning or late afternoon when the sun is low. That angled light casts shadows that can reveal dozens of small, circular dents that you'd completely miss under the direct sun of high noon. Over time, these dings can break the roof's protective coating and open the door for rust.
Pro Tip: When checking a metal roof, don't just stand in one spot. Walk around the perimeter of your house and look at the roof from different angles. Sometimes, changing your viewpoint by just a few feet is all it takes to make a field of subtle dents pop.
Spotting Damage on Wood and Tile Roofs
Roofs made from wood shakes or clay and concrete tiles are more brittle. They don't bruise or dent like other materials. Instead, they tend to chip, crack, or even shatter.
For Wood Shake Roofs:
You’re looking for splits in the wood that look fresh and run against the natural grain. Old splits from weathering are typically gray and follow the wood's lines. A new split from a hail impact will have sharp edges and expose the lighter-colored, unweathered wood underneath.
For Clay or Concrete Tile Roofs:
Damage here is usually more obvious, thankfully. Search for clean, sharp fractures or half-moon-shaped chips knocked out of the tile edges. Because these breaks are fresh, their color will stand out against the older, weathered surface of the tile. While a few minor scuffs might just be normal wear and tear, distinct cracks and shattered tiles are clear signs of impact damage that you can't ignore.
Don't Underestimate "Minor" Hail Damage—It's A Ticking Clock
It's easy to glance up at your roof after a hailstorm, see a few little dings, and breathe a sigh of relief. You might think it's just a cosmetic issue, not worth the hassle of a phone call. But from my experience, what looks like a minor problem on the surface is often a silent countdown to a much bigger, more expensive headache.
Think of it this way: when hail strikes an asphalt shingle, it's not just making a dent. It's knocking off the protective granules, which are like sunscreen for your roof. That newly exposed spot is now vulnerable to the sun's harsh UV rays, which will break down the shingle, make it brittle, and drastically cut its lifespan short. On a metal roof, that "simple" dent can easily crack the protective coating, opening the door for rust to creep in and spread.
The Financial Domino Effect of Delay
Putting off an inspection doesn't just jeopardize your roof; it puts a huge financial risk on your shoulders. The numbers don't lie. Hail damage accounts for a staggering 45.5% of all homeowners insurance claims in the U.S., and the average payout for those claims is $11,695.
To put that in perspective, State Farm alone paid out $3.5 billion for hail and wind claims in 2022. This isn't a rare problem; it's a widespread and costly one.
When those compromised spots on your roof start letting in water, even just a little, the real trouble begins. A slow leak can saturate your attic insulation, stain your ceilings, and create the perfect dark, damp environment for mold to grow within your walls. Mastering proper flashing details is critical for preventing water infiltration and ensuring the long-term integrity of your home's exterior.
Your Insurance Claim Window Isn't Open Forever
Here’s the most critical part: your insurance policy has a deadline. Most carriers give you a limited time to file a claim after a storm, often just one year. Wait too long, and you forfeit your right to get the damage covered.
If you wait too long to spot hail damage on your roof, you could miss your window to file a claim entirely. This means that when a small, covered issue finally turns into a major leak two years later, you could be on the hook for the full cost of a new roof—a preventable expense that can easily exceed $10,000. Prompt action is your best financial protection.
How to Safely Inspect Your Roof Up Close
While a ground-level check can give you a pretty good idea of what's going on, sometimes you just have to get up there to see the real story. But let's be clear: climbing onto your roof isn't a casual task. Safety is everything, and there are some hard-and-fast rules you absolutely must follow.
First off, never even think about going up in wet, icy, or windy weather. Pick a calm, dry day. Period. Make sure your ladder is planted on solid, level ground and extends at least three feet above the roofline—that gives you something secure to grab onto. And please, wear the right shoes. We’re talking rubber-soled work boots with serious grip, not old sneakers.
Your Methodical Inspection Process
Once you're safely on the roof, try to walk on the shingles as little as possible. Treading on them, especially when they're hot from the sun, can scrub off the protective granules you’re trying to inspect. Move with purpose.
You’ll want to focus your attention on the roof's "accessories." These softer metal and plastic components are often the smoking gun, showing clear, undeniable proof of hail impacts that can be subtle on the shingles themselves.
Start your scan by checking these spots first:
- Metal Vents and Flashing: Get a good look at any metal vents, exhaust caps, and the flashing around your chimney or skylights. Soft metals like aluminum will dent easily, providing some of the clearest evidence of hail.
- Ridge Caps and Edges: The shingles covering the peak of your roof (the ridge) and along the edges take a beating during a storm. I often find that damage is more concentrated in these areas.
Here’s a pro tip I’ve used for years: bring a piece of sidewalk chalk with you. When you find a spot you suspect is a hail hit, circle it lightly. It’s a simple trick, but it does wonders for keeping track of your findings and makes them pop for an insurance adjuster’s photos later.
A key thing to remember up there is that light and angle are your best friends. A dent that’s completely invisible when you’re standing over it can suddenly jump out when you shift your position and the sunlight hits it just right. Always walk around a suspicious area to view it from multiple angles.
Seeing the Long-Term Consequences
It’s tempting to look at a few "dings" and think it’s no big deal, but ignoring them kicks off a slow-motion disaster. This infographic breaks down how a little granule loss eventually becomes a very expensive problem.
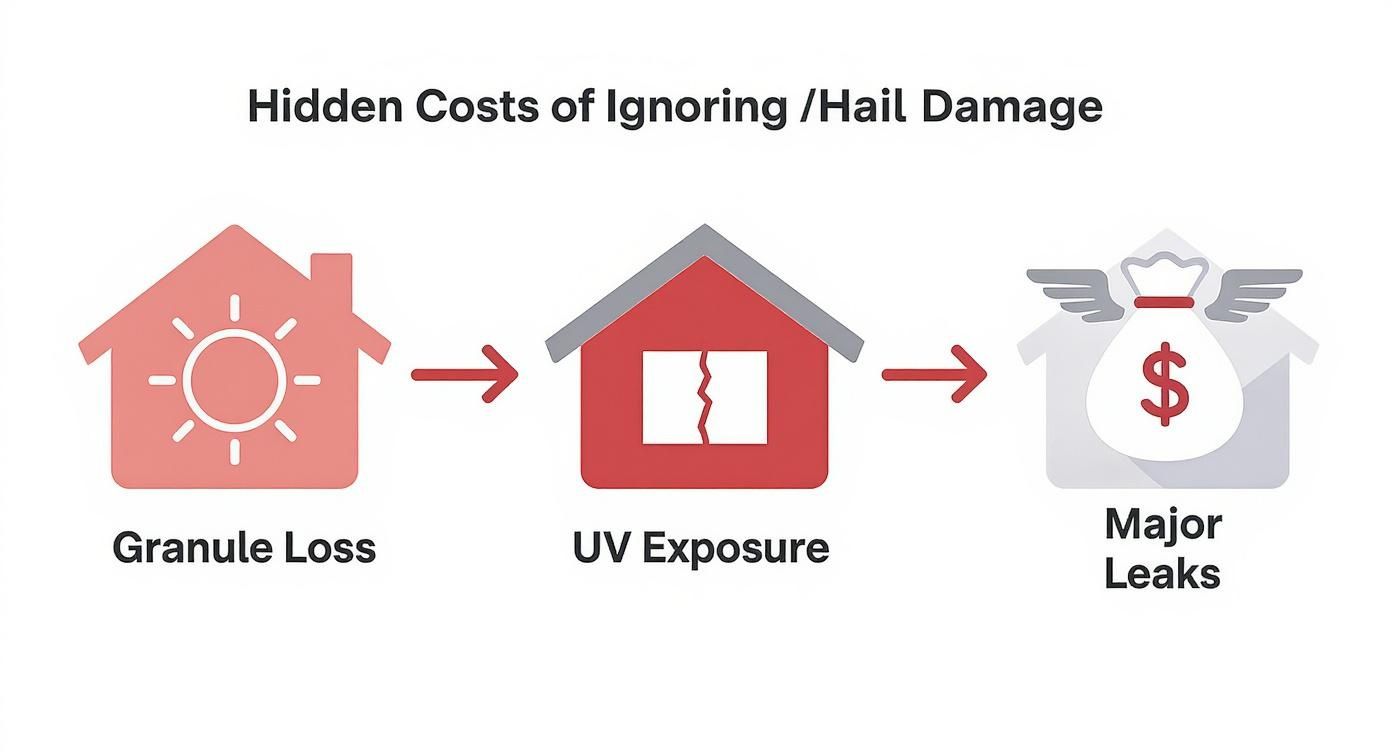
As you can see, once those granules are gone, the shingle's core is exposed to the sun's UV rays, which makes it brittle. Before you know it, you've got cracks, leaks, and serious water damage inside your home.
A DIY inspection is a fantastic first step, but it can’t replace a professional’s trained eye. We’re trained to spot the subtle stress fractures and bruising that homeowners almost always miss. To get a better handle on what a pro looks for, take a look at this guide on discovering the true roof inspection cost. A formal assessment is the only way to be certain nothing has been overlooked.
Documenting Your Hail Damage: Building a Rock-Solid Insurance Claim
Finding hail damage is one thing, but proving it to your insurance company is a whole different ball game. This is where most homeowners trip up. To get your claim approved without a fight, you need to create documentation that's so thorough and clear, it’s undeniable.
Think of it this way: you're not just taking pictures; you're building a case file. Your job is to present the evidence so clearly that the insurance adjuster has no room for doubt.
This process is about telling the story of the storm and its impact on your home, from beginning to end. Let's get it right.
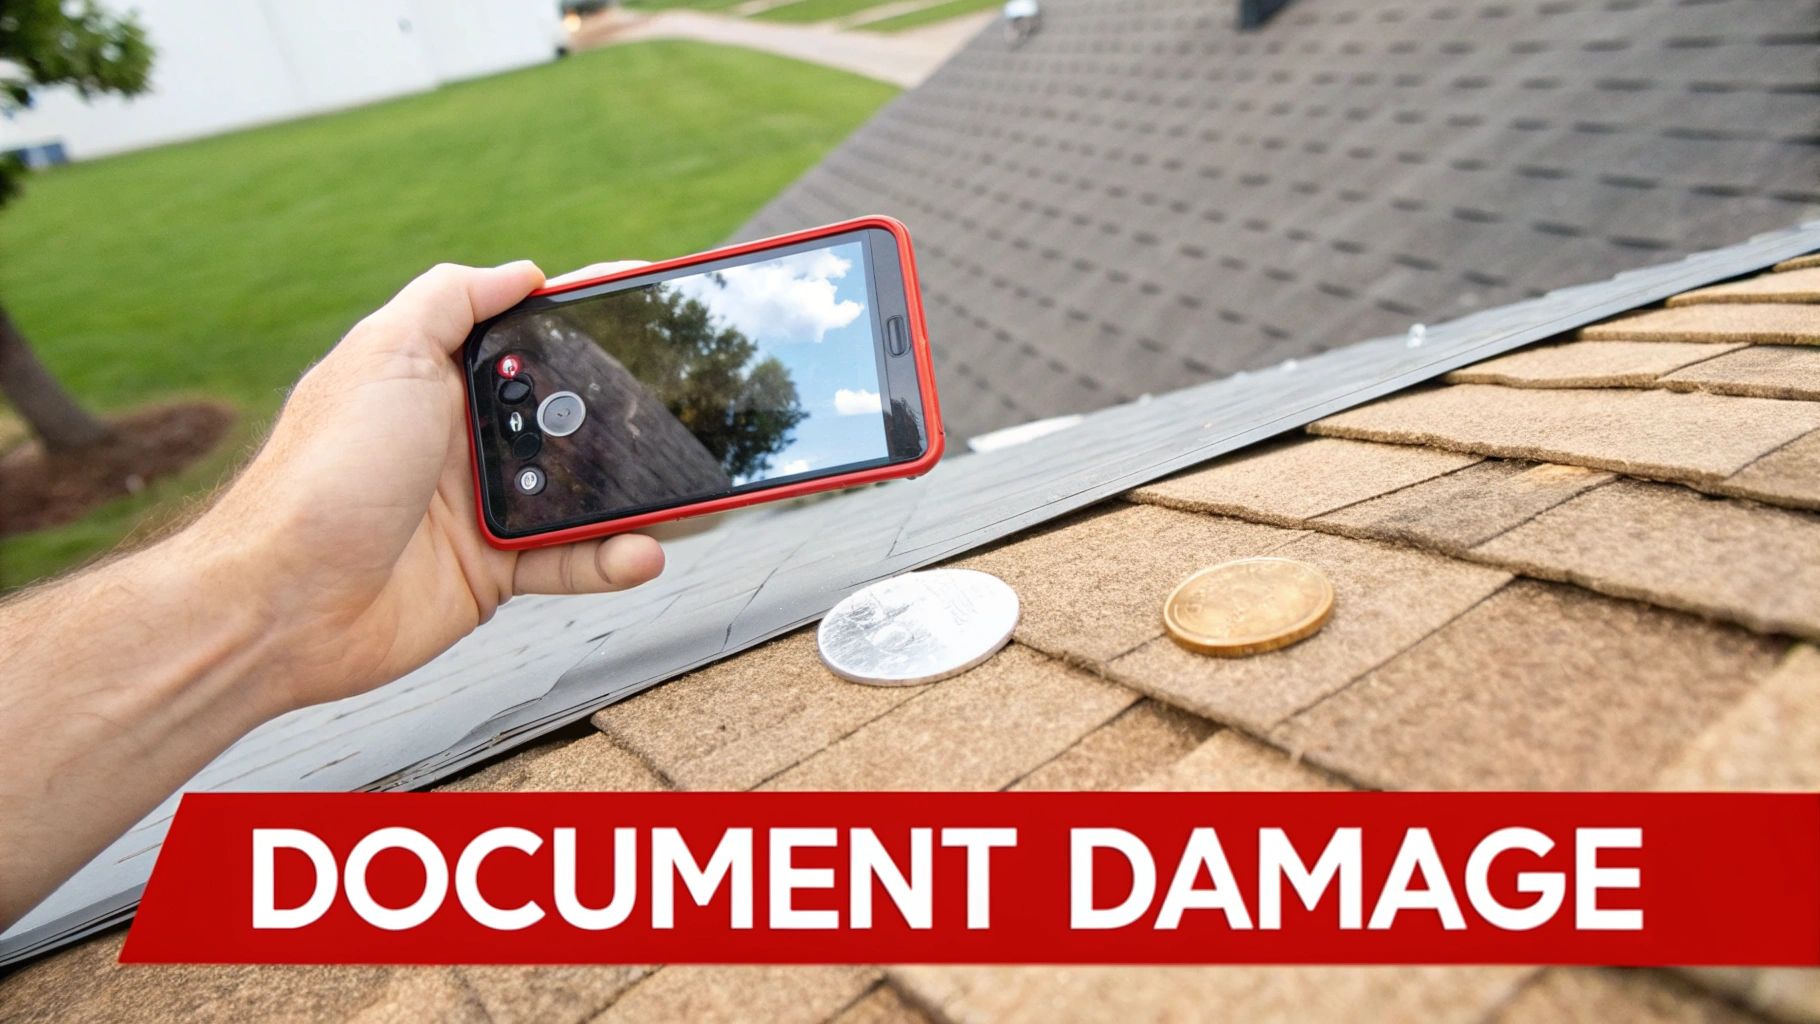
Create an Airtight Photo and Video Log
Your smartphone is your best friend here, but a scattergun approach won't work. You need to be methodical to capture the full story of the damage.
Here's a checklist I give to homeowners:
- The Big Picture: Start by taking wide shots of each side of your house and roof. This establishes the overall scene and shows the entire canvas that was hit.
- Show the Pattern: Next, get closer and take photos of larger sections of the roof. You're looking to show the density and pattern of the hail impacts. This proves the damage is widespread, not just one or two random dings.
- Get the "Money Shots": Now, get in close. For every significant impact on a shingle, place a quarter or a small tape measure next to it before taking the photo. This gives an immediate, undeniable sense of scale.
- Don't Forget Collateral Damage: This is huge. Walk around your property and photograph every dented gutter, downspout, window screen, siding ding, and banged-up A/C unit. This is powerful corroborating evidence.
A slow, narrated walk-around video can also be incredibly effective. It ties all your photos together and creates a compelling narrative that an adjuster can easily follow.
Pro Tip: Context is king. A single, isolated photo of one damaged shingle is easy to dismiss. But when you present an album showing widespread collateral damage, dense impact patterns on the roof, and clear close-ups with a scale reference? That’s a powerful story that's hard to argue with.
Keep a Simple, Detailed Log
Your visual evidence needs a written companion. A simple log adds a layer of credibility and keeps your facts straight when you’re on the phone with your insurance agent.
Jot down these key details:
- Date and Time of the Storm: Be as precise as you can.
- Date of Your Inspection: Note the day you took all your photos and videos.
- Damage Inventory: Create a running list of everything that was damaged—not just the roof. Siding, windows, gutters, patio furniture, the grill… everything.
This simple record shows you were proactive and links the damage directly to a specific weather event, which is exactly what your insurer needs to see. To get ahead of the game, it helps to understand and avoid common pitfalls when submitting a claim.
Get a Professional Opinion Before You Call
Here’s a step most people skip: before filing your claim, have a trusted local roofing contractor come out for an independent assessment. An experienced roofer will give you a detailed report and a preliminary estimate for the repairs.
This does two things. First, it serves as a third-party validation of your own findings. Second, it gives you a realistic baseline for repair costs. You’ll walk into the conversation with the insurance adjuster armed with expert knowledge, which puts you in a much stronger negotiating position from the very start.
Frequently Asked Questions About Hail Damage
How big does hail need to be to damage a roof?
Generally, hail that is one inch in diameter (about the size of a quarter) is large enough to cause significant damage to standard asphalt shingles. However, factors like wind speed, hail density, and the age and condition of your roof can cause damage from smaller hailstones as well.
Is it too late to file a claim for old hail damage?
Most insurance policies have a time limit for filing a claim, often just one year from the date of the storm. If you discover damage after this window, it may be too late. The key is proving the damage occurred during a specific storm within your policy's timeframe. It's always best to get a professional inspection immediately after a storm to avoid this issue.
What's the difference between a roofer's inspection and an adjuster's?
A roofer acts as your advocate, aiming to identify all damage to ensure your roof is properly repaired for long-term health. An insurance adjuster works for the insurance company to verify the damage is from a covered event and determine the payout based on your policy. Having your roofer present during the adjuster's inspection is highly recommended to ensure all damage is noted.
Will filing a hail claim raise my insurance rates?
Typically, filing a claim for an "Act of God," like a hailstorm, will not cause your individual premium to increase. Unlike at-fault accidents, weather-related events are considered beyond your control. However, if there is a widespread disaster in your area, the insurance company may raise rates for the entire region to cover its losses.
Can I repair hail damage myself?
While you might be able to replace a few damaged shingles, repairing widespread hail damage is not a recommended DIY project. A professional roofer can identify hidden issues like bruised shingle mats and compromised underlayment that are invisible to an untrained eye. Improper repairs can void your roof's warranty and lead to more significant problems, like major leaks.

