A water stain spreading across your ceiling is more than just an eyesore; it's a race against time. A small drip can quickly escalate, causing structural damage, promoting mold growth, and leading to expensive repairs. Effectively managing a roof leak starts with understanding the immediate steps to control the damage, how to identify the source, and knowing when to call in a professional for a permanent fix. This guide provides actionable advice for Arizona homeowners facing the stress of a leaky roof.
Key Takeaways
- Act Immediately: The first hour is critical. Contain the water with buckets, move valuables, and safely puncture any ceiling bulges to release pressure and prevent a collapse.
- Find the True Source: The leak on your ceiling is rarely where the water is entering the roof. Start your search in the attic, looking for water stains on the wood decking, damp insulation, or visible daylight.
- Temporary Fixes are Stop-Gaps: Use roofing cement for small cracks or a properly secured tarp for larger damage to buy time, but these are not permanent solutions.
- Know Your Roof Type: The repair strategy for a tile roof is completely different from that for an asphalt shingle or foam roof. Understanding your material is key to a lasting fix.
- When in Doubt, Call a Pro: Widespread leaks, a sagging roofline, or any repair on a steep or second-story roof are clear signs you need a professional roofer's expertise and safety equipment.
The second you see that dreaded water stain bloom across your ceiling, the race is on. When it comes to leaky roof repairs, what you do in that first hour is absolutely critical. It’s all about damage control—stopping the spread, protecting your home and belongings, and safely releasing any built-up pressure before a small drip turns into a full-blown ceiling collapse.
Your First 60 Minutes Responding to a Roof Leak
It’s easy to panic when you find water coming into your home, but a clear head now will save you a fortune in repairs later. Your immediate goals are straightforward: contain the water and get everything valuable out of the way.

Contain the Immediate Threat
First things first: clear the area. Get furniture, electronics, rugs—anything of value—out of the leak's path. If something is too heavy to move, cover it completely with thick plastic sheeting.
Next, grab the biggest bucket or plastic bin you can find and place it directly under the drip. Here's a little trick I’ve learned over the years: toss an old t-shirt or a small piece of wood into the bucket. It will deaden the sound of the constant dripping, which can be surprisingly maddening when you're already stressed.
What to Do About a Bulging Ceiling
If you see the ceiling paint bubbling or the drywall itself starting to sag, you have a much more urgent problem. That bulge is a water balloon just waiting to pop, and when it does, it will bring down a huge, messy chunk of your ceiling with it.
You have to release that pressure. Position a large trash can or bucket right under the lowest point of the bulge. Then, take a screwdriver or a sharp nail and carefully—carefully—puncture the center of the sag. This will create a small, manageable hole for the water to drain through, preventing a catastrophic collapse.
Once you’ve taken these first steps to manage the immediate crisis, it's time to figure out your next move. For more detailed guidance, our page on what to do during an emergency roof repair walks you through the entire process.
When you discover a leak, every second counts. This table breaks down the essential first actions to minimize damage before help arrives.
Immediate Actions for a Roof Leak
| Action Step | Why It's Important | Pro Tip |
|---|---|---|
| Clear the Area | Protects furniture, electronics, and flooring from water damage. | Use plastic tarps to cover anything too heavy to move. |
| Contain the Drip | Prevents water from spreading and causing wider damage to floors and subfloors. | Place an old towel in the bucket to muffle the dripping sound. |
| Relieve Ceiling Pressure | Safely drains trapped water to prevent a ceiling collapse and extensive drywall damage. | Puncture the very center of the bulge at its lowest point for a controlled drain. |
| Document Everything | Creates a clear record for your insurance claim, proving the extent of the initial damage. | Take photos and videos before you move anything and after you've set up buckets. |
Following these steps methodically turns a moment of sheer panic into a manageable situation, giving you the breathing room to call for professional help.
Playing Detective: How to Find the Source of a Leak
That water stain on your ceiling? It’s almost never where the actual problem is. Think of it as the final symptom, not the cause. Water is a sneaky traveler and can get into your home several feet away from where you finally see the damage. Finding the true source takes a little bit of detective work, starting from the inside and then working your way out.
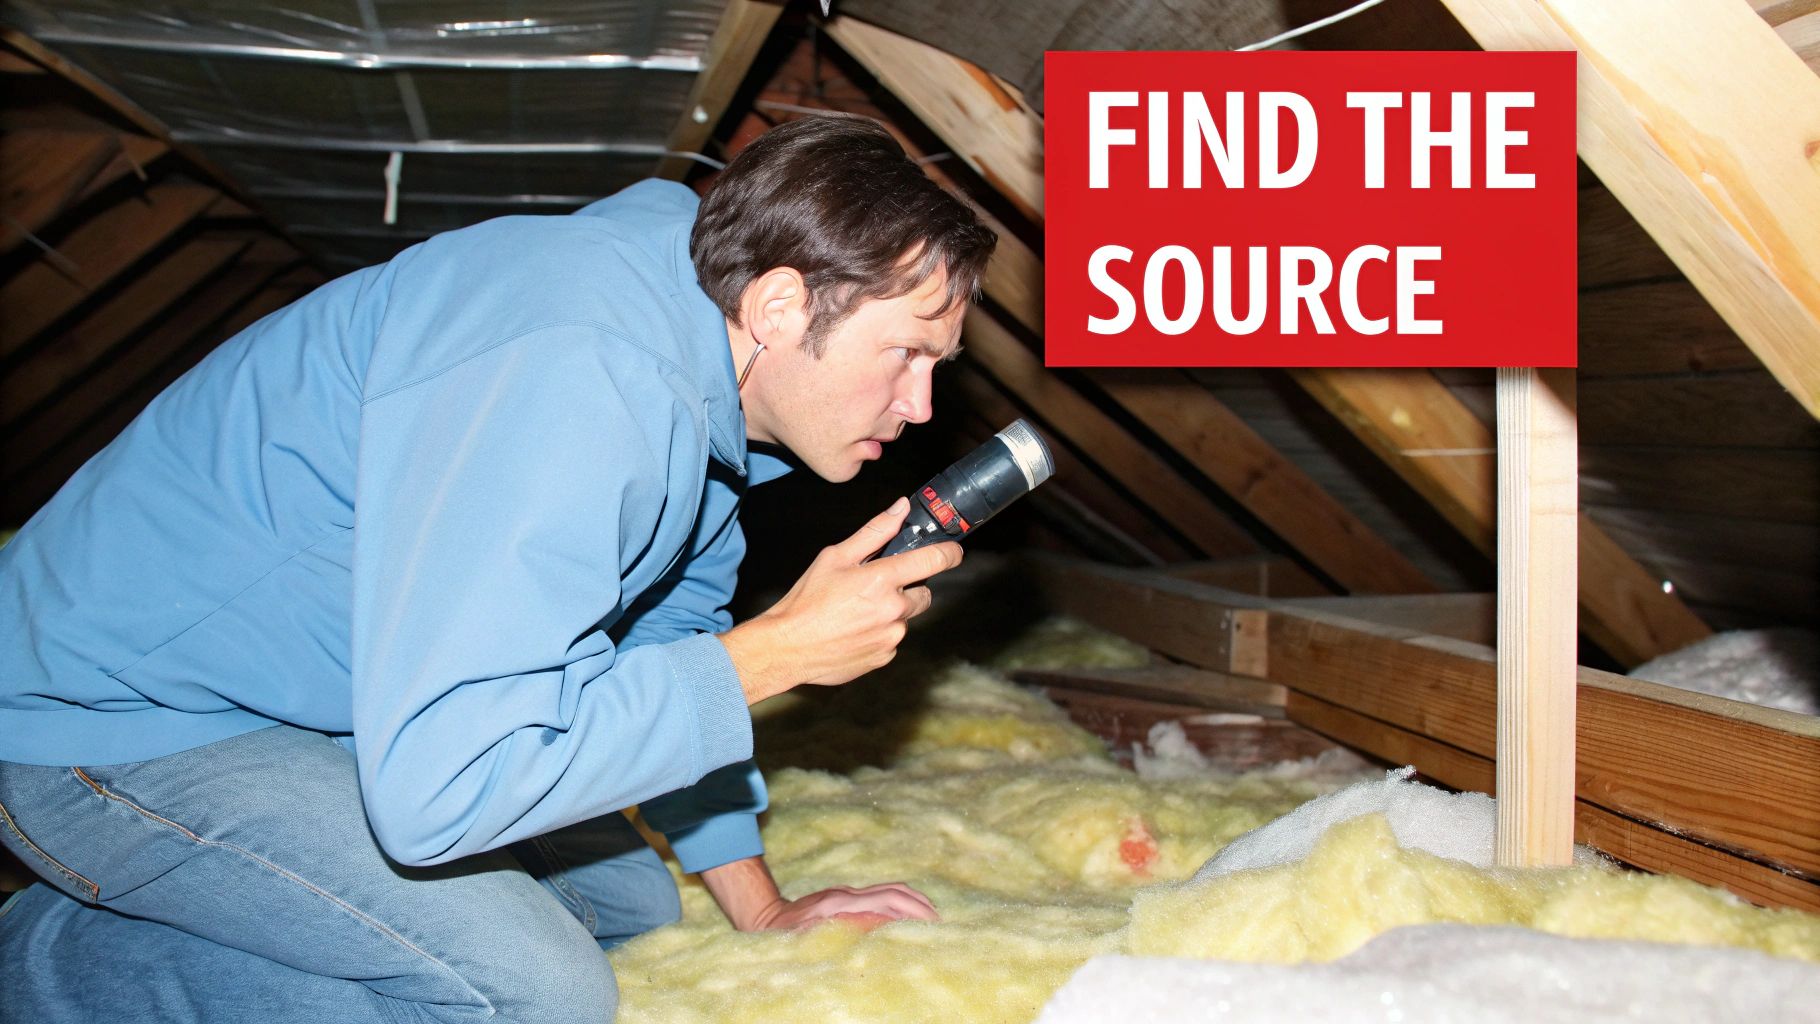
The safest place to start your search is always the attic. Grab a good flashlight and head up there during the day. Be incredibly careful where you step—only put your weight on the solid wood joists, never on the drywall ceiling below. You're not always looking for a dramatic drip; the evidence is often much more subtle.
Shine your light along the underside of the roof deck. You're searching for a few key clues:
- Dark Stains: Water leaves behind tell-tale dark streaks or spots on the wood sheathing.
- Damp or Compressed Insulation: Wet insulation loses its fluff, looking matted down and darker than the dry areas around it.
- Daylight: This is the smoking gun. If you can see even a sliver of daylight coming through on a sunny day, you've found a hole that needs to be fixed immediately.
Following the Clues Inside
Once you're in the attic, try to trace the path of the water. Look for any stains on the wood beams that lead away from the spot directly above your ceiling stain. Water always flows downhill, so the entry point on the roof will almost always be higher up than where the stain finally showed up on your ceiling.
Pay close attention to anything that pokes through the roof. These are, by far, the most common failure points.
Leaks often start right where the roofing material is interrupted. Things like plumbing vents, attic fans, chimneys, and skylights are notorious for developing leaks as their protective seals—the flashing—break down over time.
This is an incredibly common problem, especially in older homes. With so much aging housing stock in the United States, there's a constant demand for leak repair and maintenance. In fact, the U.S. roofing market was valued at a massive $23.35 billion in 2023, a number driven by the endless need for renovations and emergency leaky roof repairs. You can read more about the sheer scale of the roofing industry on consumeraffairs.com.
Conducting a Safe Ground-Level Inspection
Before you even think about getting on a ladder, you can gather a ton of critical intelligence right from the ground. Grab a pair of binoculars and take a slow walk around your property, methodically scanning every part of your roof. So many homeowners skip this crucial step.
From your yard, look for obvious signs of trouble on the roof's surface:
- Cracked or Missing Tiles/Shingles: Any gap in this primary layer of defense is a wide-open invitation for water.
- Damaged Flashing: Check the metal seals around chimneys, vents, and skylights. Look for rust, cracks, or pieces that have pulled away from the roof.
- Clogged Gutters: When gutters are stuffed with leaves, water can back up under the edge of your roof and start rotting the wood decking.
- Worn Sealant: Look for sealant around vent pipes or other protrusions that looks cracked, dried out, or is crumbling away.
This ground-level check helps you zero in on potential problem areas. If you spot multiple trouble spots or the leak's source isn't immediately obvious, it’s a pretty strong sign you need an expert's eye. A professional can safely get on the roof to confirm what you've seen, and a comprehensive roof inspection service can uncover hidden issues you might have missed. Finding the true source is the single most important step in getting a repair that actually lasts.
Temporary Fixes to Prevent a Disaster
It always seems to happen at the worst time, doesn't it? A monsoon storm rolls in on a Friday night, and suddenly you've got a drip in the living room. Getting a professional roofer out immediately just isn't in the cards. This is exactly when you need a good emergency fix in your back pocket.
These aren't permanent solutions, mind you. They're designed to do one thing and one thing only: buy you time and protect your home from potentially thousands of dollars in water damage until you can get a pro on site.
It’s crucial to remember that these are just stop-gap measures. A poorly done temporary patch can actually trap moisture, which can lead to rot and make the whole situation worse. The goal here is harm reduction—keeping things dry and safe for a day or two.
Your Go-To Tool for Small Cracks: Roofing Cement
For a small, easy-to-reach crack or hole, a can of roofing cement is a lifesaver. You might see it called flashing cement or roof patch at the hardware store. It's a thick, tar-like goo that creates a waterproof seal, and the best part is you can often apply it even when the surface is a bit damp.
First, you need to prep the area. Use a stiff brush to clear away any leaves, gravel, or other gunk. Then, grab a putty knife and slather a generous layer of cement over the crack, making sure to extend it at least two inches beyond the damage on all sides. Really press it in there to get a solid bond.
A common mistake I see is people applying roofing cement too thinly. For an effective patch, you need a thick, solid layer. If you have some fiberglass or plastic mesh lying around, you can embed it into the first layer of cement and then add a second layer over the top for some extra strength.
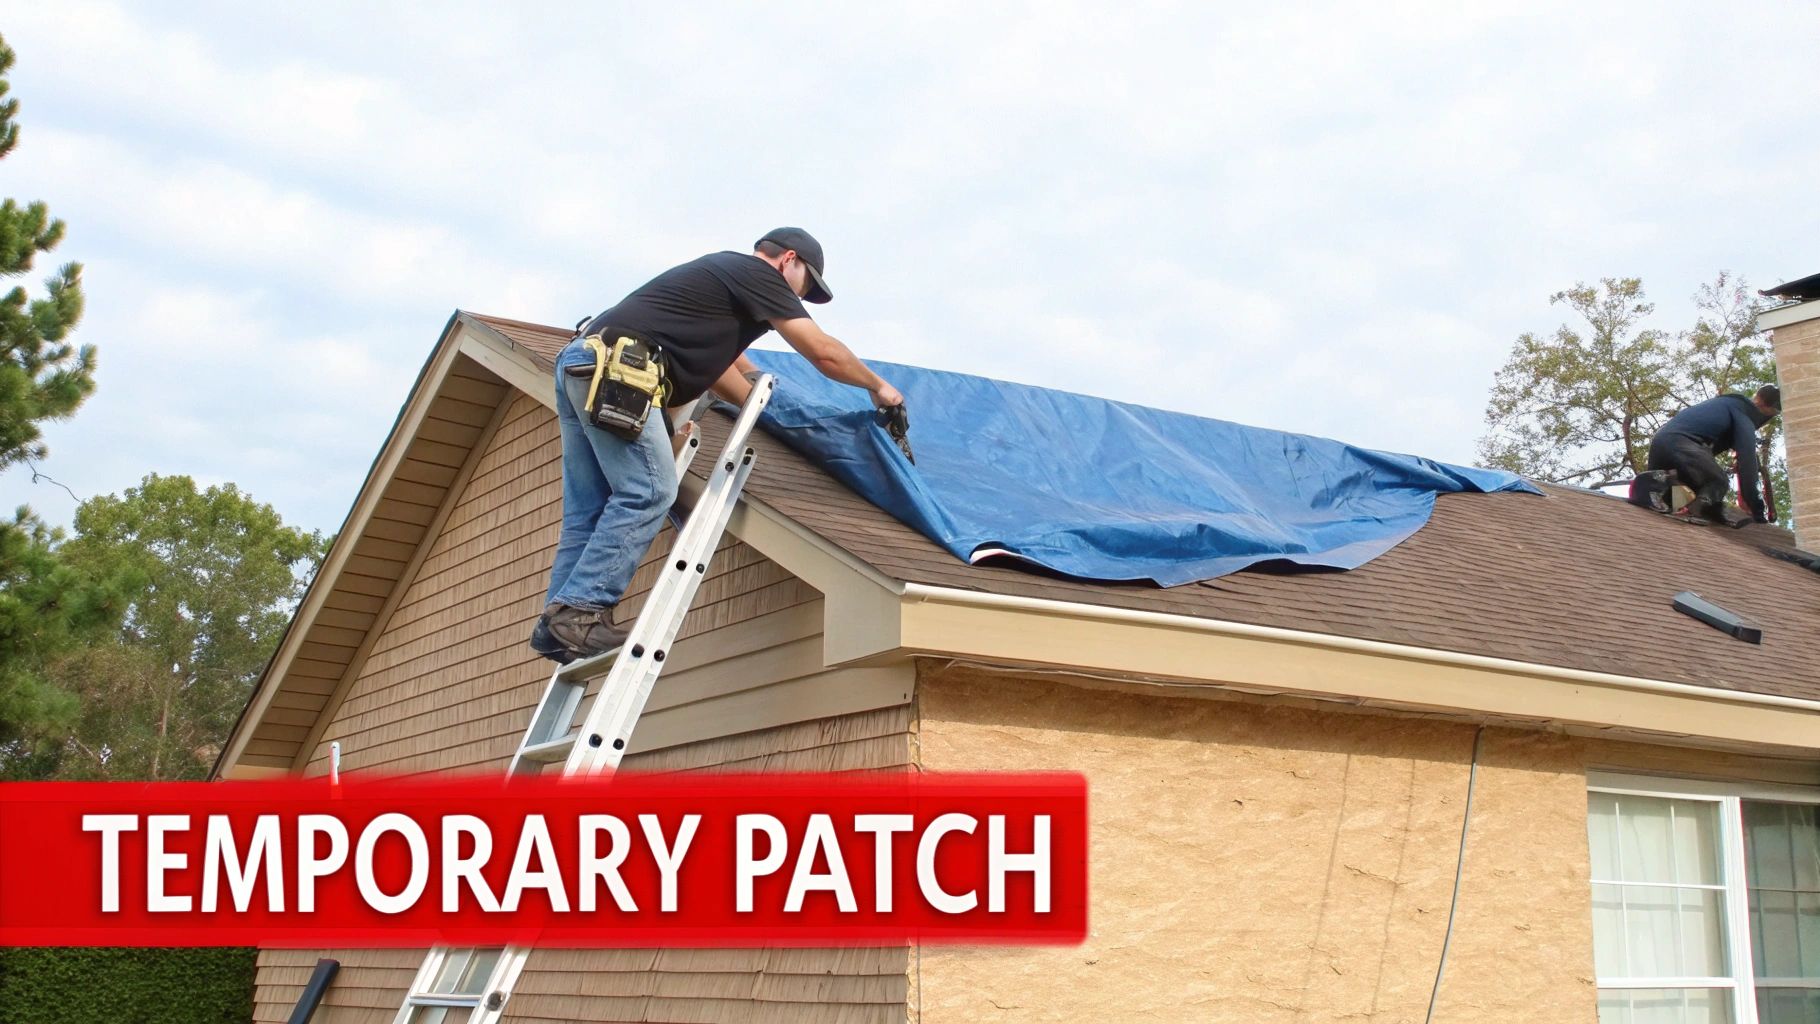
The Art of Tarping Your Roof Correctly
If you're up against a bigger leak or have a whole section of missing shingles, a heavy-duty waterproof tarp is your best friend. But there's a right way and a wrong way to do this. Tarping incorrectly can damage perfectly good shingles or, worse, get ripped off by the wind.
Safety first, always. Don't even think about getting on a steep, wet, or second-story roof, especially while it's still storming. If conditions are safe, here’s the general approach:
- Measure and Position: Your tarp has to be big enough to cover the damaged area and then some. You want it to go all the way over the peak of the roof and down the other side by at least four feet. This is key to preventing water from just running right under the top edge.
- Secure the Peak: Use 2×4 boards to anchor the tarp. Roll the end of the tarp around a 2×4 a few times, then nail right through the board and tarp into the roof decking. Do this on the undamaged side of the roof peak.
- Create the Waterfall: Let the rest of the tarp drape smoothly over the damaged spot. You don't want any folds or creases that could trap water. It should hang over the eave by at least a foot.
- Anchor the Edges: Use more 2x4s to lock down the remaining edges. Just like at the peak, roll the tarp's edges around the boards and nail them down. This method holds way better and is much less damaging than just putting nails directly through the tarp itself.
The Bigger Picture Beyond the Patch
These temporary fixes are a reminder that a roof is in a constant battle with the elements, which is why the roofing industry is so massive. In the U.S. alone, it's a market valued at around $56.7 billion, with projections to blow past $60 billion. That growth is largely driven by homeowners wanting modern, energy-efficient solutions—a huge deal for us in Arizona trying to cut those summer cooling bills.
While these quick fixes can get you out of a jam, they really highlight the critical role of regular property maintenance. It is always, always better to catch a small problem during a routine inspection than to deal with a full-blown emergency in the middle of a storm. After any emergency patch, your very next call should be to a professional to find and fix the root cause for good.
How to Fix a Leak on Common Arizona Roofs
An Arizona roof takes a beating. It’s not just the heat; it’s the relentless sun, the sudden monsoon deluges, and the wild temperature swings that cause different roofing materials to fail in very specific ways. If you want a repair that actually lasts, you have to understand what makes your particular roof tick.
Tackling a leaky roof repair on a tile roof is worlds apart from patching up a foam roof. Let's walk through the common culprits for the materials we see most often on Arizona homes.
Tile Roof Leaks: It's Rarely Just the Tile
From the street, a tile roof looks like a fortress. But get up close, and you'll see how the intense UV radiation can make clay and concrete tiles surprisingly brittle over time. Usually, the most obvious suspect is a single cracked, slipped, or missing tile—a clear invitation for water to sneak underneath.
The real weak point, however, is almost always hidden: the underlayment. This is the waterproof barrier underneath the tiles, and it does the real work of keeping your home dry. After 15-20 years in the Arizona sun, this material dries out, cracks, and fails, even when the tiles themselves look perfectly fine.
How can you tell if the underlayment is the problem?
- You're seeing leaks pop up in different, random spots.
- Lifting a tile reveals visible cracks or tears in the black paper beneath.
- Walking on the roof produces a "crinkling" sound, a dead giveaway of brittle, aging underlayment.
Here's a pro tip: A legitimate tile roof repair is rarely about just swapping out one broken tile. A good roofer will always lift the surrounding tiles to inspect the underlayment. Just replacing the tile is like putting a tiny bandage on a major wound—it might look fixed, but it doesn’t address the real issue.
If you're curious about the material itself, our guide on the differences between clay or concrete roof tiles is a great resource for understanding their lifespan and quirks.
Asphalt Shingle Roofs: The Sun Is Not Your Friend
Asphalt shingles are a popular choice because they're cost-effective, but they definitely show their age more visibly under our harsh sun. The heat essentially bakes the life right out of them, leading to some very common and predictable leaks.
Keep an eye out for these tell-tale signs:
- Curling Shingles: You’ll see the edges and corners start to lift up, making them easy targets for monsoon winds to grab and rip off.
- Cracking: As the asphalt loses its oils, it becomes brittle. Tiny thermal cracks appear, creating a perfect pathway for water to seep through.
- Granule Loss: Notice a bunch of sand-like grit in your gutters? Those are the protective granules. Once they're gone, the shingle is exposed and deteriorates rapidly.
For a roofer, fixing a few damaged shingles is usually a quick job. It involves carefully prying up the damaged section, sliding in a new shingle, and making sure everything is sealed down tight to block out any moisture.
Flat and Foam Roofs: Water is Public Enemy #1
You see a lot of foam and flat roofs on modern Arizona homes, and they demand a completely different way of thinking. Their biggest enemy is "ponding water"—any spot where water sits for more than 48 hours after a rainstorm. That standing water will eventually break down the protective coating and saturate the roof.
The first signs of trouble are almost always blisters and cracks in the roof's coating. A blister is just a bubble where the top coat has separated from the foam below, creating a fragile pocket. While this guide on commercial roof leak repair strategies is aimed at larger buildings, many of the same principles apply to residential flat roofs.
A proper fix isn't just a glob of sealant. It means cutting away the blistered or cracked coating, making absolutely sure the foam underneath is bone dry, filling the void with roofing mastic, and then applying several new layers of coating that blend seamlessly into the surrounding roof.
Repair Approach by Arizona Roof Type
To make it easier to see the differences, here’s a quick breakdown of how these materials compare when it comes to leaks and repairs.
| Roof Type | Common Leak Source | DIY Potential | Professional Solution |
|---|---|---|---|
| Tile | Cracked/slipped tiles, failed underlayment. | Low. Walking on tile is risky; underlayment work is complex. | Lift tiles, inspect/replace underlayment, re-lay tiles. |
| Asphalt Shingle | Curling/cracked shingles, granule loss, wind damage. | Moderate. A single shingle replacement is possible for the handy. | Remove damaged shingles, install new ones, reseal area. |
| Metal | Failed fasteners/screws, sealant breakdown at seams. | Low. Requires specialized tools and knowledge of panel systems. | Replace worn gaskets/screws, reseal seams, panel replacement. |
| Foam / Flat | Ponding water, blisters/cracks in coating, punctures. | Moderate. Small coating patches are DIY-friendly. | Cut out damaged area, dry substrate, fill, apply new coating. |
Ultimately, knowing your roof type is the first and most important step. Each material has its own set of rules, and what works for one can be a disaster on another.
Knowing When to Call a Roofing Professional
The DIY spirit is great, and I'm all for homeowners who want to tackle projects themselves. But when it comes to a leaking roof, knowing your limits isn't just smart—it's critical for your safety and your home's integrity. Some jobs are just too risky to handle without years of experience and the right equipment.
Deciding to call a pro usually comes down to a few straightforward scenarios. If you're looking at anything more than a single, obvious leak on a low-slope, single-story roof, it’s probably time to pick up the phone.
Red Flags That Demand an Expert Eye
Certain signs of damage are immediate red flags that point to a problem much deeper than a simple patch job. Trying to fix these on your own can easily turn a manageable issue into a catastrophic and expensive failure.
Here are the situations where you should absolutely call a certified roofing contractor, no questions asked:
- Widespread or Multiple Leaks: Seeing water stains in several rooms? That’s not a coincidence. It strongly suggests a systemic failure, most likely with your underlayment or flashing, not just one bad shingle.
- A Sagging Roof Deck: This is a big one. If you stand back in your yard and your roofline looks like it's dipping or bowing, that’s a sign of a serious structural problem. Get off the roof immediately and call for an emergency inspection.
- Steep Pitches or Second Stories: The moment a repair involves a steep roof or a second story, the risk of a life-altering fall skyrockets. Professionals have the safety harnesses, ladders, and training to work at these heights. It's just not worth the risk.
A professional roofer does more than just fix the leak you can see. They have the experience to spot hidden dangers an untrained eye would miss, like compromised flashing, subtle signs of wood rot in the decking, or poor ventilation that's causing premature aging.
The different roofing materials we see all over Arizona each have their own quirks and common failure points that a pro knows exactly how to spot.

This just goes to show that materials like tile, shingle, and foam roofing all require specialized knowledge for a repair that's actually going to last.
The Value of Professional Workmanship
Bringing in a professional isn't just a repair cost; it's an investment in your home's future. The global roofing market is expected to grow from $306 billion to $353 billion by 2029, which really underscores how vital proper roof maintenance is for property value. For those of us in Arizona, professional leak repair is a necessity to stand up to our brutal sun and monsoon seasons. You can explore more data on the roofing market's growth to see the trends for yourself.
At the end of the day, hiring a pro gives you two things a DIY job can't: accountability and peace of mind. A reputable contractor will stand behind their work with a warranty, guaranteeing the fix will hold up. That assurance, coupled with keeping your feet safely on the ground, is often worth every single penny.
Frequently Asked Questions About Leaky Roof Repairs
When you find a water stain spreading across your ceiling, a million questions probably race through your mind. It’s stressful, and you need straight answers to figure out what to do next. Let's cut through the noise and tackle the most common questions Arizona homeowners have about fixing a leaky roof.
How Much Does a Leaky Roof Repair Cost in Arizona?
This is always the first question, and the honest answer is: it really depends. The final bill for a leaky roof repair is tied directly to how bad the problem is and what it takes to fix it right. A simple fix, like sealing a cracked plumbing vent boot, might only run you a few hundred dollars. But if we're talking about a bigger issue, like replacing a large section of sun-scorched underlayment beneath your tiles, the cost can easily climb into the thousands.
Here’s what really moves the needle on an estimate:
- Your Roofing Material: Fixing standard asphalt shingles is almost always cheaper than working with materials like concrete tile or standing seam metal, which require more specialized labor.
- How Hard is it to Reach? A leak on a low-slope, single-story roof is a lot easier (and cheaper) to work on than one on a steep, two-story home that demands extra safety gear and time.
- The Damage You Can't See: This is the biggest wild card. If water has been getting in for a while, it can rot the wooden decking underneath. That rotted wood has to be cut out and replaced, which adds to both material and labor costs.
My Advice: Always get a detailed, itemized quote that breaks down every part of the job. This isn't just about the total price; it's about transparency. You should know exactly what you're paying for before any work begins.
Will My Homeowners Insurance Cover a Leaky Roof?
This is a tricky one, and the answer almost always hinges on why the roof is leaking. Homeowners insurance is designed to cover sudden and accidental damage, not problems that crop up from old age or neglect. Generally, your policy is likely to cover leaky roof repairs if the leak was caused by something specific, like a fierce monsoon, a hailstorm, or a tree crashing down. It almost never covers a leak that developed slowly over time because the roof was simply old and worn out.
This is exactly why documentation is your best friend. The moment you spot a leak, grab your phone. Take photos and videos of the damage inside and, if it's safe, on the roof. Note the date. This evidence is crucial for showing your insurance adjuster that the damage was from a specific event, not a lack of maintenance. A clear record can make or break your claim.
How Can I Prevent Future Roof Leaks?
When it to comes to your roof, being proactive is always cheaper than being reactive. An ounce of prevention is absolutely worth a pound of cure, especially in Arizona's harsh climate. I always tell homeowners to get a professional roof inspection at least once every two years. A trained eye can spot subtle issues—like cracked sealant or sun-damaged underlayment—that you’d likely miss from the ground.
Besides that, here are a few simple things you can do yourself:
- Clean Your Gutters: When gutters get clogged, rainwater has nowhere to go. It backs up against the edge of your roof and can easily seep underneath, rotting the wood fascia and decking.
- Trim Your Trees: Keep branches cut back at least six feet from your roof. This stops them from scraping off shingle granules in the wind and prevents leaves and debris from piling up in the valleys, which act like dams.
- Fix Small Problems Fast: See a cracked tile? A shingle that’s lifted up? Don't put it off. Taking care of these little things immediately is the single best way to stop them from becoming a major headache.
Can I Just Patch the Leak Myself to Save Money?
The temptation to grab a tube of sealant and climb up there yourself is strong, especially when you're worried about the cost. For a tiny, straightforward issue—maybe a single exposed nail head on a flat, easy-to-access part of the roof—a DIY patch might hold for a little while. But here’s the reality: roofing is dangerous, and a bad repair can make things much, much worse. A classic DIY mistake is smearing sealant over a damp spot. All you're doing is trapping moisture inside, which just makes the underlying wood rot faster. You could turn a $500 repair into a $5,000 one.
A professional leaky roof repair gives you something a DIY patch can't: expertise and a guarantee. A good roofer won’t just slap a patch on the hole. They’ll diagnose why it leaked and inspect the surrounding area for other weak points. And most importantly, their work comes with a warranty. That peace of mind is worth every penny.

