A hole in your roof is more than a minor inconvenience; it's a direct threat to the safety and integrity of your home. From unexpected storm damage to the simple wear and tear of time, a breach in your roof allows water to invade, leading to potential structural rot, ruined insulation, and harmful mold growth. Acting quickly is paramount. This guide is designed to walk you through the entire process, from immediate emergency patching to permanent, professional-quality repairs. Whether you're a seasoned DIYer or a homeowner facing your first leak, you'll find the essential steps, safety protocols, and expert advice needed to tackle the job with confidence.
Key Takeaways
- Act Immediately: The moment you discover a roof hole, your first priority is to stop water from entering. A temporary patch, like a tarp or roofing cement, can prevent thousands of dollars in water damage.
- Safety First, Always: Never get on a roof without proper safety gear, including a sturdy ladder, non-slip footwear, and a spotter on the ground. For steep roofs, a safety harness is non-negotiable.
- Assess from the Inside: Before climbing on the roof, inspect the damage from your attic. Look for water stains, soft or sagging wood, and daylight. This helps determine if the roof is safe to walk on.
- Know Your Materials: The correct materials are crucial for a lasting repair. Asphalt shingles, tiles, and metal roofs each require specific tools, sealants, and techniques.
- Recognize Your Limits: While many small holes can be a DIY project, extensive structural damage, steep roof pitches, or damage near complex features like chimneys are jobs best left to insured professionals.
Your First Steps in Fixing a Roof Hole
This guide will walk you through it. We'll cover everything from that first safe, ground-level assessment to applying a quick patch that buys you precious time. Taking these first steps can save your home from a world of hurt and give you the breathing room to plan a proper, lasting repair.
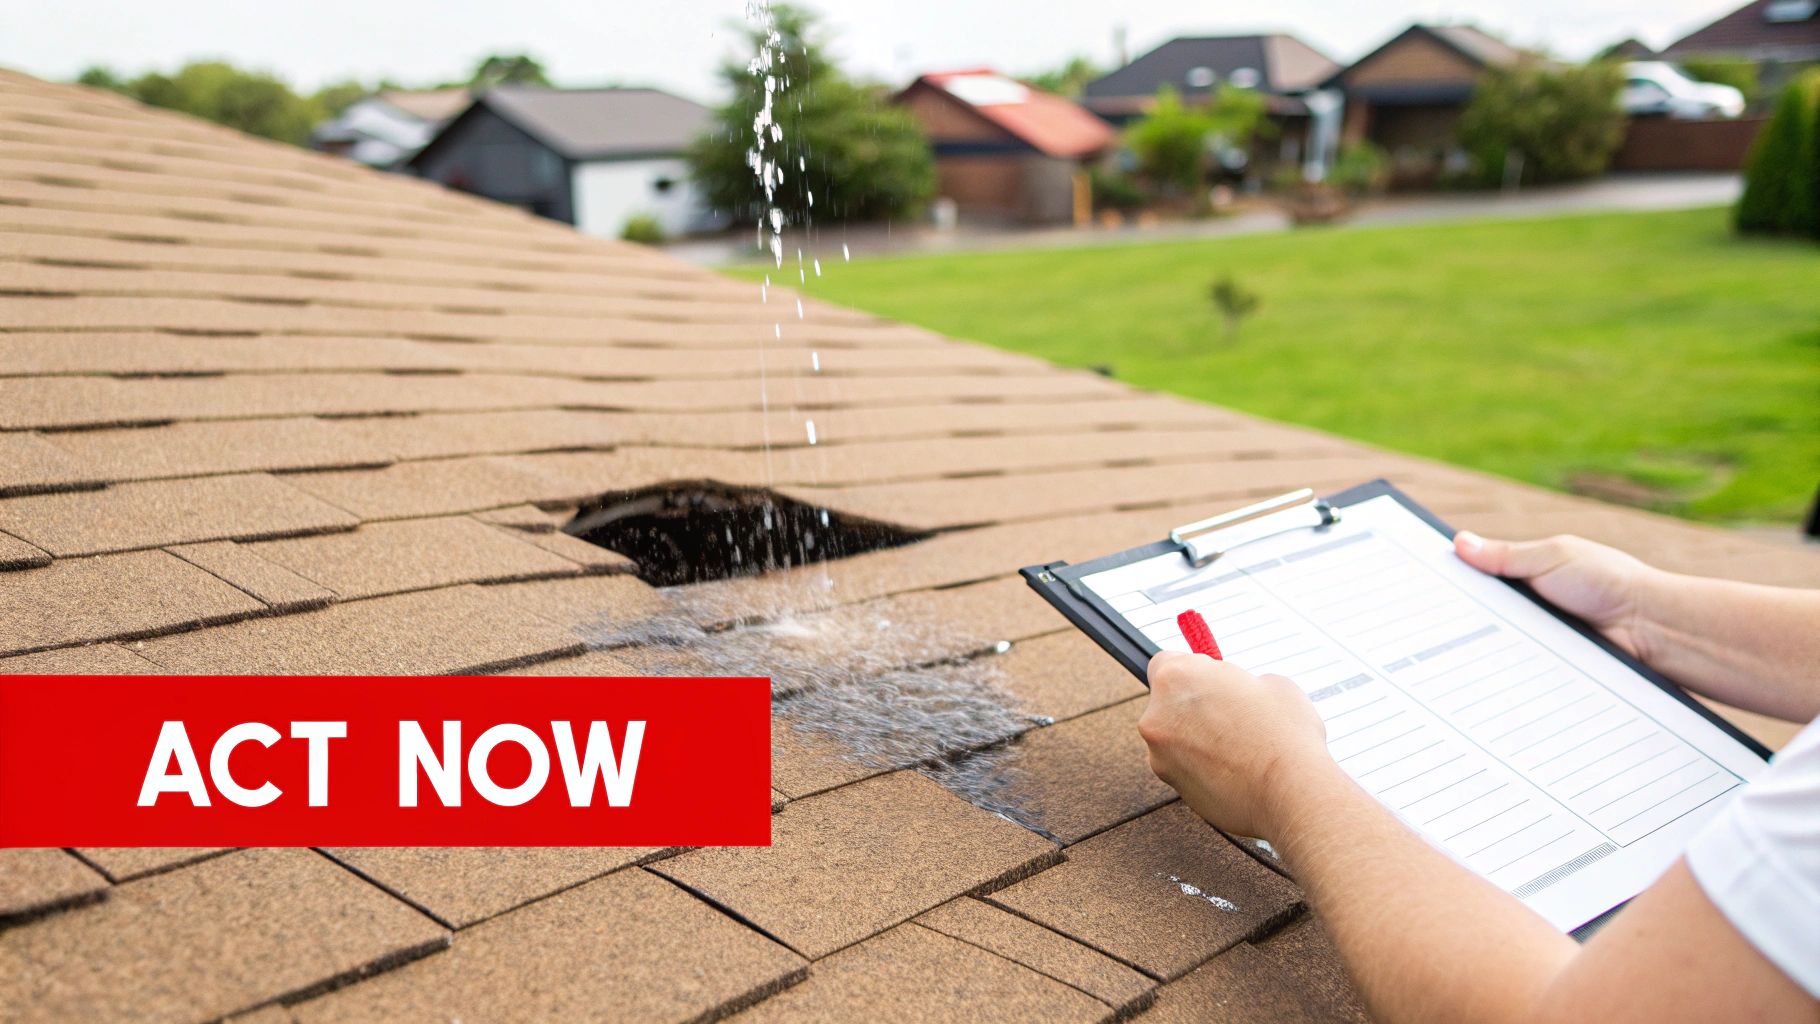
Why Immediate Action Is Non-Negotiable
A roof hole isn't just a cosmetic problem; it's an open wound on your home. Here in Arizona, we all know how fast a monsoon can roll in and turn a tiny gap into an indoor waterfall. The longer you wait, the worse—and more expensive—the fallout gets.
Here’s a look at what you’re really fighting against:
- Structural Damage: Water soaks into the wooden decking, rafters, and ceiling joists, slowly rotting them and weakening your home's entire frame.
- Insulation Failure: Once insulation gets wet, it’s basically useless. It loses its R-value, and your energy bills will start climbing as your HVAC system struggles to keep up.
- Mold and Mildew: Trapped moisture is the perfect breeding ground for mold, which isn't just a nightmare to remove but can also pose serious health risks to your family.
Key Takeaway: The number one priority is to stop the water. A quick and dirty temporary patch is a thousand times better than waiting for a sunny day while water continues to pour in. Even if you're calling a pro, getting the leak contained is a crucial first move.
An Overview of the Repair Plan
Fixing a roof hole isn't as intimidating as it sounds when you break it down. The whole process follows a logical path that makes it much more manageable.
First, you need to get a handle on the situation, preferably from the safety of the ground or by poking your head into the attic. Once you know roughly what you're dealing with, the next mission is to get a temporary patch in place. This is your emergency bandage. For more on handling these urgent situations, our guide on emergency roof repair has some great advice.
This stopgap fix buys you time to either get the right materials for a permanent repair or to bring in a professional roofer to handle it for you.
Prioritizing Safety and Assessing the Damage
Before you even think about patching that hole, let’s talk about safety. Seriously. Getting up on a roof is risky business, and one wrong move can change everything. Your well-being has to be the top priority, no exceptions.
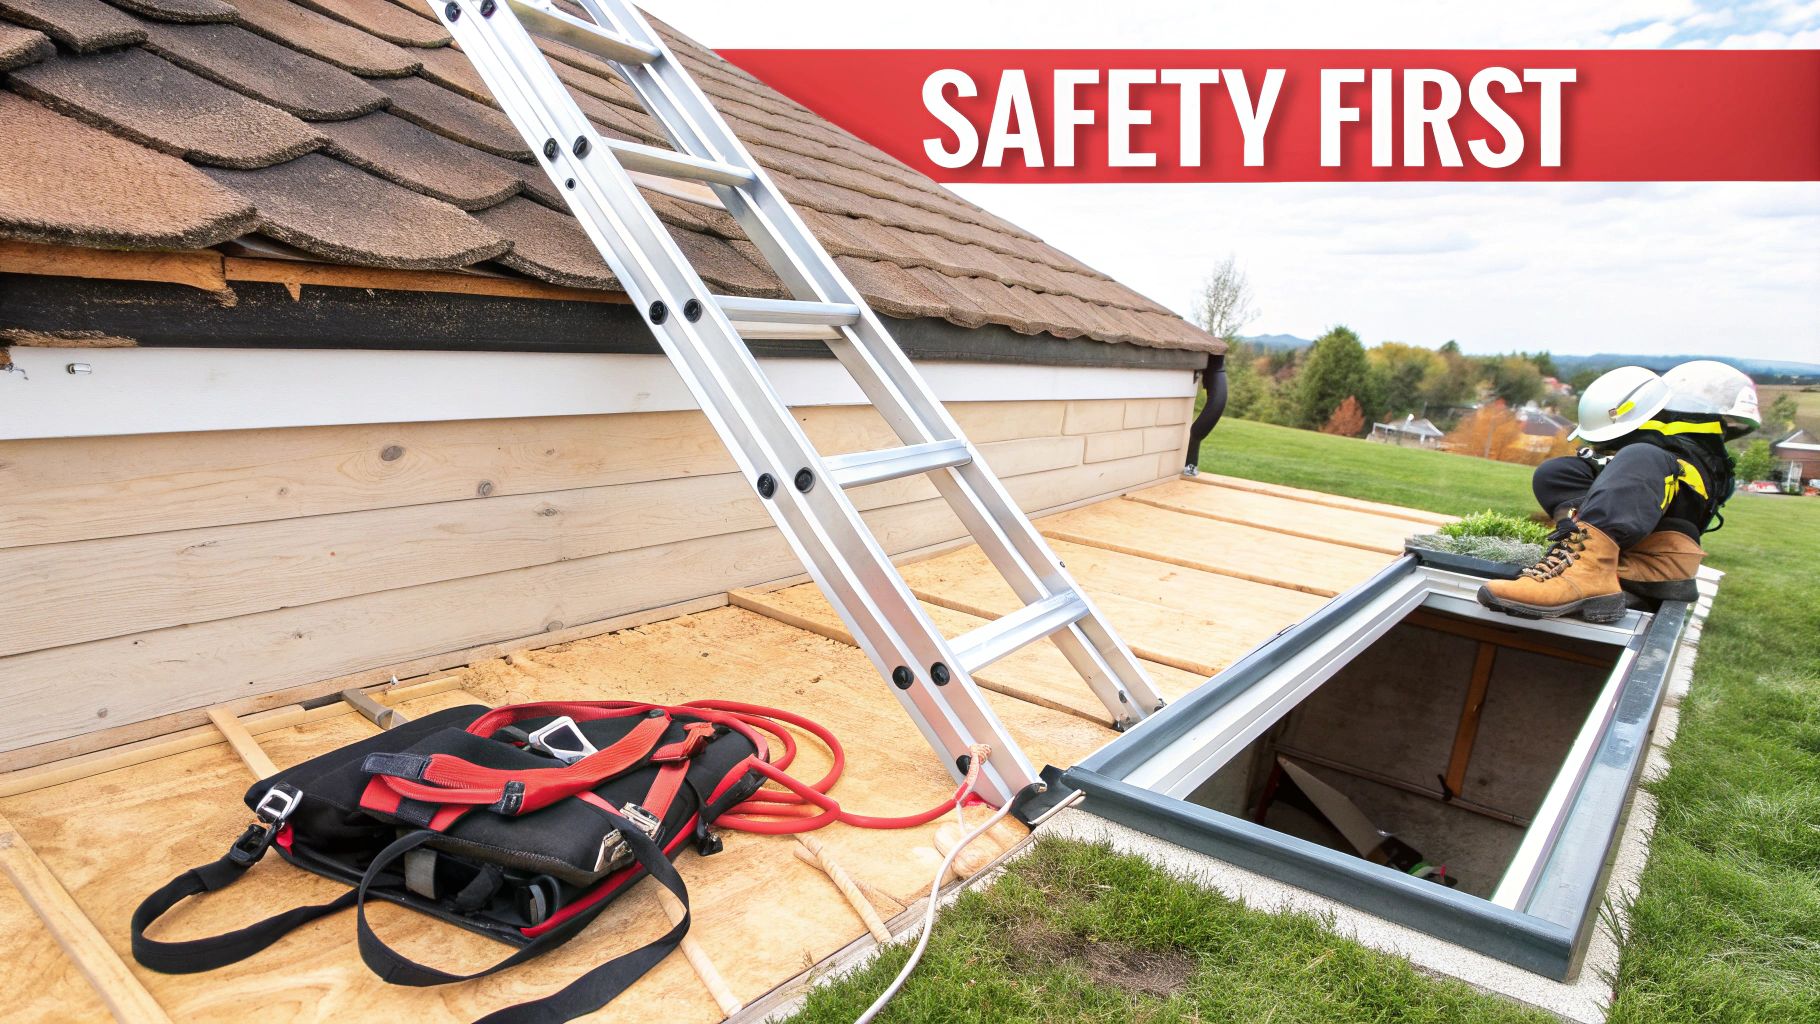
The stats don't lie. Injuries from roofing work are on track to cost the industry a staggering $2.8 billion by 2025. That number alone should tell you why the pros are so meticulous about safety. It’s always a good idea to brush up on some general safety guidelines before you even think about leaning a ladder against the house.
Your Essential Safety Checklist
Don't even consider climbing up there without the right gear. This isn't optional—it's what keeps you safe.
- A Sturdy, Well-Placed Ladder: Your ladder needs to be on solid, level ground. It should also extend at least three feet above the roof's edge so you have something to grab onto.
- Non-Slip Footwear: Get a pair of boots or shoes with a serious grip. Roofs get slick from morning dew or loose shingle granules, and you need reliable traction.
- Safety Harness: If your roof has any kind of steepness to it (what we call a pitch greater than 4/12), a safety harness is a must-have. It needs to be properly anchored, as it's your lifeline if you slip.
Pro Tip: Never work alone. Ever. Have a spotter on the ground who can steady the ladder, hand you tools, and, most importantly, call for help if something goes wrong.
Assessing Damage From the Inside First
Your first stop shouldn't be the roof—it should be your attic. Looking at the problem from underneath gives you a critical preview of the roof's structural integrity and tells you if it's even safe to walk on.
Grab a bright flashlight and head up there. Look for the obvious signs directly above the leak: water-stained decking, sagging plywood, or insulation that’s damp and matted down. You might even see a sliver of daylight. If you poke the wood and it feels soft or spongy, do not walk on that part of the roof. Widespread moisture often points to a much bigger issue than a single hole, and you’ll likely need a professional roof inspection service to figure out what’s really going on.
Identifying the Type and Size of the Hole
Okay, so the attic check went well, and you've got your safety gear ready. Now you can head up top. Your mission is to get a clear picture of the damage. What caused it? How big is it? The answers will dictate your repair strategy.
Is it a small puncture from a wind-blown branch? Or are you looking at a mess of cracked and dented shingles around a larger hole caused by hail? Get your phone out and take plenty of pictures. Measure the hole itself and any surrounding damage. This information is key to deciding whether this is a patch you can handle yourself or if it’s time to call in a pro to make sure it's done right.
Getting the Right Tools and Materials on Hand
There's nothing worse than getting up on the roof, ready to work, only to realize you're missing a critical tool. It’s not just frustrating; it’s a safety hazard. Every extra trip up and down that ladder is another chance for a fall. The secret to a safe, efficient repair is simple: get everything you need organized and within reach before you even think about climbing up.
This goes beyond just having a hammer and some nails. The specific materials you pick are make-or-break, especially under the brutal Arizona sun. Grab the wrong type of roofing cement, and you'll get a patch that cracks and gives up within a few months, leaving you right back where you started.
The Standard DIY Roofing Kit
No matter what kind of roof you have, there's a core set of tools that you’ll almost certainly need. Think of this as your foundational repair kit.
- Pry Bar: You’ll need this to gently lift shingles or tiles without snapping them.
- Claw Hammer or Roofing Nailer: A good old claw hammer is perfect for pulling old nails and driving in new ones. A nailer is faster, but for a small patch, it's not a must-have.
- Utility Knife with Hook Blades: Hook blades are a roofer's best friend. They're designed to slice through shingles and underlayment cleanly and safely.
- Caulking Gun: Absolutely necessary for applying sealant or roofing cement with any kind of precision.
- Tape Measure: You know the old saying: measure twice, cut once. Accuracy is everything up there.
- Chalk Line: If you're replacing more than one or two shingles, this is the only way to ensure your new rows are perfectly straight.
Getting these basics together first means you’re ready to tackle the essentials—removing the damaged stuff and putting the new patch in place correctly.
A quick pro-tip: Don't skimp on the little things. A tool belt frees up your hands for climbing, which is huge for safety. And a magnetic nail sweeper is a lifesaver for finding stray nails in the yard that could pop a tire or hurt someone.
Choosing Materials for Common Arizona Roofs
Okay, now let's get into the specifics. The materials you'll need are completely different for asphalt shingles, concrete tiles, and metal roofs. This is where getting it right really counts. Making the right choice here is the difference between a quick fix and a repair that actually lasts.
For example, not all roofing cements are the same. In a climate like ours, you absolutely need a product rated for high heat and UV exposure. A generic "wet patch" cement might get you through a monsoon storm, but it won't stand a chance against a Phoenix summer.
To make it easier, I've put together a quick cheat sheet for what you'll need for the most common roof types we see around here.
Required Tools and Materials by Roof Type
This table breaks down the essentials for the three most common residential roof systems in Arizona. Notice how the sealants and fasteners change—using the wrong ones can cause leaks or corrosion.
| Item | Asphalt Shingle | Tile | Metal |
|---|---|---|---|
| Primary Material | Matching Shingles | Matching Roof Tiles | Sheet Metal & Fasteners |
| Sealant | Asphalt Roofing Cement | Polyurethane Sealant | Butyl Tape & Metal Sealant |
| Underlayment | Self-Adhering Membrane | Synthetic Underlayment | High-Temp Ice & Water Shield |
| Fasteners | 1 ¼" Galvanized Roofing Nails | Corrosion-Resistant Screws | Self-Tapping Screws with Gaskets |
Remember, the goal is to match your existing materials as closely as possible for a seamless and durable repair.
How to Figure Out How Much You Need
Running out of shingles or sealant halfway through the job is a classic rookie mistake, and it can bring your whole project to a grinding halt.
The best way to avoid this is to carefully measure the damaged area and then add a healthy buffer. A good rule of thumb is to buy 15-20% more material than your measurements call for.
This extra bit covers you for any miscuts, mistakes, or pieces that get damaged during installation—and trust me, you'll probably crack a tile or two. Whatever is left over can be stored for the next time a storm rolls through, saving you a future trip to the hardware store. A little bit of planning here makes the whole job go smoother.
Step-by-Step Guide to Patching a Roof Hole
Alright, let's get our hands dirty. When you find a hole in your roof, you’ve got two battles to fight: the immediate scramble to stop the leak, and then the proper, long-term repair. We’ll cover both, focusing on the kinds of roofs you see all over Arizona.
The first move is all about damage control. A quick, temporary patch can be the only thing standing between a minor fix and thousands of dollars in water damage inside your home. Think of it as first aid for your roof—it buys you the time you need to get the right materials and wait for a dry, sunny day to do the job right.
The Immediate Emergency Patch
When rain is pouring into your attic, you don't have time for a perfect fix. Your one and only job is to stop the water now. This isn't about looks; it's about getting a seal that will hold until you can get back up there. For that, you’ve got two solid options: a tarp or a healthy smear of roofing cement.
Applying a Tarp for Quick Coverage
A heavy-duty waterproof tarp is your best bet for a bigger hole. It's a classic for a reason.
- Get It Sized Right: Before you even get on the ladder, roll the tarp out on the ground. You need it to be big enough to cover the hole with at least four feet of extra material on all sides. Critically, the top edge has to go all the way over the peak of the roof (the ridge). If it doesn't, water will just run down the roof and right under it.
- Anchor It Down: Don't just throw a few screws in it. The Arizona wind will tear that apart in minutes. The pro trick is to use 2×4 boards. Roll the edges of the tarp around the boards a few times, then drive screws through the board, through the tarp, and into the roof decking. This sandwiches the tarp and distributes the force, making it much more secure.
This is a simple but incredibly effective way to shield the damaged area until you're ready for the real repair.
Using Roofing Cement for Smaller Punctures
For smaller punctures, maybe up to 6 inches across, roofing cement (often called "roof patch" or "flashing cement") is a lifesaver.
- Prep the Surface: You can't just slap it on. Grab a stiff brush and clean all the dirt, leaves, and loose granules from around the hole. The sealant needs a clean, dry spot to stick to.
- Don't Be Shy: Using a putty knife, lay down a thick coat of the cement directly over the hole. Smear it out several inches past the damage, feathering the edges so there's no hard lip for water to catch on.
- Beef It Up: To make that patch last a little longer, cut a piece of fiberglass mesh and press it into the wet cement. Then, trowel another layer of cement over the top. It creates a much tougher seal that can withstand the sun a bit better.
Let's be clear: These are both temporary fixes. A tarp will get shredded by our sun, and roofing cement will dry out and crack over time. These patches are designed to get you through the next few days or weeks, not the next few years.
Permanent Roof Hole Repair Techniques
Once the panic is over and the rain has stopped, it's time for a permanent solution. How you approach this depends entirely on what your roof is made of. What works for asphalt shingles will absolutely wreck a tile roof. So, let's get specific.
Before you start, make sure you've got your key supplies gathered.

This gives you a good mental checklist: the new roofing material itself, the right sealant, and the tools to get the old stuff out.
Fixing a Hole in an Asphalt Shingle Roof
This is probably the most common repair homeowners tackle themselves, and for good reason. It's pretty straightforward—you're just replacing the bad shingles and, if needed, the wood decking underneath.
Your first job is to get the damaged shingles out without making things worse. Use a flat pry bar to carefully slide under the shingle above the damaged one and pop its sealant strip loose. This will reveal the nails. Gently pry them out, and the damaged shingle should slide free. Go slow. If you crack a good shingle, you’ve just doubled your workload.
With the old shingles out, take a hard look at the wood sheathing below. Is it dark, soft, or spongy? If so, it’s rotted and has to go. Set a circular saw blade to the exact depth of the plywood and cut out a neat square around the damage. Make sure your cuts land over the center of the roof rafters so the new piece has something solid to nail into. Cut a new piece of plywood to fit, and nail it securely in place.
Now, you rebuild. Cover the new plywood with a piece of roofing underlayment (tar paper or, even better, a peel-and-stick membrane). Slide your new shingles into position, making sure they line up perfectly with the surrounding rows. Nail them down with proper galvanized roofing nails. As a final touch, put a few dabs of roofing cement under the tabs of the shingles you loosened earlier to glue them back down.
Repairing a Damaged Tile Roof
Working on a tile roof is a whole different ballgame. Tiles are fragile, and walking on them the wrong way is a surefire way to hear that dreaded crack.
Here, the mission is to remove only the single broken tile. You’ll need a pry bar to gently lift the overlapping tiles above and next to the broken one. This should give you just enough room to get at the nail or screw holding it down. Remove the fastener, slide out the broken pieces, and check the underlayment.
If the underlayment is ripped, you have to patch it before you do anything else. Once that’s done, slide the new tile into its spot, making sure it interlocks correctly. Secure it with a new, corrosion-resistant fastener. To finish, cover the fastener head with a polyurethane-based sealant and run a small bead along the edges where it meets the other tiles to keep wind-driven rain out.
Sealing a Hole in a Metal Roof
A metal roof repair is all about precision. Your patch needs to be just as waterproof and tough as the rest of the panel.
Start by scrubbing the area around the hole with a wire brush to get rid of any rust, dirt, or flaking paint. Then, cut a patch from a matching piece of sheet metal that’s at least a few inches bigger than the hole on all sides.
Now for the seal. Lay down a thick bead of high-quality butyl tape or a specialized metal roof sealant around the perimeter of the hole. Press your metal patch down firmly onto the sealant, squeezing it out a bit. Finally, lock it all down with self-tapping roofing screws—the kind with the little rubber gaskets. Drive a screw about every two inches around the edge of the patch. This combination of a gummy sealant and mechanical pressure creates a permanent, watertight bond.
It’s no surprise that repairs like these are a huge part of the roofing industry. The global market hit $296.21 billion and is projected to climb to $306 billion, growing at a 3.3% CAGR. A huge chunk of that growth comes from repair and maintenance, driven by aging homes and rough weather. For flat roofs or larger repairs where you want an extra layer of defense, it’s worth looking into modern waterproof roof coating systems. These can create a seamless membrane over the entire repaired area, basically adding a brand-new, leak-proof surface.
Knowing When to Call a Professional Roofer
While this guide gives you the confidence to handle many common roof issues, the smartest DIYers know their limits. There are times when the best thing you can do for your home—and for your own safety—is to step away from the ladder and call in an expert. Pushing past your skill level can quickly turn a simple patch job into a catastrophic failure.
Making that call is about more than just getting the job done right. It's about protecting your home's structural integrity and, most importantly, yourself. A professional roofer has the training, insurance, and specialized gear to work safely and efficiently, especially when things get complicated.
Clear Signs It Is Time for a Pro
Some situations are non-negotiable. If you see any of the following, your DIY project is over. It's time to get on the phone with a qualified roofer.
-
Extensive Structural Damage: Remember that attic inspection? If you found decking that feels soft, spongy, or is actively rotting, stop immediately. Widespread water damage means the roof's framework is compromised, making it incredibly dangerous to walk on.
-
A Dangerously Steep Pitch: Let's be honest—some roofs are just plain scary to be on. A steep incline dramatically increases the risk of a life-altering fall. Pros use harnesses and anchoring systems that you simply don't have in your garage.
-
Damage Near Complex Features: Is the hole right up against a chimney, skylight, or plumbing vent? These intersections are the most vulnerable spots on a roof. They require precise, multi-layered flashing to remain watertight, and even a tiny mistake can cause leaks that are a nightmare to track down later.
Calling a professional for these jobs isn't admitting defeat; it's making a smart financial decision. A botched repair around a chimney could lead to thousands in hidden water damage inside your walls.
The Financial Side of Professional Repairs
It might feel like you're saving money by doing it yourself, but sometimes hiring a pro is the most cost-effective move. The average professional roof hole repair costs around $750, though this figure can shift depending on the size and complexity. The U.S. roofing market, valued at $56.7 billion, is constantly busy with repairs from storm damage and normal wear, so these pros have seen it all. You can dive deeper into the roofing industry trends on sunsent.com to see the full picture.
Hiring a contractor brings more than just their labor. You're paying for their expertise, their insurance, and the peace of mind that comes with a warranty on materials and workmanship. They can also spot bigger, underlying problems you might have missed, saving you from another leak in a few months.
If you're ready to make that call, our guide on how to find a good roofer will help you find a trustworthy contractor who can protect your investment for years to come.
Frequently Asked Questions About Roof Hole Repairs
Fixing a roof hole can be a stressful experience, and it's natural to have lingering questions. To provide more clarity, we've compiled answers to some of the most common concerns homeowners have when faced with a damaged roof.
How long does a temporary roof patch last?
A temporary patch made from a tarp or roofing cement is only designed to be a short-term solution. Depending on the material and weather conditions, it might last anywhere from a few days to a few months. However, it should not be relied upon as a permanent fix. The goal is to prevent immediate water damage until a proper, permanent repair can be scheduled and completed.
Can I repair my roof in the rain?
No. Attempting a roof repair in the rain is extremely dangerous. Roof surfaces become incredibly slippery when wet, significantly increasing the risk of a serious fall. Furthermore, sealants and adhesives require a clean, dry surface to bond correctly. A repair made in wet conditions will likely fail, leading to continued leaks. Always wait for clear weather and a completely dry roof.
Does homeowners insurance cover a roof hole?
Typically, homeowners insurance covers roof damage caused by sudden, accidental events like storms, hail, wind, or falling trees. It generally does not cover damage resulting from old age, wear and tear, or lack of maintenance. It's crucial to document the damage with photos as soon as it's safe to do so and contact your insurance agent promptly to understand your specific coverage.
What's the best way to find a small leak?
Finding the source of a small leak can be tricky. The best method is to have one person on the roof with a garden hose and another person inside the attic with a flashlight. Start by soaking the area just below where the leak appears inside, and slowly work your way up the roof. The person in the attic should watch for the first sign of water, which will pinpoint the entry point.
What is the most difficult type of roof to repair?
For a DIY repair, slate and clay tile roofs are often the most challenging. The tiles are heavy, fragile, and can crack easily if not handled correctly. They also require specialized tools and techniques to replace without damaging the surrounding tiles or the underlying waterproof membrane. Metal roof repairs also demand precision. Asphalt shingle roofs are generally the most manageable for experienced DIYers.

