A drip edge is a simple piece of metal flashing installed at the edge of a roof, but its role in protecting your home from water damage, pests, and structural decay is enormous. Especially in Arizona, where intense sun and monsoon downpours put roofing materials to the test, understanding the different drip edge types is crucial for any homeowner. This guide will walk you through the various profiles, materials, and installation requirements to help you make an informed decision and safeguard your investment.
Key Takeaways
- Essential Protection: A drip edge is a critical roofing component that directs water away from your fascia and roof deck, prevents wood rot, and blocks pests from entering your attic. It is required by most Arizona building codes.
- Know the Profiles: The three main types are Type C (L-Shape), a basic and cost-effective option; Type D (Hemmed), which offers superior resistance to wind-driven rain; and Type F (Fascia Wrap), ideal for rake edges and retrofit applications.
- Material Matters: The best material for Arizona's climate balances durability and cost. Aluminum is a rust-proof, popular choice. Galvanized steel offers superior strength against wind. Copper is a premium, long-lasting option for high-end homes.
- Proper Installation is Key: A drip edge must be installed correctly to work. It goes under the underlayment at the eaves (bottom edges) and over the underlayment at the rakes (sloped sides).
What Is a Drip Edge and Why Does It Matter
So, what does this little piece of metal actually do? It punches well above its weight, delivering a surprising amount of protection.
-
It steers water away. The primary job of a drip edge is to guide water off the shingles and directly into the gutters, preventing it from curling back under the roof's edge and soaking the fascia board.
-
It protects your roof deck. Without it, water can easily wick up under the shingles, rotting out the plywood or OSB sheathing at the edges. This is one of the most common spots for expensive roof repairs to start.
-
It keeps pests out. That tiny gap between the roof deck and the fascia is a welcome mat for insects, birds, and rodents. A drip edge effectively seals this opening, closing the door on unwanted guests in your attic.
-
It’s required by code. For good reason, the International Residential Code (IRC) mandates drip edge on new roofs and re-roofs. Most Arizona building codes have adopted this rule to ensure homes are properly protected.
During Arizona's monsoon season, wind-driven rain is a serious threat. It can force water horizontally, right under the edge of your shingles. A drip edge is your home's first line of defense, kicking that water away before it can saturate the fascia and roof deck, leading to rot, mold, and long-term structural decay.
A properly installed drip edge doesn't just manage water; it extends the lifespan of your entire roofing system. By keeping the edges of your roof dry and secure, it helps prevent the premature failure of shingles and underlayment.
It also adds crucial stability to the roofline. By providing a clean, finished edge, it helps lock down that first course of shingles, making them far more resistant to blow-offs during high winds.
Ultimately, choosing and installing the right drip edge isn't just about checking a box on a building code inspection. It’s a fundamental investment in your home’s health and longevity.
Understanding the Different Drip Edge Profiles
When you're looking at drip edge, it's definitely not a one-size-fits-all product. Different roof areas have different needs, and that’s why drip edge comes in various profiles, or shapes. Think of it like having a set of specialized tools—you wouldn't use a hammer to turn a screw, and you wouldn't use the same drip edge on a flat eave as you would on a sloped rake.
The specific shape of the drip edge is what determines how well it will manage water, stand up to wind, and ultimately protect the vulnerable wood components of your home. Let's walk through the common profiles you’ll see on a job site.
Type C: The Classic L-Shape
The most common and straightforward profile is the Type C, which you'll often hear called "L-style" flashing. It’s exactly what it sounds like: a simple piece of metal bent at a 90-degree angle, forming an 'L' shape. One leg rests flat on the roof deck, and the other drops down over the fascia board.
Its simple design makes it incredibly versatile and a favorite for quick installations. For homeowners in Phoenix and Tucson dealing with insurance claims after a storm, its affordability is a huge plus. Type C often costs just $3 to $10 per 10 linear feet, which can be up to 50% less than more robust profiles. It gets the basic job done by directing water away from the fascia and into the gutters, a critical job during our intense monsoon seasons. If you're curious about installation, you can find out more about drip edge costs and considerations.
Type D: The Wind Fighter
Next is the Type D profile, which some pros call a "hemmed" or "T-style" drip edge. Imagine a 'T' tipped on its side. It has a lower flange, or "hem," that kicks out at the bottom.
That small design tweak makes a world of difference in performance.
- Superior Wind Resistance: The extended flange directs water farther away from the fascia. More importantly, it helps block wind-driven rain from getting pushed up and under your roof shingles—a major benefit during Arizona's fierce monsoons.
- Added Strength: The hem gives the metal extra rigidity, making it tougher against high winds and physical impacts.
Because it offers much better protection against wind-driven rain, Type D is the go-to profile for the eaves (the horizontal bottom edges of the roof), especially in places that see severe weather.
This simple diagram breaks down the three core ways a drip edge protects your home, from channeling water to blocking pests.
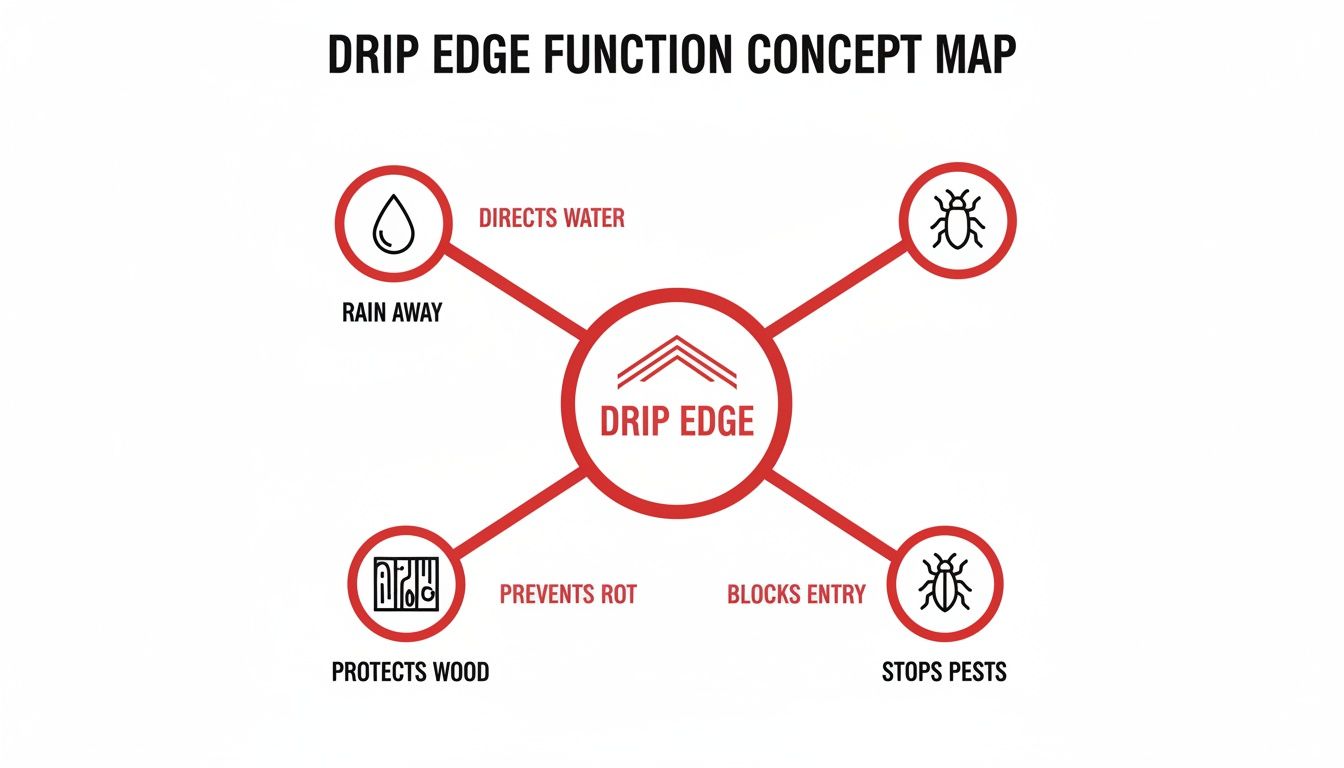
As you can see, a drip edge does more than just one thing. It’s a multi-functional piece of flashing that preserves your roof's structure by controlling water, preventing wood rot, and sealing up potential entry points.
Type F: The Fascia Wrap
Last but not least is the Type F profile, also known as a "fascia wrap" or "rake edge." This one is designed with a longer leading edge that extends farther down the face of the fascia board compared to other types.
You’ll typically see this used on the rake edges—the sloped sides of a gable roof. It’s also the perfect problem-solver for retrofit jobs, like when the existing shingles overhang too much, or when an older fascia board needs some extra coverage and protection. That extended design ensures that no gaps are left exposed along those tricky angled rooflines.
Choosing The Best Material For The Arizona Climate
It’s not just about the shape—the material your drip edge is made from is a huge deal, especially here in Arizona. Our climate is no joke. You need something that can stand up to the relentless sun, fend off corrosion from dust storms, and handle the sudden humidity of monsoon season. Making the right call comes down to balancing durability, looks, and your budget.
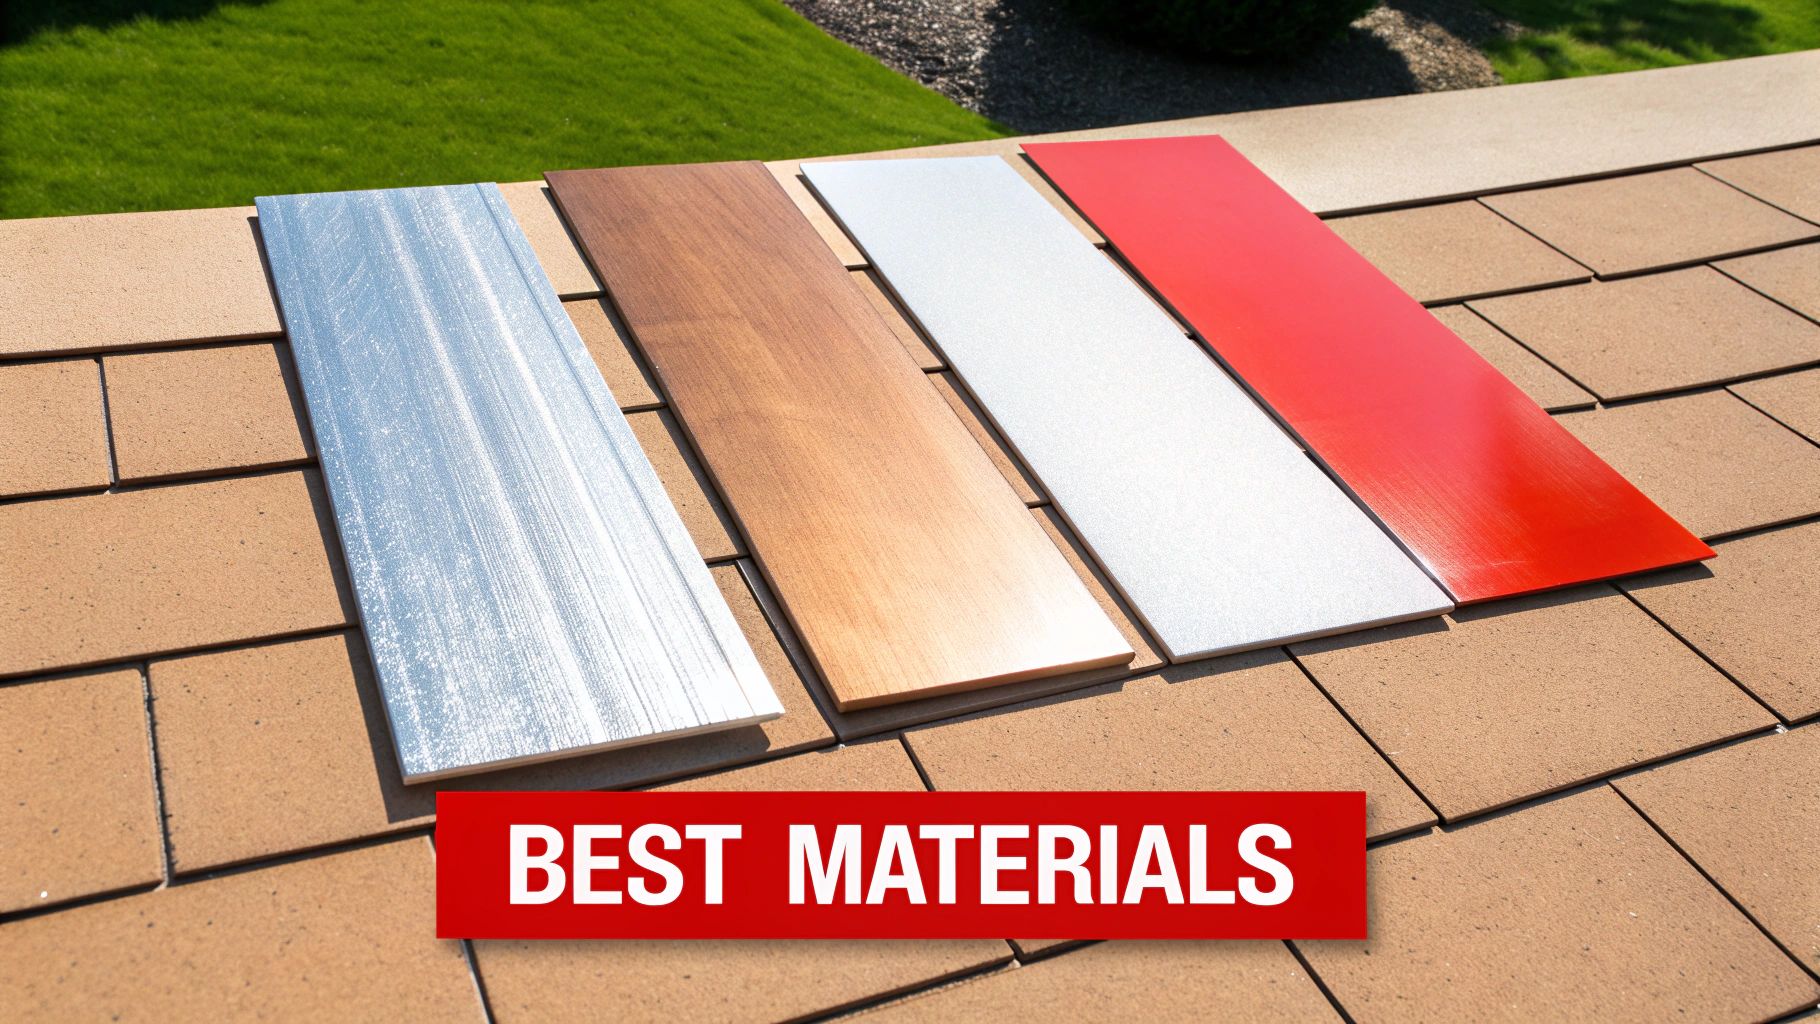
Each option brings its own strengths and weaknesses to the table. Let's walk through the most common materials to see how they perform against our desert's unique challenges.
Aluminum: The Lightweight Champion
There's a reason you see aluminum drip edges everywhere in Arizona. It’s a popular pick for residential projects, hitting a sweet spot of performance and price. Aluminum is naturally rust-proof, so you don’t have to worry about ugly streaks running down your fascia. It’s also available in a ton of factory-painted colors, making it simple to find a perfect match for your home's trim.
The one thing to watch out for is its weight. Because it’s so light, thinner gauges of aluminum can dent from a stray hailstone or a misplaced ladder. That's why it's so important to go with a professional-grade thickness to make sure it holds up.
Galvanized Steel: The Durable Workhorse
If you’re looking for something tougher, galvanized steel is your go-to. It’s essentially a steel core dipped in a protective zinc coating, which creates a rugged barrier against corrosion.
Galvanized steel is incredibly rigid. This strength makes it a fantastic choice for homes that get hammered by powerful monsoon winds, as it won't easily bend or get damaged.
The only catch? If that zinc coating gets deeply scratched, the steel underneath can be exposed to moisture and eventually rust. This is a key reason why many homeowners explore the benefits and drawbacks of metal roofing materials to understand long-term performance. A quality installation is everything when it comes to keeping that protective layer intact.
Copper: The Premium Choice
Copper is in a league of its own. It's stunning, unbelievably durable, and will never rust. Over the years, it develops that classic, beautiful blue-green patina that adds so much character to historic and high-end homes. When it comes to pure performance, nothing beats copper—it can easily last for 100 years or more.
Of course, that level of quality comes with a price tag to match. Copper is hands-down the most expensive material, often costing several times what you'd pay for aluminum or steel. It also takes a skilled hand to install correctly, requiring special techniques like soldering. It’s a true investment, but for the right home, the result is absolutely timeless.
Drip Edge Material Comparison for Arizona Homes
Choosing the right material involves weighing cost, durability, and how well it stands up to our intense sun and weather. This table breaks down the most common options to help you decide what's best for your home.
| Material | Average Cost (Per Linear Foot) | Durability & Lifespan | Corrosion Resistance | Best For |
|---|---|---|---|---|
| Aluminum | $1.50 – $3.00 | Good (20-30 years) | Excellent | Most residential homes seeking a cost-effective, rust-proof option with many color choices. |
| Galvanized Steel | $2.00 – $4.00 | Excellent (30-50 years) | Good (if coating is intact) | Homes needing extra strength against high winds, hail, and physical impacts. |
| Copper | $8.00 – $15.00+ | Exceptional (100+ years) | Exceptional | High-end custom homes, historic restorations, or anyone wanting a premium, long-lasting aesthetic. |
Ultimately, the best material depends on your specific needs. Aluminum offers fantastic value for most homeowners, while steel provides an upgrade in toughness. For those with the budget, copper delivers unmatched beauty and a lifespan that can't be beaten.
Proper Installation and Local Building Code Rules
Picking the right drip edge is a great start, but it's only half the job. How and where that flashing gets installed is what really determines whether it will protect your home and pass a building inspection. Here in Arizona, proper installation isn’t just a best practice—it's the law.
The secret to a watertight seal is all in the sequence. Think about how roof shingles are layered: each one overlaps the one below it to direct water downwards. The same principle applies to your drip edge and the roofing underlayment (that's the layer of tar paper or synthetic wrap beneath the shingles).
Eaves vs. Rakes: A Critical Difference in Sequencing
Your roof has two distinct types of edges, and getting the installation order right for each one is absolutely crucial.
-
Along the Eaves (Bottom Edges): The drip edge goes on first, right onto the bare wood of the roof deck. After that, the underlayment is rolled out over the top flange of the drip edge. This creates a perfect, uninterrupted path for water to flow off the underlayment, onto the metal, and straight into the gutter.
-
Along the Rakes (Sloped Sides): Here, you do the exact opposite. The underlayment goes down first, and then the drip edge is installed on top of it. This layering prevents strong, sideways rain from getting blown underneath the underlayment along the angled sides of your roof.
Mix up this sequence, and you could accidentally channel water into your roof structure instead of away from it. That's a recipe for the very rot and damage you were trying to avoid in the first place.
According to the International Residential Code (IRC), specifically Section R905.2.8.5, a drip edge is required at all eaves and gables on shingle roofs. This isn't just a friendly suggestion—it's a hard-and-fast rule for most new roof and re-roofing projects across Arizona.
Arizona Building Codes: A Non-Negotiable Requirement
I often get asked if a drip edge is really necessary. Local building authorities have already answered that question for us with a firm "yes." Cities and towns all over the state, from Phoenix to Flagstaff, have adopted IRC standards, which makes installing a drip edge a legal requirement.
This means any reputable, licensed contractor handling roof installations in Arizona will include a drip edge as a standard part of their work. It’s not an upsell. It ensures your roof is built to last and is fully compliant with the codes, which is vital for passing home inspections, securing insurance, and maintaining your home’s value.
At the end of the day, a proper roof is a system where every piece works together. While the drip edge is key, don't forget about the other seals on your home's exterior. For instance, knowing how to handle caulking large gaps is another important skill for keeping your entire home envelope watertight.
How to Spot a Failing Drip Edge and When to Replace It
Your drip edge works tirelessly behind the scenes, but it's not invincible. Here in Arizona, the combination of intense sun, powerful monsoon winds, and drastic temperature swings eventually takes its toll.
Knowing how to spot the early signs of failure is key to stopping a small issue from becoming a major, expensive repair. Think of it as a regular health check for one of your roof’s most important defenders.
The easiest thing you can do is keep your gutters clean. That’s your first line of defense, and it’s a big one. When gutters get clogged with leaves and desert debris, water has nowhere to go. It backs up and sits right against the drip edge and fascia, which speeds up corrosion and invites wood rot. A quick cleaning each season keeps water flowing freely where it's supposed to go—away from your house.
Key Warning Signs of Drip Edge Failure
Even with perfect maintenance, every part of a roof has a lifespan. The good news is you don’t have to be a roofer to spot trouble. Just keep an eye out for these clear visual cues that your drip edge is compromised.
- Visible Rust or Corrosion: This is the most obvious red flag for galvanized steel. Rust means the protective zinc coating is gone, leaving the raw steel exposed. On aluminum, you'll see a white, chalky-looking oxidation instead.
- Bending, Denting, or Detachment: Monsoon winds are strong enough to bend, dent, or even pull the drip edge away from the fascia. Any gap, no matter how small, is an open door for water and pests.
- Water Stains on the Fascia: See those dark streaks or discolored patches on the wood right below the roofline? That’s a classic sign that water is sneaking behind the drip edge instead of being properly channeled into the gutters.
These symptoms are often just the tip of the iceberg. It's smart to understand the top warning signs of roof damage you can't afford to miss to get the full picture of your roof's health.
A failing drip edge is never just a cosmetic flaw. It's a direct threat to the structural integrity of your roof deck and fascia. Ignoring these signs gives moisture a free pass to rot the underlying wood, leading to repairs that are far more complex and costly than just replacing the flashing itself.
When to Schedule a Replacement
So, when does a small sign of trouble justify a replacement? The short answer is almost always "sooner rather than later."
If you catch a few isolated rust spots on a drip edge that's otherwise solid, you might get away with cleaning and sealing them as a temporary fix. But if you see widespread corrosion, noticeable gaps, or any signs of water damage on the fascia, it’s time to call in a professional for a replacement.
Ideally, the best time to replace a drip edge is during a full roof replacement. This ensures every component of the system is integrated perfectly for maximum, long-term protection. Catching it early always saves money and protects your home.
Frequently Asked Questions About Drip Edge Types
Is a Drip Edge Really Necessary for My Roof?
Yes, a drip edge is a critical component of a modern roofing system and is required by most building codes for new and replacement roofs. It protects the underlying wood of your roof deck and fascia from water damage, prevents rot, and blocks pests from entering the gap between the roof and fascia. In climates with heavy or wind-driven rain, its role is even more crucial.
What Is the Best Type of Drip Edge to Use?
The best type depends on your specific roof and climate.
- Type D (Hemmed/T-Style) is often recommended by roofers as the best all-around option because its extended flange offers superior protection against wind-driven rain.
- Type C (L-Shape) is a standard, cost-effective choice for many homes.
- Type F (Fascia Wrap) is best for rake edges or for retrofitting over existing shingles and fascia boards.
Can I Add a Drip Edge to an Existing Roof?
While it is technically possible, adding a drip edge to an existing roof is a complex and risky task. It requires carefully lifting the edge shingles, which can be brittle and may crack or break, potentially causing leaks. For this reason, it is almost always recommended to install a new drip edge during a complete roof replacement to ensure it is integrated properly with the underlayment and shingles.
How Much Does Drip Edge Installation Cost?
The cost of the drip edge itself is relatively low, typically ranging from $1.50 to $4.00 per linear foot for common materials like aluminum or galvanized steel. However, the cost is almost always bundled into the total price of a full roof installation. When included as part of a larger roofing project, it represents a very small fraction of the overall cost but provides a massive return on investment by preventing expensive water damage repairs down the line.

