
A homeowner in Phoenix, Mesa, or Tucson may notice a long ceiling crack after a hot summer, a faint sag near an exterior wall, or a stain that reappears after a monsoon storm. The first reaction is often to blame drywall. That's reasonable because many cracks are cosmetic. But the ceiling finish can also reveal movement, moisture, termites, or stress in the framing above it.
A ceiling support beam isn't just a piece of wood hidden behind drywall. It's part of the load path that carries weight toward the foundation. Arizona's heat, seasonal humidity swings, roof leaks, dry rot, and termite activity make that path worth understanding before a homeowner patches, cuts, or removes anything overhead.
Table of Contents
- A Crack in the Ceiling and What It Really Means
- What Ceiling Support Beams Actually Are
- Comparing the Main Beam Types Used in Homes
- Joists, Rafter Ties, and Ridge Beams Explained
- How to Spot Damage Before It Gets Worse
- Arizona-Specific Risks You Should Not Ignore
- Repair Options, Costs, and Permit Basics
- When to Call a Pro and What Happens Next
A Crack in the Ceiling and What It Really Means
A homeowner steps into the living room and sees a line running across the ceiling. It follows a drywall seam, looks narrow, and hasn't changed since the last coat of paint. In that situation, the crack may be a finish problem caused by normal movement, poor taping, or minor seasonal changes.
A different picture deserves more attention. The ceiling has a visible bow, the gap between the ceiling and wall is growing, or a water stain returns after every summer storm. Those signs can indicate that moisture or framing movement is affecting the structure above the drywall. The visible finish may be the first place stress becomes easy to see, even though the cause sits in the attic, roof framing, or support points.
Practical rule: A crack deserves closer inspection when it appears with sagging, recurring moisture, separated joints, or changes in nearby doors and walls.
Three questions help sort a cosmetic concern from a structural warning:
- Is it a hairline crack? A narrow crack that stays stable and follows a drywall joint often has a different cause from a widening diagonal crack or one paired with sagging.
- Is the ceiling bowing? A long, visible “smile” along the underside of a beam line suggests deflection or movement that shouldn't be covered with joint compound before inspection.
- Was there recent water or monsoon damage? Roof penetrations, evaporative coolers, plumbing vents, and attic leaks can wet framing and weaken connections over time.
The right response isn't panic, and it isn't blind patching. A homeowner should document the location, photograph the crack with the date, and look for related signs in the attic or roof above. The next questions involve what the member does and whether it carries a real load.
What Ceiling Support Beams Actually Are
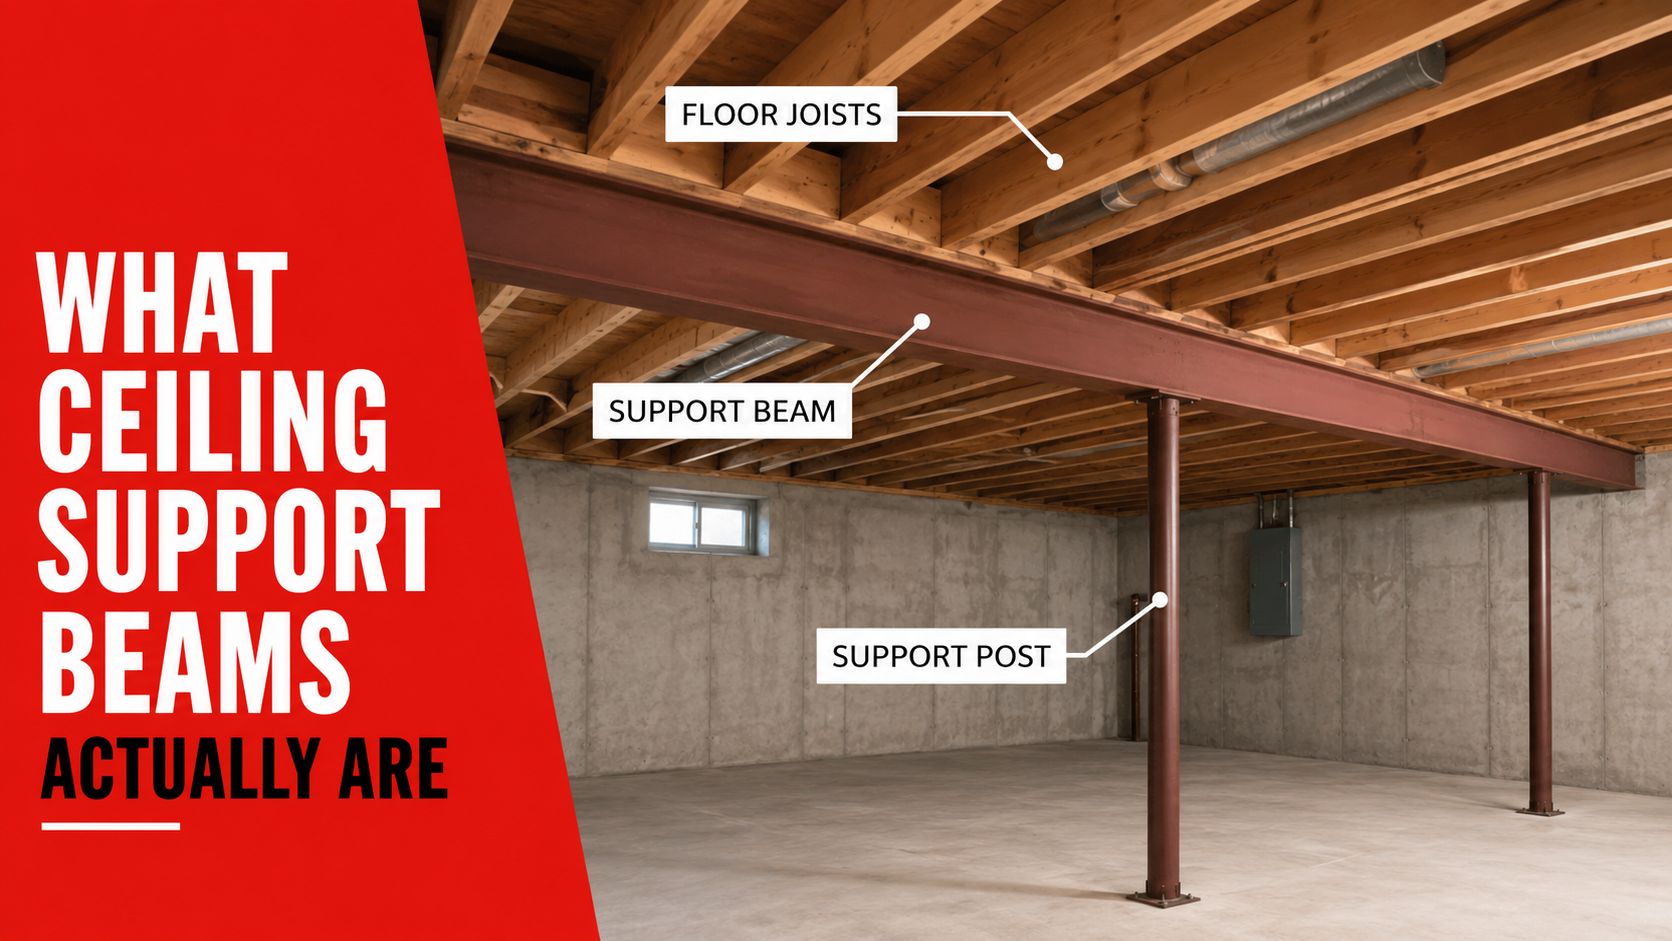
A ceiling support beam is a horizontal structural member that carries weight from the roof, an upper floor, or the ceiling assembly to walls, posts, and eventually the foundation. It works like a bridge girder. The beam crosses the opening, while its supports transfer the load into the ground. In an Arizona house, that load path matters even when drywall hides every part of it.
Start with span, the distance between supports. Structural guidance may measure span from centerline to centerline or between adjacent bearing points, depending on the table or design method. As the span gets longer, bending and movement usually increase. A beam that performs well across a short room may sag over a great room. Building guidance on span and deflection explains how support distance relates to allowable movement.
Deflection is sag under load. A beam may remain strong enough not to break while still moving enough to crack drywall, bind doors, or leave the ceiling uneven. A commonly used limit is L/360. For example, a 15-foot span allows about 0.5 inches of deflection under that criterion. That small amount can become visible when rigid finishes are attached below the framing.
Tributary load in plain language
Tribary load is the portion of roof or floor area assigned to a beam. If the beam supports a strip of ceiling six feet wide, it receives the weight from that strip along its length. UMass Amherst gives an example in which a 6-foot tributary width, 20 psf ceiling live load, and 10 psf ceiling dead load produce 120 plf live load plus 60 plf dead load, or 180 plf total before self-weight and other permanent loads. The UMass beam-load guidance shows why sizing depends on the supported area, not just the beam's visible dimensions.
Arizona conditions add another reason to understand the load path. Repeated heat expansion, monsoon humidity swings, termites, and dry rot can affect wood, connections, or bearing points. Seismic and snow-load rules that dominate many national guides are less central here, but local roof loads and framing condition still matter.
Drywall conceals these members in many homes. A remodel may expose one after a wall is removed or a ceiling is vaulted. Decorative box beams can look structural while carrying no load. Material, span, bearing, and the connected framing determine a member's job, not its appearance.
Comparing the Main Beam Types Used in Homes
Arizona homes use several beam families, and each solves a different framing problem. Older Phoenix and Tucson houses commonly rely on solid-sawn lumber and conventional joists. Open-plan remodels often turn to engineered lumber when a wall must be removed and a longer clear opening is needed. Steel appears where the design requires a high-capacity member, compact depth, or a different fire-performance strategy.
The comparison below uses qualitative span and cost descriptions because actual sizing and pricing depend on the opening, load, access, finish work, permits, engineering, and support conditions. A beam's material doesn't decide the project by itself. The supports at each end matter just as much.
Beam Types Compared for Arizona Homes
| Beam Type | Typical Span | Cost per Linear Foot (Installed) | Best Fit in Arizona Homes |
|---|---|---|---|
| Solid wood joists | Short to moderate residential spans | Lower for straightforward replacement | Older Phoenix and Tucson framing, conventional ceiling support |
| LVL or glulam | Moderate to longer clear spans | Moderate to high, depending on size and access | Great rooms, wall removals, flush beams, and remodels |
| Steel I-beam | Long or heavily loaded spans | Higher when lifting, columns, and finishes are involved | Custom homes, concentrated loads, and projects needing a compact or robust member |
Solid wood is familiar and easy to modify when the original framing remains in good condition. Its vulnerabilities include termites, moisture, checking, twisting, and natural variation between pieces. Heat and moisture movement can make loose connections more obvious, especially where an attic has poor ventilation or a roof leak has wet the framing.
LVL and glulam are engineered wood products made for predictable structural performance. They're often selected over a great room because they can provide a longer clear opening than ordinary joists while remaining easier to handle than steel. Their performance still depends on correct bearing, fastening, restraint, and protection from water.
Steel I-beams can carry substantial loads, but they're heavy and may require lifting equipment, larger posts, or carefully designed connections. Arizona's generally light roof loading compared with mountain states can keep many residential spans within conventional wood or engineered-lumber solutions. However, longer steel and roof framing spans can still become economical in the 25 to 40 ft range, about 8 to 12 m, according to code-based span guidance.
A homeowner shouldn't choose a beam by material preference alone. The decisive questions are span, tributary load, deflection, bearing, connection details, and whether the wall or footing below can accept the reaction.
Joists, Rafter Ties, and Ridge Beams Explained
Homeowners often call any exposed horizontal member a ceiling beam, but three different framing elements may be involved. They don't carry the same load, and removing one can produce a completely different result from removing another.
Ceiling joists usually run across the room and support the ceiling finish. In roof framing, they can also help resist the outward thrust that rafters create at the eaves. If a remodel removes them without replacing their structural function, the roof system may push outward or lose support.
Rafter ties connect opposing rafters, generally in the lower portion of the roof triangle. Their job is to control spreading at the eaves. They aren't automatically interchangeable with ceiling joists, and their connection and bearing conditions must be checked before alteration.
Ridge beams run along the roof peak. Unlike a nonstructural ridge board, a true ridge beam carries roof loads downward to end supports, posts, or other designed bearing points. That distinction is especially important when a homeowner wants a vaulted ceiling. An open ceiling may need a properly sized engineered-wood or steel ridge beam, but the member must transfer its reactions to supports that continue down through the structure.
A practical identification rule
If a member sits at ceiling height and runs across the room, it's likely a joist or tie, not a ridge beam. That rule helps with orientation, but it doesn't make cutting safe. A structural professional must verify the load path before anyone notches, drills, removes, or relocates a member.
The same caution applies to hardware. Connections need appropriate hangers, fasteners, bearing, and restraint. A homeowner researching how to choose joist hangers can learn why hardware selection matters, but a deck-hanger guide can't replace a project-specific structural design.
Roof framing has several interacting parts, from coverings and underlayment to rafters, trusses, valleys, and ridges. A visual overview of the sections of a roof can help a homeowner orient an attic inspection, but it shouldn't be used to approve a structural change.
How to Spot Damage Before It Gets Worse
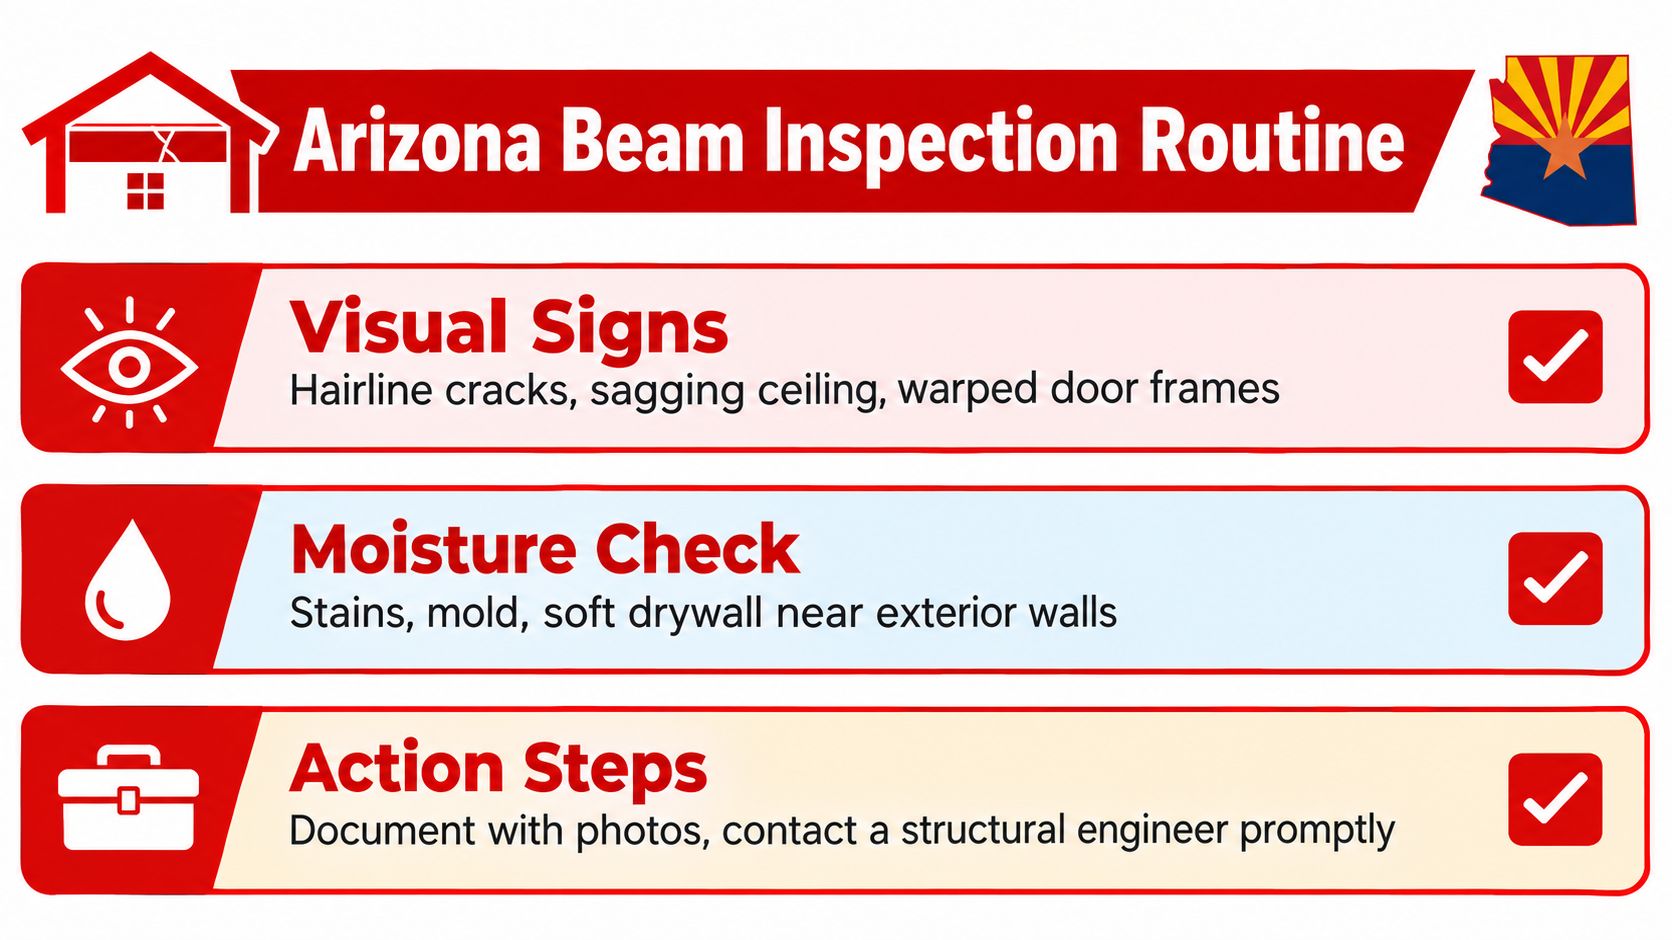
A homeowner can perform a useful visual check without climbing onto a fragile ceiling or disturbing insulation. The purpose is to document symptoms and identify when professional evaluation is needed, not to diagnose beam capacity from below.
Start in the room where the change appeared. Stand at one end and use a flashlight held at a shallow angle across the ceiling. Raking light highlights cracks, nail pops, uneven drywall, and a sag that ordinary overhead lighting can hide. Sight along the beam line from eye level, then compare the opposite side of the room.
Room-by-room checks
- Look for movement: Check hairline cracks at drywall seams, separation where the ceiling meets the wall, and a noticeable bow or “smile” under a beam.
- Trace moisture: Note stains that return after repainting, soft drywall, musty odors, or damage near exterior walls, roof penetrations, evaporative coolers, and plumbing vents.
- Inspect connections safely: From an accessible attic location, use binoculars to examine beam ends, joist hangers, posts, and bearing points without pulling apart framing.
- Check wood condition: Press only accessible, unfinished wood gently. Punky or hollow-sounding areas can indicate deterioration.
- Watch for termites: Fine sawdust below small exit holes can signal drywood termite activity. Surface appearance alone doesn't prove that the interior is sound.
- Measure moisture carefully: A moisture-meter reading above 15 percent is a red flag, so that result should prompt further evaluation rather than immediate cosmetic repair.

Photographs turn a vague concern into a useful record. A homeowner should photograph the full room, the close-up, and a nearby fixed feature for orientation, then write down the date and whether the crack or stain changes after weather. For roof-related symptoms, the signs of roof leaks provide a useful checklist for connecting ceiling evidence with conditions above.
Safety boundary: A homeowner shouldn't cut drywall, remove a rafter tie, or crawl across attic framing to investigate a suspected structural problem.
Arizona-Specific Risks You Should Not Ignore
Arizona's climate changes the way ceiling framing ages. Intense summer heat dries wood and can open small gaps at joints, while monsoon humidity temporarily changes moisture conditions in attics and roof assemblies. Steel and engineered lumber may behave more predictably in some applications, but neither material can compensate for a leaking roof, inadequate bearing, or poor connections.
Termites deserve special attention in Phoenix, Tucson, and Flagstaff. Subterranean and drywood termites can damage wood internally, leaving a surface that appears intact. Dry rot creates a different problem. It typically follows persistent wetting from roof leaks, evaporative coolers, plumbing, condensation, or poorly detailed exterior penetrations. The repair must address the water source before the damaged member receives new finishes.
Arizona Climate Stressors vs. Beam Vulnerability
| Climate Stressor | Most Affected Beam | Typical Damage |
|---|---|---|
| Extreme attic heat | Solid wood joists and connections | Shrinkage, opened joints, checking, and loosened fasteners |
| Monsoon humidity swings | Wood joists, ties, and bearing points | Temporary swelling, later shrinkage, cracks, and movement |
| Termite activity | Wood beams, joists, and posts | Hollowed sections, weakened bearing, and hidden loss |
| Roof or equipment moisture | Any wood member near the leak | Staining, soft fibers, fungal decay, and connection damage |
| High-snow mountain conditions | Roof-supporting beams and rafters | Increased roof load requiring location-specific design |
National beam guides often emphasize snow and seismic conditions that don't govern most low-desert homes. High-snow areas such as Flagstaff, Show Low, and the White Mountains require a different review, with ground snow loads of 20 to 30 psf identified in the supplied Arizona-specific guidance. Near the California border, minor seismic category D considerations may affect tie-down hardware more than beam sizing. Local code review still controls.
The broader point is simple. A beam that looks adequate in a dry inspection can have a serious weakness at its end, around a fastener group, or inside a termite-damaged section. Arizona's weather patterns make the surrounding roof and connection details as important as the member itself.
Repair Options, Costs, and Permit Basics
Repair begins with the load path, not with a shopping list. A contractor must determine whether the problem is isolated wood damage, inadequate original sizing, a changed roof or ceiling load, or a missing support beneath the beam. The visible crack may require drywall repair, but the structural remedy could involve framing, posts, footings, roofing, or moisture control.
Sistering adds a new member alongside a compromised joist. Matching lumber may work for limited damage, while an LVL can provide a more consistent reinforcement when the design calls for it. The new member must bear correctly at both ends and connect to the existing framing according to the design. Fastening a board beside a damaged joist without restoring bearing doesn't create a dependable load path.
An LVL retrofit can serve as a flush beam above the ceiling or a drop-down beam below it. This approach often suits an open-plan conversion where a wall is removed and a longer clear span is needed. A steel I-beam or flitch plate may be considered when termite loss, dry rot, concentrated loads, limited depth, or a major wall removal makes ordinary reinforcement unsuitable.
Ceiling Beam Repair Options and Typical Arizona Costs
| Repair Method | Best For | Typical Arizona Cost |
|---|---|---|
| Sistering a few joists | Localized sag, cracking, or limited member damage | $500 to $1,500 |
| LVL retrofit | Open-plan conversion or increased span capacity | $1,500 to $4,000 |
| Steel beam with columns and posts | Severe damage, wall removal, or substantial reinforcement | $3,000 to $8,000 or more |
These are typical Arizona ranges, not guaranteed quotes. Access, drywall removal, temporary shoring, engineering, finish repairs, electrical relocation, roofing work, and footing conditions can change the total substantially.
Permits and engineering
A structural change usually requires review by the local jurisdiction, especially when a wall is removed, a beam is added, or loads are redirected to new posts. An Arizona-licensed structural engineer should size the member when the work changes the load path, involves uncertain framing, or addresses significant damage. The engineer may also specify bearing length, post size, connections, and footing requirements.
Routine maintenance, such as sealing a minor finish crack or repairing a confirmed nonstructural surface issue, may not require structural paperwork. The homeowner should verify the local requirement before work begins. Phoenix homeowners can review the building permit guidance for roofing and related work, then confirm the exact scope with the jurisdiction handling the project.
When to Call a Pro and What Happens Next
A professional inspection makes sense when the ceiling line is visibly sagging, the problem is changing, or the framing shows evidence of moisture or biological damage. A crack wider than a quarter inch that keeps growing deserves prompt attention, especially when it appears with a separated wall joint or a sticking door. Water staining that returns after monsoon storms is another reason to inspect the roof and framing together.
The same applies to sound and smell. Audible creaking when the attic heats up can indicate movement, although sound alone doesn't identify the cause. Termite evidence, fungal growth, soft wood, or a musty odor near a beam should be treated as a reason to stop cosmetic repairs and investigate the source.
What an inspection should cover
An Arizona Roofers inspection should include an attic walk-through when access is safe, a visual review of the ceiling and roof interface, and checks around beam ends and bearing points. Moisture indicators, staining patterns, roof penetrations, equipment locations, and visible connection details help establish whether water or movement is involved.
A written assessment should separate three possible outcomes:
- Repair: The existing member remains suitable after localized damage is removed and the cause is corrected.
- Reinforcement: Sister members, an LVL, a new post, or improved connections restore the intended capacity.
- Replacement: The member or its support has lost too much integrity for reinforcement to be reliable.
A careful contractor won't recommend a beam replacement solely because a homeowner sees a crack. The contractor should also say when no structural work is needed. If the proposed repair changes the load path, the contractor should identify when structural engineering and a permit are required before cutting, shoring, or installing new supports.
For homeowners in Phoenix, Scottsdale, Tucson, Mesa, Chandler, and surrounding Arizona communities, the next step is to document the symptoms and schedule an evaluation before the ceiling is closed up again. A prompt inspection can connect the visible finish problem with the roof, attic, framing, and support conditions that control the repair.
Arizona Roofers provides roof and attic inspections that can help identify moisture, framing concerns, and conditions affecting ceiling support beams. Homeowners can visit Arizona Roofers to request an inspection, or call (480) 531-6383 to discuss the ceiling symptoms and arrange the next step.