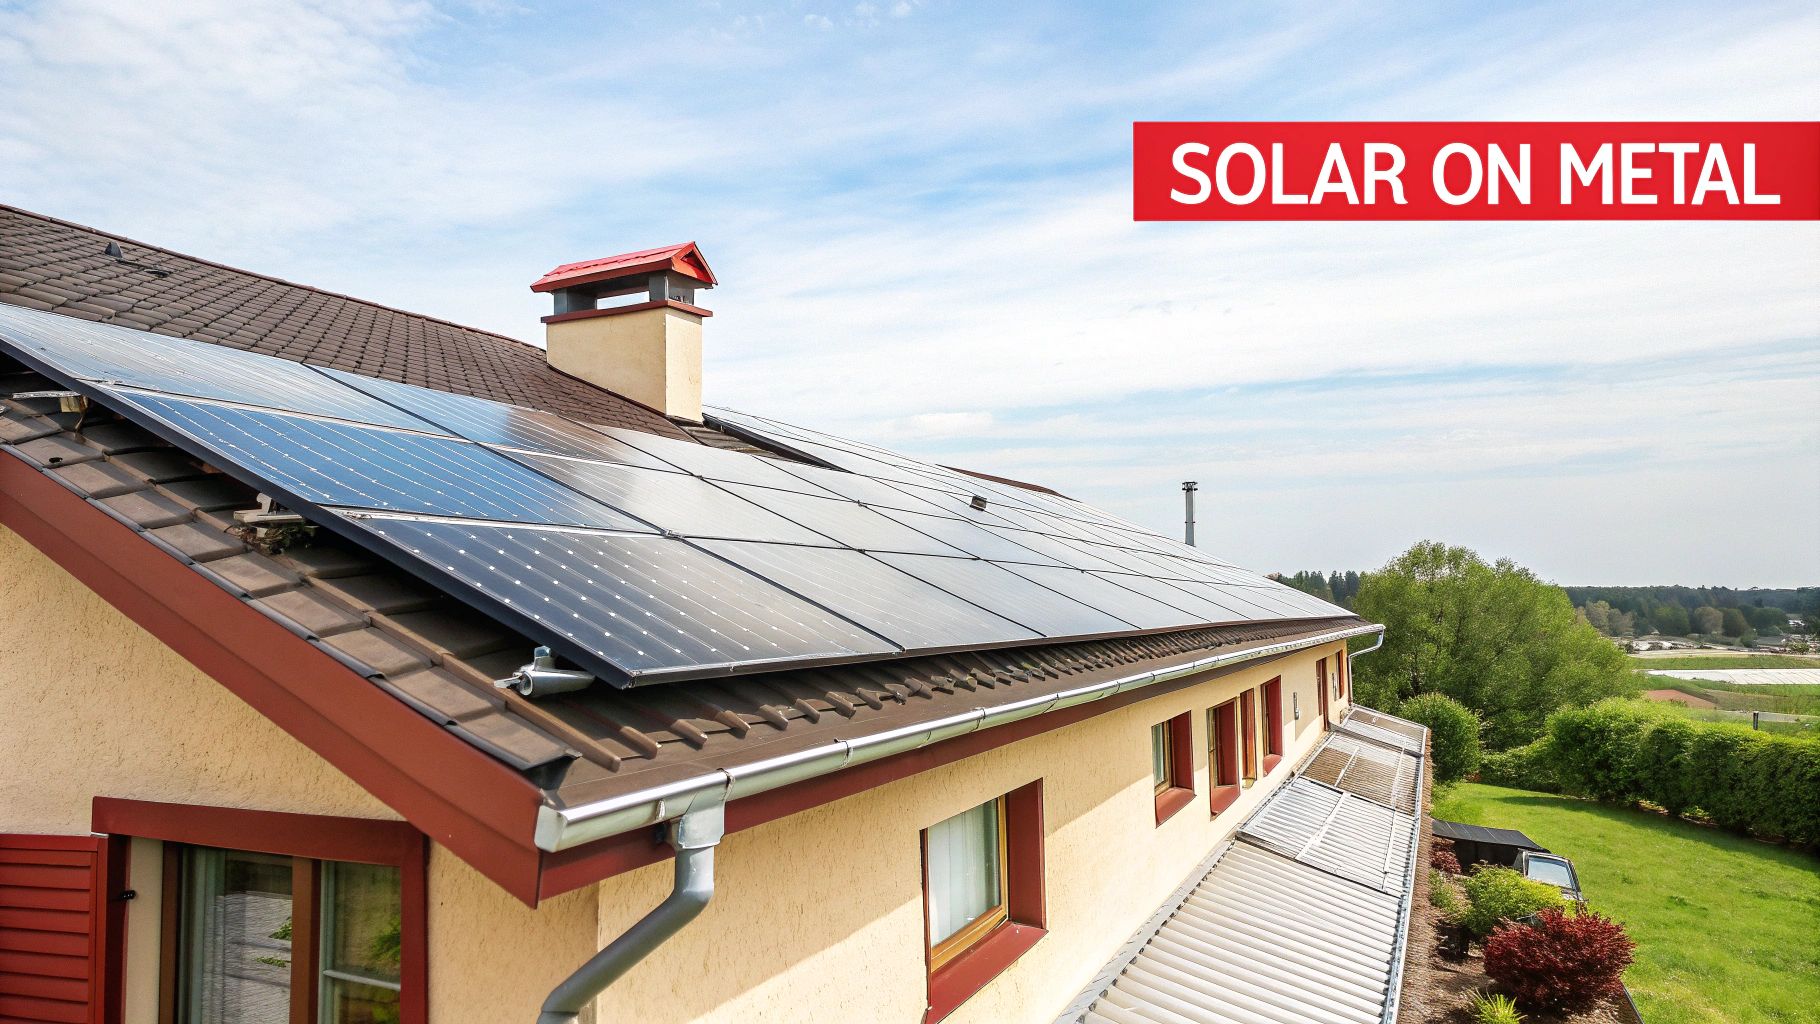
Mounting solar panels on a metal roof is a powerful combination for any homeowner looking to invest in renewable energy. The exceptional longevity of a metal roof, often lasting 40 to 70 years, perfectly complements the 25-plus-year lifespan of modern solar panels. This synergy means you can avoid the costly and disruptive process of removing your solar array to replace a worn-out roof down the line. For many homeowners, especially those with standing seam metal roofs, the installation process can even be done without drilling a single hole, preserving the roof's integrity and warranty.
This guide provides a comprehensive overview of everything you need to know about mounting solar panels on a metal roof, from choosing the right hardware to understanding the critical safety checks involved. We'll explore why this pairing is so effective, break down the installation process, and highlight common mistakes to ensure your solar investment is secure, efficient, and built to last.
Key Takeaways
- Perfect Lifespan Match: Metal roofs last 40-70 years, syncing up beautifully with the 25+ year lifespan of solar panels.
- No Holes Necessary: Standing seam roofs allow for clamp-on mounts, which is the best way to protect your roof's integrity and warranty.
- Incredibly Strong: Metal is more than robust enough to support the weight of a full solar array without any problems.
- Get a Pro's Opinion: Always have a structural engineer or a qualified roofer give your roof a full inspection before you sign on the dotted line.
Why Metal Roofs Are Ideal for Solar Energy
Putting solar panels on a metal roof isn't just a smart move; it’s one of the best long-term investments you can make, especially here in sunny Arizona. The durability is the real star of the show. While you can read all about the metal roofing benefits and drawbacks in our detailed guide, their incredible lifespan is what makes them a perfect partner for solar. You completely sidestep the headache of removing and reinstalling panels just to replace old asphalt shingles down the road.
Beyond just lasting a long time, metal roofs bring a few other key advantages to the table that make them a superior foundation for a solar energy system.
- Built to Last: Metal is naturally strong. It can easily handle the added weight of solar panels, which usually come in at around 3 to 5 pounds per square foot.
- Keeps Things Cool: Many metal roofs, especially the lighter-colored options, are considered "cool roofs." They reflect more sunlight and absorb less heat, which helps keep your attic and home cooler. This takes some of the load off your AC unit and can even give your panel efficiency a slight boost.
- Simple, Secure Mounting: If you have a standing seam metal roof, you're in luck. Installers can use non-penetrating clamps that attach right to the seams. This brilliant method means no drilling, no holes, and no worries about leaks or voiding your roof's warranty.
The market for this kind of setup is exploding for a reason. Valued at roughly $2.5 billion in 2025, the global market for metal roof solar mounting systems is expected to hit an estimated $8 billion by 2033. It’s clear proof that homeowners and installers recognize what a powerful combination this is.
Getting Your Roof Ready for Solar
Before anyone starts installing panels, you need to know exactly what kind of metal roof you have and what it can handle. This is where getting a professional opinion is non-negotiable. Reaching out for specialized metal roofing services can give you peace of mind, ensuring your roof is in prime condition for solar and identifying any potential issues ahead of time. A thorough assessment confirms your roof is ready to be a secure, long-lasting platform for your renewable energy investment.
Choosing the Right Mount for Your Metal Roof
Not all metal roofs are the same, and the mounting hardware you choose is the critical detail that separates a secure, lifelong solar investment from a costly disaster. The specific type of metal on your home—whether it's standing seam, corrugated, or R-panel—dictates the exact mounting system you need. Getting this match right is non-negotiable for a safe, leak-proof, and warranty-compliant solar installation.
It's no surprise that metal roofing has become so popular. In the United States alone, we've seen over 2 billion square feet of it installed annually for the past four decades. This isn't just a trend; it's a massive shift toward durable, sustainable materials that are practically made for solar. With a lifespan of up to 60 years and being 85% recyclable, metal roofs offer an incredibly solid platform for a solar array. You can discover more insights about these trends on pv-magazine.com.
This incredible longevity is precisely why choosing the correct mounting system is so vital—that hardware has to perform perfectly for decades.
Standing Seam Roofs: The Non-Penetrating Gold Standard
If you have a standing seam metal roof on your home, you've hit the solar jackpot. These roofs are defined by their prominent vertical ribs, or seams, that run from the ridge down to the eaves. This design is perfect for using non-penetrating clamps, which are widely considered the gold standard for mounting solar panels.
These specialized clamps attach directly to the standing seams with set screws, gripping the metal tightly without ever breaking the roof's surface. This method comes with two huge advantages:
- Zero Leak Risk: With no holes drilled into the roof deck, the risk of water intrusion is virtually eliminated. This is a massive relief, especially here in Arizona where monsoon storms can be intense.
- Warranty Protection: This non-penetrating approach keeps your metal roof's warranty fully intact, as the integrity of the material is never compromised.
Think of these clamps like a vice grip for your roof's seams. They lock onto the strongest part of the roof panel, creating a rock-solid anchor for the solar racking system without creating a single hole. It’s simply the safest and most reliable way to mount solar on a metal roof.
Corrugated and R-Panel Roofs: Securing with Precision
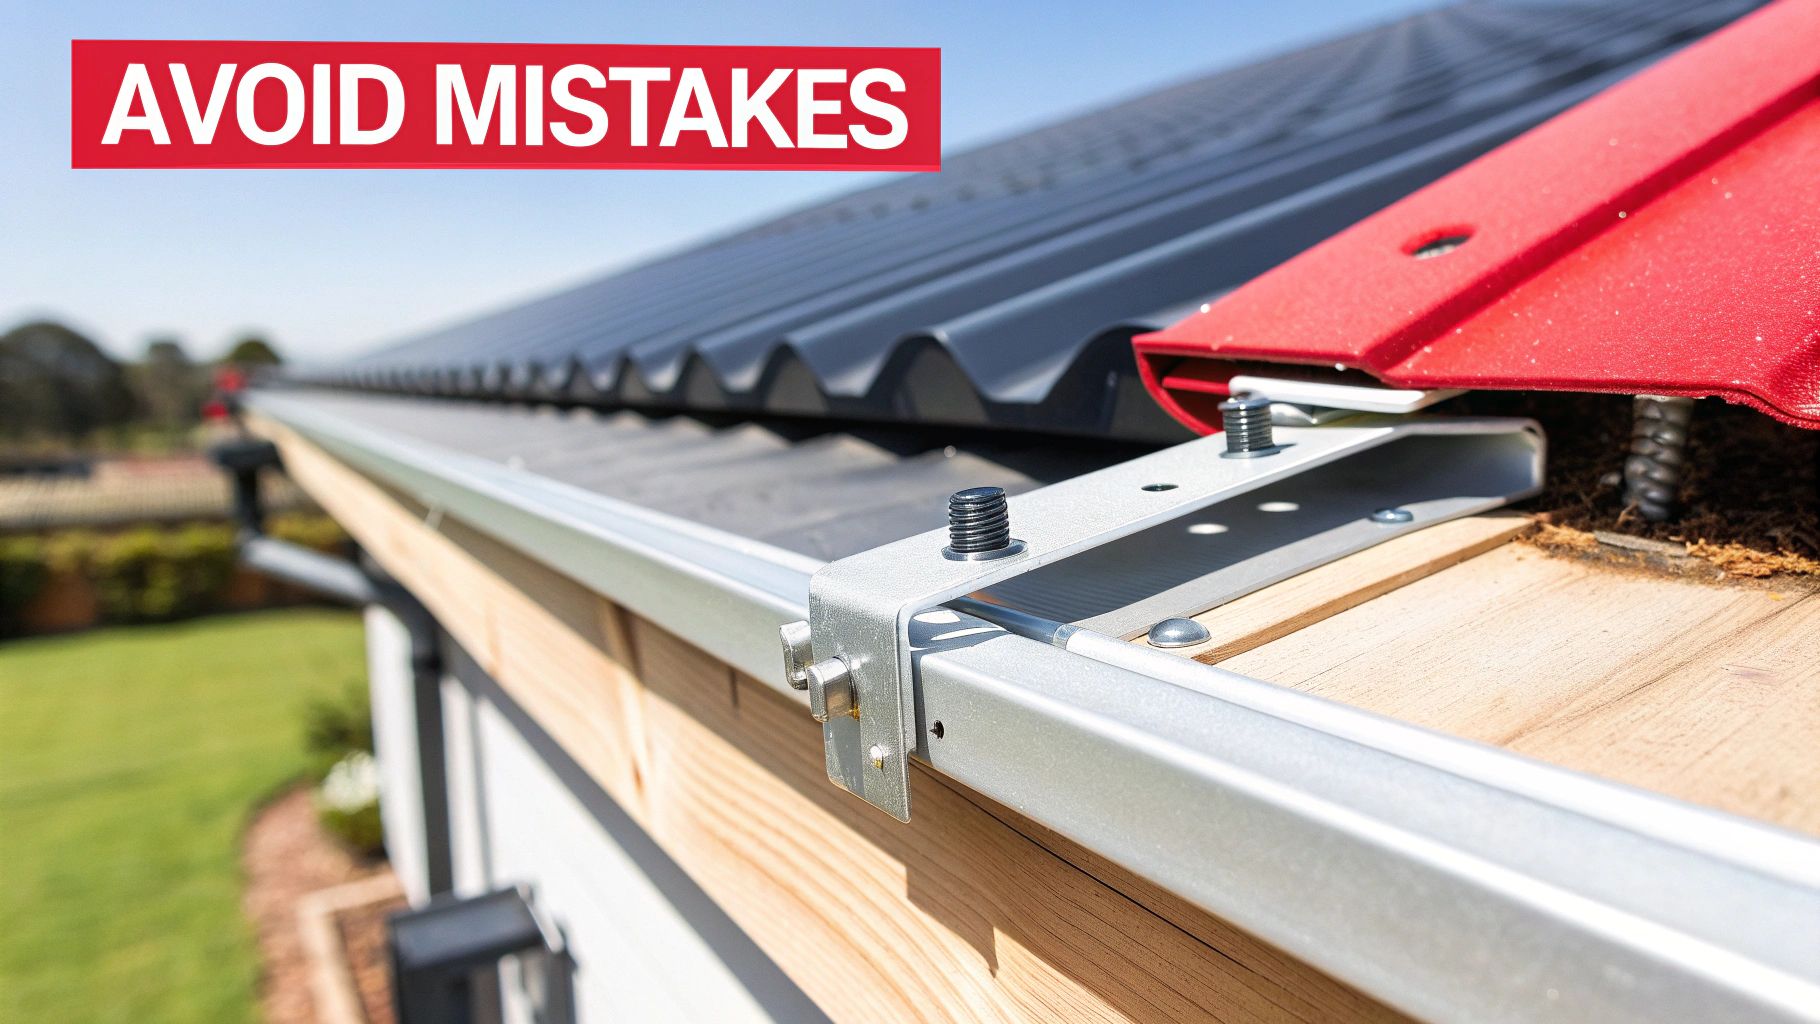
Corrugated and R-panel (sometimes called trapezoidal) roofs have a different profile, with repeating waves or flat-topped ribs. Unlike standing seam, these roofs require penetrating mounts. But when done right, the process is just as secure and waterproof.
For these roof types, installers use specialized brackets engineered to fit the specific profile of your roof panels. Crucially, these brackets are not attached in the low-lying "valleys" where water flows. Instead, they are mounted on the high points, or "ribs," of the panel. This simple detail is what dramatically minimizes the risk of leaks.
The installation for these penetrating mounts is meticulous. It's a proven formula for a waterproof seal.
First, a pilot hole is drilled through the high rib, going directly into the structural support below. Before the bracket is attached, a thick layer of high-grade butyl sealant is applied to its underside, creating a tough, gasket-like barrier. Finally, the bracket is secured with a structural screw, which compresses the butyl sealant to form a watertight, permanent seal.
Understanding the unique shapes of these roofs is vital. If you're curious, our guide on the different types of corrugated metal roofing can give you a better visual.
To make it even clearer, I've put together a quick comparison table to show how the hardware matches the roof type.
Matching Your Metal Roof to the Right Solar Mount
This table gives you a direct comparison of common metal roof profiles and the specific mounting hardware they require. I've also outlined the key benefits and critical installation tips for each to help you understand why the right match is so important.
| Metal Roof Type | Recommended Mounting System | Key Advantage | Installation Note |
|---|---|---|---|
| Standing Seam | Non-Penetrating Seam Clamps | No holes are drilled, which fully preserves the roof's warranty and eliminates leak risk. | Clamps must be torqued to the manufacturer's exact specifications to avoid damaging the seams. |
| Corrugated Metal | Penetrating Brackets | Brackets are engineered to match the roof's wavy profile for a secure fit. | Always mount on the high ribs and use a generous amount of high-quality butyl sealant. |
| R-Panel / Trapezoidal | Penetrating Brackets | Provides a strong connection to the roof's structural members through the panels. | The installer must use the correct bracket that matches the specific trapezoidal shape of your panels. |
As you can see, the details matter.
Ultimately, a mismatch between your roof profile and the mounting hardware can lead to all sorts of problems, from persistent leaks and structural damage to a voided manufacturer's warranty. This is exactly why a professional assessment isn't just a suggestion—it's an essential first step.
A Look at the Installation Process, From Start to Finish
It might seem like a complex job, but mounting solar panels on a metal roof is a methodical process. It all comes down to precision, safety, and building something that will last. From the initial inspection of your roof structure to setting the last panel, every step is crucial for a system that will perform reliably for decades.
This isn't just about bolting hardware to your roof. It's about carefully integrating a power-generating system into your home's most vital protective layer. Let's break down how the pros get it done, ensuring a secure and leak-proof result.
Starting With a Structural Assessment
Before a single tool comes out, the first order of business is always a thorough structural check. This is non-negotiable. We need to confirm that your roof’s framework can handle the added weight of a solar array, which typically adds 3 to 5 pounds per square foot.
A qualified professional—usually a structural engineer or a roofer with deep solar experience—will get up there and inspect your rafters, trusses, and sheathing. They’re looking for any red flags like wear, damage, or anything that seems undersized. Here in Arizona, that assessment also has to account for our intense monsoon storms and the potential for wind uplift. Skipping this check is a risk no reputable installer will ever take.
Mapping a Precise Panel Layout
Once your roof gets the green light, the next move is to design a detailed layout. Think of it as a technical blueprint that shows exactly where every panel, rail, and mounting point will go.
This plan is far from random. It's carefully optimized to capture maximum sunlight while steering clear of obstacles like vents, chimneys, or skylights. The layout also strategically distributes the system's weight across the roof's structural supports, so no single point is under too much stress. It’s a game of inches, where precision is everything for both energy production and safety.
The infographic below shows how the mounting strategy changes based on the type of metal roof you have.
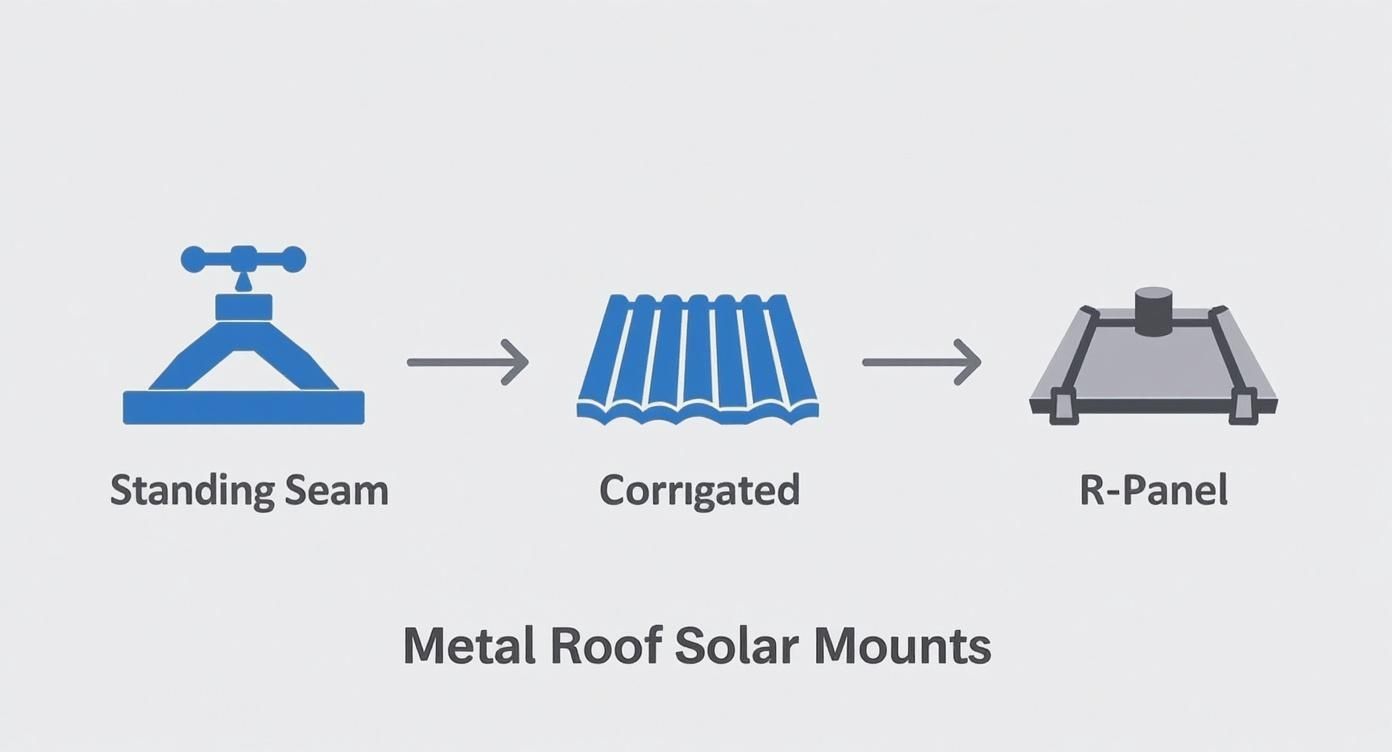
As you can see, the hardware is completely different: standing seam roofs use non-penetrating clamps, while corrugated and R-panel roofs require specialized brackets that are meticulously sealed.
Attaching the Mounting Hardware
With the blueprint in hand, it's time to install the mounting hardware. The method used is dictated entirely by your roof profile, and getting this right is the key to a successful installation.
- For Standing Seam Roofs: Installers use special non-penetrating clamps. These aluminum blocks are designed to grip the raised seams without drilling any holes. They're tightened with set screws using a torque wrench to hit the manufacturer's exact specifications—too loose and it's not secure, but too tight and you risk damaging the seam.
- For Corrugated or R-Panel Roofs: This approach requires penetrating brackets. Installers drill small pilot holes through the high point of the ribs, directly into the rafters or purlins beneath. Before the bracket is attached, a generous bead of high-grade butyl sealant is applied to its base. This creates a flexible, waterproof gasket when the lag bolt is driven home.
This sealing technique is what makes a penetrating mount completely watertight. When the fastener is tightened, the butyl sealant compresses to fill any microscopic voids, forming a durable barrier against moisture that will last the life of the system.
A great seal depends on more than just the sealant; it's part of a whole system. For those curious about what lies beneath, learning about the best underlayment for a metal roof can give you a better picture of how your entire roof assembly works together.
Installing the Racking System
With the mounts (clamps or brackets) locked in place, the racking system comes next. These are long aluminum rails that bolt directly to the mounts, creating a sturdy, level grid that will hold the solar panels.
The rails do two important things. First, they provide the structural backbone for the panels. Second, they elevate the panels a few inches off the roof deck, which allows for critical airflow. This air gap is essential for keeping the panels cool, which helps them run more efficiently, especially during our scorching Arizona summers. An installer will use a level to make sure the rails are perfectly aligned before moving on.
Securing the Solar Panels
The final piece of the construction puzzle is securing the panels to the rails. The panels are carefully lifted onto the racking and positioned according to the layout plan. Specialized mid-clamps and end-clamps are then used to fasten them securely to the rails.
These clamps are designed to grip the panel frames firmly without causing any stress or damage. And just like with the mounting hardware, a torque wrench is essential here to tighten every bolt to the exact spec. This guarantees a uniform, solid hold across the entire array that won't budge or rattle, even in high winds. Once all the panels are mounted, the physical installation is complete and ready for the electrical work to begin.
Key Structural and Electrical Checks
Before a single panel gets hoisted onto your roof, there's some critical homework to be done. A professional solar installation is built on a foundation of careful structural engineering and strict electrical safety. These aren't just boxes to tick—they're what guarantee your system is safe, compliant, and ready to perform for decades.
Can Your Roof Handle the Weight?
Mounting solar panels on a metal roof starts with a hard look at the structure itself. It's not just about the static weight of the panels and racking, which typically adds about 3 to 5 pounds per square foot. That's the easy part.
The real test is how your roof stands up to dynamic loads, especially the kind we see here in Arizona. We're talking about the intense wind uplift from our monsoon storms and, for homes in places like Flagstaff, the potential snow load. A structural engineer's assessment is the only way to be absolutely sure your roof trusses and support system can handle all these forces combined.
This isn't just a friendly suggestion; it's a non-negotiable step for a safe, code-compliant installation. The engineer will check out your roof's framework, age, and overall condition to give a definitive thumbs-up, ensuring the whole setup is solid for the next 25+ years.
"A structural check is the bedrock of any rooftop solar project. It confirms the roof can handle not only the weight of the panels but also the powerful uplift forces from high winds. Skipping this step is a gamble with your home's integrity."
This rigorous approach is becoming the standard worldwide. North America and Europe are way ahead in the metal roof solar mounting market, largely because they prioritize safety and have high adoption rates for durable metal roofing. In 2024 alone, the U.S. added about 40 gigawatts (GW) of new solar capacity, and rooftop projects like yours are a huge part of that number.
Getting the Electrical Safety Right
Once the roof structure gets the all-clear, our focus pivots to the electrical system. This is where precision is everything. A solar array is essentially a small power plant on your roof, and it demands that level of respect to prevent hazards and ensure it runs reliably for years.
Here's what goes into a safe electrical setup:
- Proper System Grounding: This is hands-down the most critical safety feature. Grounding creates a safe path for stray electrical current to go into the earth, which is vital for preventing shocks and protecting your gear during events like a lightning strike.
- Clean Wire Management: Wires can't just be left dangling. Every cable needs to be neatly tucked away under the panels and secured to the rails with UV-resistant clips. This simple step stops them from sagging, rubbing against the roof, or getting chewed on by critters.
- Bonding All Components: Every metal part of the system—from the panels and racking down to the mounts—has to be electrically bonded together. This creates one continuous electrical path, so if any component accidentally becomes energized, the current has a direct route to the ground instead of becoming a shock hazard.
Making sure every connection is safe and up to the National Electrical Code (NEC) standards is crucial. Using a detailed electrical rough-in inspection checklist can give you a good idea of the meticulous work involved. This is why having a licensed electrician involved from the get-go isn't just a good idea—it's an essential part of the process.
Common Installation Mistakes to Avoid
I've seen it happen more times than I can count. A homeowner invests in a great solar system, only to face leaks and headaches because of a few simple, avoidable installation mistakes. When you're working with metal roofing, precision is everything. A tiny shortcut or oversight can cause huge problems later on.
Learning from the mistakes of others is the best way to get your own project right from the start. Let's walk through the most common pitfalls I see in the field and how you can sidestep them for a secure, long-lasting solar array.
Over-Tightening Clamps and Fasteners
This is probably the most frequent—and damaging—mistake out there. It's tempting to just crank down on a fastener until it feels "tight enough," but that's a recipe for disaster on a metal roof. Whether you're securing set screws on a standing seam clamp or driving lag bolts for a bracket, a torque wrench isn't just a suggestion; it's mandatory.
Every piece of mounting hardware has a specific torque value, usually measured in foot-pounds or inch-pounds, straight from the manufacturer. Guessing can deform the metal seam, crush the roof panel's insulation, or strip the threads right out of the fastener. This not only creates a weak connection but also causes stress points that can lead to cracks and leaks over time.
Using the Wrong Sealant
When your installation involves penetrating the roof—like on a corrugated or R-panel system—your choice of sealant is absolutely critical. So many DIY projects go wrong right here. Grabbing a generic tube of silicone caulk from the local hardware store is a massive error. That stuff just isn't built to survive the intense UV exposure and wild temperature swings we get on an Arizona roof.
Pros stick to one thing: high-grade butyl sealant or tape. Butyl rubber is a non-curing, permanently flexible material that creates a bulletproof, watertight gasket. It bonds aggressively to metal and never dries out or cracks, even under our relentless sun. Honestly, using the wrong sealant is one of the top reasons I get called out to fix a leaking solar installation.
"The difference between a 30-year waterproof seal and a leak in two years often comes down to the sealant. Butyl is the industry standard for a reason—it remains pliable and creates a permanent bond that moves with the metal as it expands and contracts."
Ignoring Thermal Expansion
Metal roofs breathe. They expand in the blistering heat and contract when it cools down. Your solar racking system absolutely must be designed to move with it. A common oversight is installing long, continuous rails without accounting for this movement.
When the racking is too rigid, it puts incredible stress on the mounting points. Day after day, this constant push-and-pull loosens fasteners, warps the screw holes, and can even damage the roof panels themselves. A professional layout always accounts for thermal expansion. Here's how:
- Using slotted connections that give the racking system a little room to shift.
- Leaving small gaps between rail sections so they don't buckle under pressure.
- Following the manufacturer's specs for maximum continuous rail length.
Forgetting to plan for this natural process is a slow-motion failure. A properly installed system works with the roof's movement, ensuring it stays secure for decades.
Getting Your Project Off the Ground
You've done the homework and now you understand what it takes to successfully put solar on your metal roof. It all boils down to a few key things: picking the right hardware for your specific roof type, sticking to a careful installation plan, and never, ever cutting corners on safety.
Now, it's time to turn that knowledge into action. Moving from the research phase to having a system up and running on your roof is an exciting process, but it needs a clear plan. Let's walk through what you need to do next.
Creating Your Action Plan
Think of this as your roadmap from here to a finished, power-generating solar array.
-
Bring in the Pros First: Before you do anything else, you need two key experts. First, get a licensed structural engineer to look at your roof and confirm it can handle the extra weight. Then, have a certified solar installer do a full site assessment to check your home's solar potential.
-
Get Your Bids in a Row: Don't just go with the first company you talk to. I always tell homeowners to get detailed quotes from at least three different certified installers. This lets you really compare the nuts and bolts—the equipment they're proposing, the warranties they offer, and of course, the total cost.
-
Know the Local Rules: Every town and county here in Arizona plays by slightly different rules. While your installer will be the one pulling the permits, it’s a smart move to have a basic understanding of your local requirements and how long that process usually takes.
Taking these steps methodically is the single best way to protect your investment. It ensures your project is handled by professionals from the get-go, leading to a safe, reliable solar system that will perform for decades.
Frequently Asked Questions
Can I install solar panels on any type of metal roof?
Just about every metal roof is a great candidate, but how the panels are attached will differ. Standing seam roofs are the easiest, using those non-penetrating clamps. For corrugated or R-panel roofs, installers will use specialized brackets that require proper sealing. The most important first step is always a structural assessment to confirm your roof can handle the extra weight.
Will installing solar panels void my roof warranty?
It shouldn't, as long as it's done by a professional. Using non-penetrating clamps on standing seam roofs is the best way to keep the warranty intact since you aren't drilling any holes. For other types of metal roofs, the key is using professional-grade sealants and meticulously following the installation guidelines from both the roofing and the mounting system manufacturers.
How much weight do solar panels add to a metal roof?
A standard solar installation adds about 3 to 5 pounds per square foot. Most modern metal roofs are built to handle this without an issue. Still, it's a smart and necessary precaution to have a structural engineer verify your roof's specific load-bearing capacity.

