A single damaged shingle can seem like a minor issue, but it's a critical weak point in your home's first line of defense against the elements. Ignoring a cracked, curled, or missing shingle is an open invitation for water damage, leading to rotted roof decking, ruined insulation, and costly interior repairs. Fortunately, learning how to patch a roof shingle is one of the most manageable and cost-effective DIY projects a homeowner can tackle.
This guide will walk you through every step of the process, from safely assessing the damage to applying the final waterproof seal. With the right tools and a bit of patience, you can perform a professional-quality repair that protects your home and saves you money.
Key Takeaways
- Safety First: Always assess roof damage from the ground using binoculars first. When working on the roof, use a sturdy, properly angled ladder and wear non-slip boots.
- The Right Tools are Crucial: A flat pry bar, hammer, galvanized roofing nails, and asphalt-rated roofing cement are non-negotiable for a lasting repair.
- Technique Matters: The process involves carefully breaking the seal of the shingle above the damaged one, prying out the four nails, sliding out the old shingle, and securing the new one in its place.
- A Proper Seal is Everything: The final step of applying dabs of roofing cement under the shingle tabs is what makes the patch fully watertight and durable.
- Know Your Limits: While patching a single shingle is a great DIY task, widespread damage or soft spots on the roof deck are signs you need to call a professional.
Your Quick Guide to a Lasting Shingle Repair
Think of a cracked, curled, or missing shingle as an open door. It’s a direct invitation for water to sneak onto your roof deck. At first, it's just a drip. But over time, that drip can lead to rotted wood, soggy insulation, and those dreaded water stains on your ceiling. Learning how to properly patch a shingle is a core skill for any homeowner who wants to keep their house safe and dry.
This guide is your complete walkthrough, from start to finish. It’s designed to be a project checklist, giving you the confidence you need before you even set foot on the ladder. We'll cover all the essentials to make sure your patch is weatherproof and built to last.
Getting Ready For The Job
Before you start prying up shingles, let's get a clear picture of what this project involves. Knowing the full scope will make the actual work go much smoother.
Here's a quick look at what we'll cover:
- Safety Above All: We'll start with the non-negotiable safety rules for working on a roof.
- The Right Tools and Materials: I'll give you a detailed list of the gear you need to do this like a pro.
- A Step-by-Step Guide: I’ll break down exactly how to remove the old shingle and fit the new one perfectly.
- The Final Seal: You'll learn the right way to use roofing cement for a truly watertight finish.
When it comes to shingle repair, being proactive saves you a world of trouble. Fixing a small issue today is the best way to prevent a massive, expensive disaster down the road. You're not just fixing a shingle; you're protecting the entire roofing system.
This isn't some niche repair, either. Asphalt shingles are king in the U.S., covering an estimated 75% of homes. The good news is that patching a single shingle is incredibly affordable, typically costing between $100 and $300. That's a tiny price to pay to avoid thousands in potential water damage.
My goal here is to give you the practical knowledge to tackle this yourself. If you're looking for more general tips, these additional roof repair guides are a great resource to expand your know-how.
Your Essential Shingle Patching Toolkit
Having the right tools on hand before you climb up the ladder makes all the difference. It turns a frustrating job into a smooth, efficient repair. Here’s a checklist of what you'll need.
| Item | Purpose | Pro Tip |
|---|---|---|
| Replacement Shingles | The patch itself. | Try to get a pack of the same brand and color. Bring a piece of the old shingle to the store if you're unsure. |
| Flat Pry Bar | To gently lift shingles and pry out old nails. | Look for a thin, wide-bladed pry bar to avoid damaging the surrounding shingles. |
| Hammer or Nail Gun | To drive in the new roofing nails. | A standard hammer works fine. A roofing nailer is faster but not necessary for a small patch. |
| Utility Knife | For trimming or cutting shingles if needed. | A sharp blade is crucial for clean cuts. A hooked blade is even better for cutting asphalt shingles. |
| Roofing Nails | To secure the new shingle. | Use 1 1/4-inch galvanized roofing nails. They have a wide head designed to hold shingles down. |
| Roofing Cement/Sealant | To seal the shingle tabs and nail heads. | Comes in a caulk tube. Make sure it's rated for asphalt shingles and outdoor use. |
| Caulking Gun | To apply the roofing cement. | A standard gun will do the trick. |
| Safety Gear | Goggles, gloves, and non-slip boots. | Never skip safety. A fall from a roof is serious. |
Gathering everything on this list will ensure you're prepared for every step of the process.
Common Questions Answered
Can I use a different color shingle for a patch?
You can, but it's really not ideal for your home's curb appeal. The top priority is creating a watertight seal, so a mismatched shingle is always better than a leaky one. Do your best to find a close match.
How do I know if the damage is too big for a DIY patch?
If you spot a cluster of damaged shingles, feel any soft or spongy spots underfoot (a sign of rotted decking), or simply don't feel comfortable working at heights, that's your cue. It's time to put the tools down and call in a professional roofer.
Assess the Damage Safely from the Ground
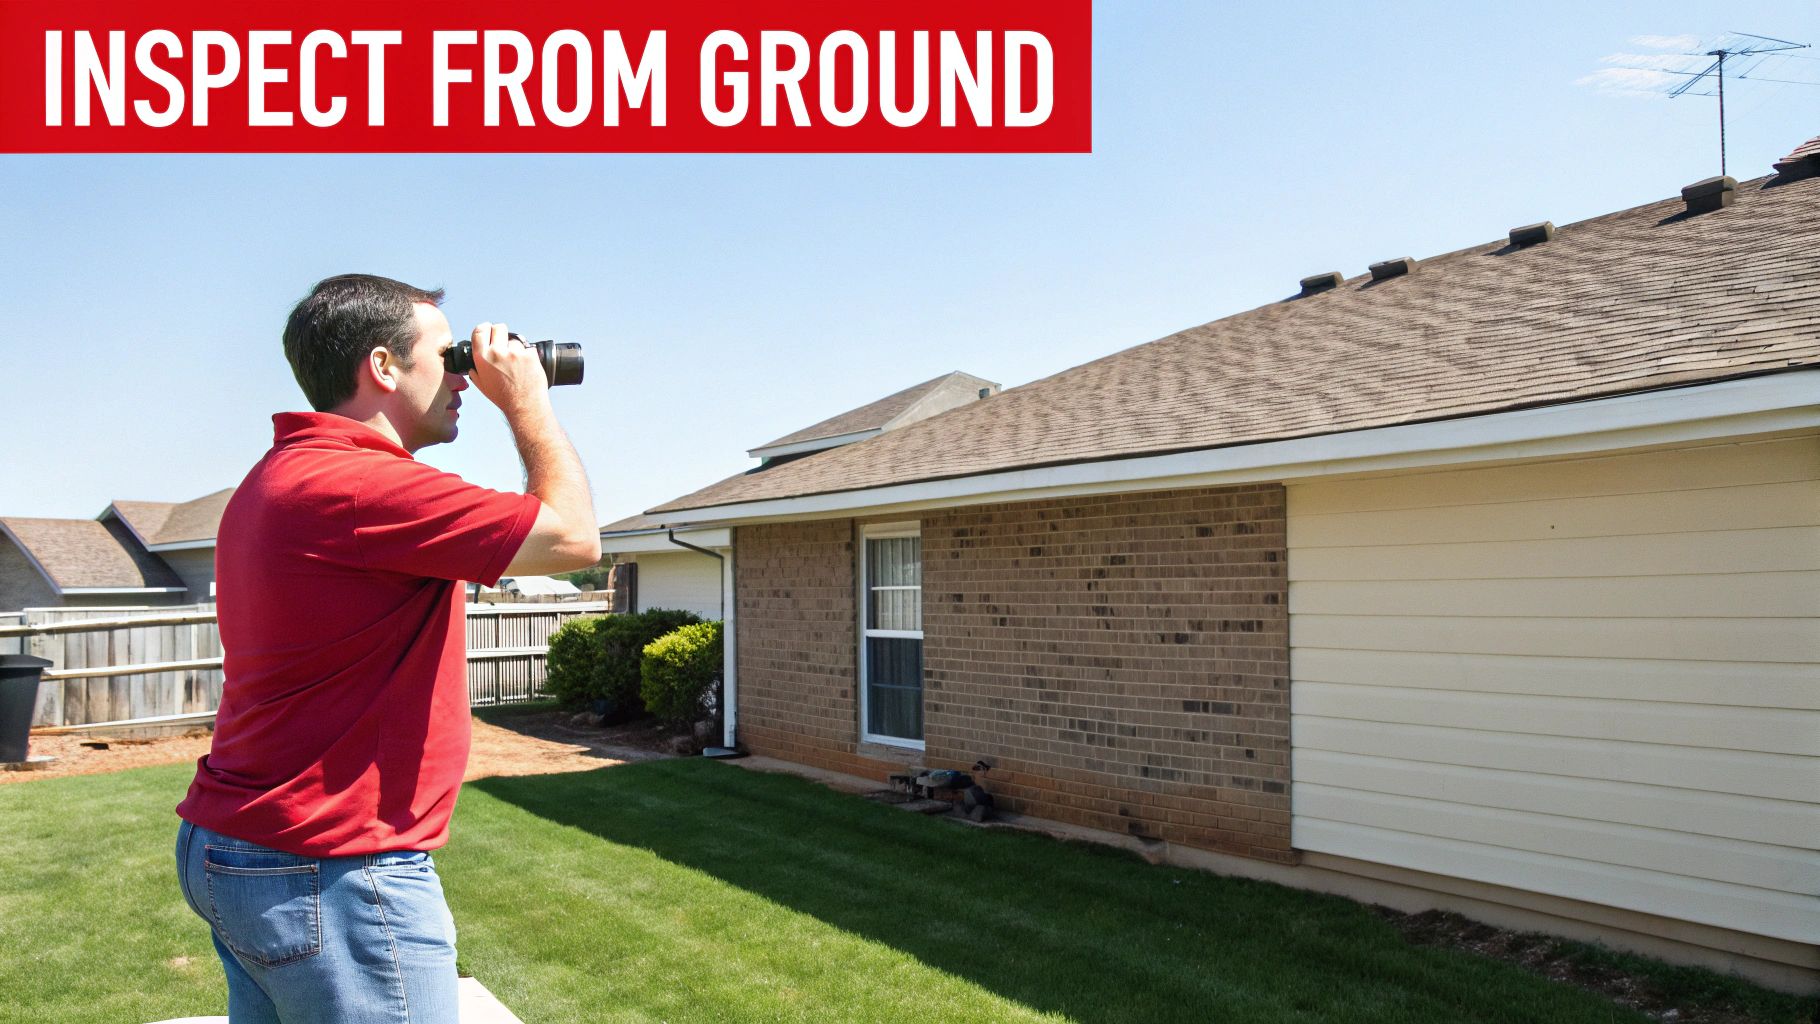
Before you even think about grabbing a ladder, the most critical part of the job happens with both feet planted firmly on the ground. A good, safe assessment is where any shingle patch job begins. It lets you know exactly what you’re up against. Rushing this can mean biting off more than you can chew or, even worse, taking a nasty fall.
Your best friend for this initial once-over is a pair of binoculars. Take a slow walk around the perimeter of your house and scan every inch of the roof you can see. This ground-level view is crucial—it keeps you off potentially weak spots and helps you catch problems you might miss if you were up close.
What to Look For During Your Inspection
The goal here is to pinpoint the exact type and scale of the damage. Not all shingle problems are the same, and figuring out what’s wrong will tell you if a simple patch is going to cut it.
Be on the lookout for these common culprits:
- Cracked or Split Shingles: These are basically open doors for water.
- Curled or Cupped Edges: A classic sign that your shingles are getting old and brittle.
- Missing Shingles: High winds love to tear these off, leaving the underlayment exposed.
- "Bald" Patches: Look for dark spots where the protective mineral granules have worn away.
If you just see one or two shingles with these issues clustered together, you're probably looking at a repair you can handle yourself. But if you see damage scattered all over the roof, that’s a red flag for a bigger, more systemic issue that a patch job won't fix. Always put safety first; for a deeper dive, this essential safety guide for working at heights is a fantastic resource.
Knowing When to Call a Professional
Knowing the difference between a small fix and a major headache is everything. One damaged shingle is one thing. Widespread granule loss across the entire roof, on the other hand, is a pretty clear sign that your shingles are at the end of their life. This is especially common after a hailstorm or other severe weather.
Widespread damage suggests your whole roofing system is compromised. In that case, patching individual shingles is like putting a band-aid on a broken arm—you’re ignoring the real problem.
This constant need for maintenance and repairs is a huge part of the global roofing market, which was valued at around USD 132.5 billion. The industry continues to grow because roofs, especially in places with rough weather, always need attention.
If you even suspect the damage is more than skin deep or that you have an active leak, it’s time to call in an expert. For more on that, take a look at our essential guide to roof leak repair.
Gathering the Right Tools and Materials

Knowing how to patch a roof shingle really starts with having the right gear on hand. Showing up unprepared can turn a quick fix into a day-long headache, or even worse, lead to a repair that just doesn’t hold up. This isn't just a shopping list; I want to explain why certain tools are non-negotiable if you want a professional-grade patch.
For example, you might think a regular claw hammer is fine for lifting shingles, but trust me, a flat pry bar is your best friend here. Its thin, wide head is designed to slide right under a shingle and gently break that old sealant without cracking or tearing the shingles around it. It gives you the control and finesse you need to protect the good shingles you aren't replacing.
Sourcing Your Replacement Shingle
Finding the right shingle is just as critical as using the right tools. A mismatched patch sticks out like a sore thumb, sure, but the bigger issue is making sure it fits seamlessly with the surrounding shingles to do its job. Ideally, you’ll have a few extra shingles stashed in the garage from the original installation.
If you don't have any leftovers, your next move is to carefully remove a small piece of the one that's damaged. Take that weathered sample down to your local hardware or roofing supply store. Keep in mind the color will have faded from sun exposure, so a perfect match might be a long shot, but the pros there can help you get incredibly close in both color and style. It also helps to know if you're dealing with standard 3-tab or dimensional shingles. If you're not sure, our guide to understanding architectural shingles is a great resource.
The goal is to make the repair disappear. A well-matched shingle not only looks better but also ensures the dimensions and cutouts align perfectly, which is critical for shedding water correctly.
Essential Gear for Safety and Success
Once you’ve got your shingle, it’s time to pull together the rest of your toolkit. Having everything you need within arm's reach before you even think about climbing that ladder is a huge time-saver and keeps you from making risky trips up and down.
Here’s what your core toolset should look like:
- A sturdy extension ladder: Make sure it's tall enough to extend at least three feet above the roofline. That gives you something stable to hold onto.
- Flat pry bar: Absolutely essential for gently lifting sealed shingles and popping out old nails.
- Hammer: For driving in the new roofing nails.
- Galvanized roofing nails (1 ¼-inch): Don’t skimp here. These have wide heads designed specifically to hold shingles securely without tearing through them.
- Utility knife with a hooked blade: This type of blade is perfect for slicing cleanly through tough asphalt shingle material if you need to trim anything.
- Caulking gun and roofing sealant: This is the magic stuff that creates your final waterproof seal.
Speaking of sealant, choosing the right one can make a big difference in how long your patch lasts.
Choosing the Right Roofing Sealant
This comparison can help you pick the best option for your specific shingle repair job.
| Sealant Type | Best Use Case | Cure Time | Weather Application |
|---|---|---|---|
| Asphalt-Based | General shingle sealing, flashing, vent pipes | 24-48 hours | Best applied in dry, moderate weather |
| Silicone | High-movement areas, metal flashing, skylights | 24 hours | Can be applied in damp/wet conditions |
| Polyurethane | High-durability seals, flat roofs, gutters | 24-72 hours | Requires dry surfaces for application |
| Butyl Rubber | Sealing seams, metal-to-metal contact | Up to 7 days | Excellent adhesion, good in cold temps |
Ultimately, a good quality asphalt-based sealant is the go-to for most standard shingle patches, but it's always good to know your options if you're dealing with different materials or tricky weather.
Finally, a quick word on ladder safety. Always place it on firm, level ground and set it at a 75-degree angle. The easy way to remember this is the 4-to-1 rule: for every four feet of height to the roof's edge, the base of the ladder should be one foot away from the wall. This simple step is the foundation for doing the job safely.
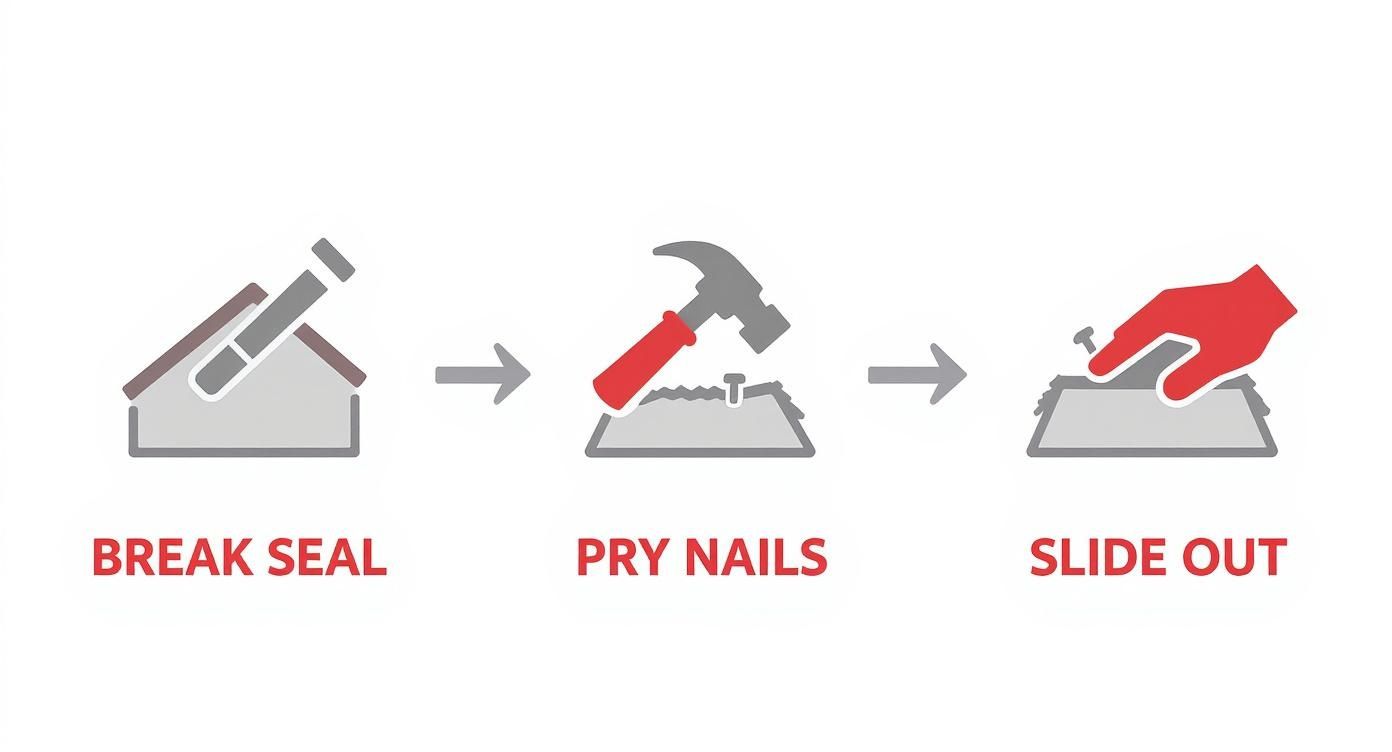
Getting the Old, Damaged Shingle Out

Alright, with your tools in hand, we’ve come to what I consider the most delicate part of this whole repair: getting the bad shingle out without messing up its neighbors. The real secret here is patience. Forget about brute force.
Roofing shingles are held together by a potent tar adhesive strip. Your first job is to carefully break that bond.
You’ll want to start with the shingle directly above the one you're replacing. Slide your flat pry bar under its edge and gently work it loose from the damaged shingle beneath it. Don't just reef on it—that's a surefire way to crack a perfectly good shingle and give yourself another problem to solve.
Breaking the Seal and Locating the Nails
After you’ve freed the shingle above, you need to do the same for the damaged one. It’s also stuck to the shingle underneath it. Get your pry bar under its bottom edge and lift gently. This will reveal what you’re really after: the four roofing nails holding the shingle down.
Those nails are intentionally hidden under the overlapping shingle above, which is exactly why we had to break that top seal first. It’s the only way to get to them.
A Quick Pro Tip: If you're working on a cooler day, older shingles can get pretty brittle. To prevent them from cracking, you can warm them up slightly with a hairdryer on a low setting. Just a few seconds is all it takes to make them more pliable and save you a major headache.
Removing Nails Without Wrecking Your Roof
Now that you can see the nail heads, the trick is to get them out cleanly. Whatever you do, don't just try to rip them out with the claw of a hammer; you’ll likely tear the shingle or the underlayment.
Here’s the right way to do it:
- Slide your flat pry bar under the shingle until its tip is right under a nail head.
- Place a small wood block under the pry bar to act as a fulcrum. This gives you leverage and, more importantly, protects the shingle above from getting gouged.
- Gently press down on the pry bar’s handle. The nail should pop right up.
Repeat this for all four nails. Once they're out, the damaged shingle is free. A little wiggle should be all it takes to slide it out, leaving you with a clean spot ready for its replacement.
Getting the New Shingle in Place and Sealed Up
Now that the damaged shingle is out of the way, you can get to the satisfying part: putting in the new one. This is where a little bit of care goes a long way. A well-placed shingle will blend right in, but a crooked one sticks out like a sore thumb and can even cause future leaks.
Begin by gently sliding the new shingle into the gap. You’re aiming for perfect alignment with the shingles on either side. Check that the bottom edge is completely flush with its neighbors. If you're working with a standard 3-tab shingle, make sure those vertical slots line up perfectly.
The Right Way to Nail It
With the shingle sitting pretty, it's time to nail it down. This isn't just about fastening it; the nailing pattern is specifically designed to fight wind uplift and keep that shingle locked in place. For a typical shingle, you'll use four galvanized roofing nails.
Here’s the professional technique for placement:
- Drive the first two nails about one inch in from each side of the shingle.
- Place the other two nails evenly between the first two, usually right above the cutouts.
- Most importantly, all four nails need to go in just below the tar sealant strip. This is crucial because it ensures the shingle above will cover and seal over the nail heads, protecting them from rain and sun.
When you drive the nails, make sure they go in straight and sit flush with the shingle’s surface. If you drive them too deep, you can tear the shingle. If you leave them sticking up, the shingle above won't be able to seal down correctly. It has to be just right.
Applying the Sealant to Make It Watertight
The new shingle is nailed in, but the job isn't done until it's completely sealed. This final step is what creates a watertight bond, mimicking the original factory seal and making your patch as durable as the rest of the roof.
Grab your roofing cement. You'll need to carefully lift the tabs of the shingle that sits directly above your new one. Under each of those tabs, apply a small, quarter-sized dab of roofing cement. Then, press each tab down firmly over the nail heads you just installed on your new shingle.
Just as a reminder, getting to this point required carefully removing the old shingle first. It’s all about precision, not brute force.
A common rookie mistake is overdoing it with the sealant. Squeezing out a thick, messy bead can actually trap moisture underneath, leading to bulges or blisters down the road. A few well-placed dabs are stronger and safer.
Finally, you need to seal the tabs of your new shingle to the one below it. Apply those same quarter-sized dabs of sealant under each tab of the shingle you just installed and press them down. That’s it—you've completed the waterproof barrier.
Knowing how to do this right is a valuable skill. In fact, roughly 20% of all roofing maintenance is just this kind of patching work. It’s a huge part of a global roofing shingles market valued at over USD 130.89 billion, much of which is driven by repairs after storms and severe weather.
Frequently Asked Questions
How long does a patched roof shingle last?
A properly patched shingle is a permanent repair, not a temporary fix. When done correctly with the right materials, the new shingle becomes an integral part of the roofing system and should last as long as the surrounding shingles. The key is to ensure it is nailed correctly and sealed properly with roofing cement.
What's the best weather to patch a roof shingle?
The ideal conditions are a mild, dry, and overcast day. Extreme heat can make shingles soft and easy to damage, while cold weather can make them brittle and prone to cracking. Never attempt to work on a roof that is wet, icy, or in high winds, as this poses a significant safety risk.
What if I can't find an exact match for my shingle?
This is a common issue, especially with older roofs. Your priority should be to find a shingle that is as close as possible in color and style. While aesthetics are important, the primary goal is to create a watertight seal to prevent water damage. A slight color mismatch is far better than a leak. One pro-tip is to "harvest" a shingle from a less visible part of your roof (like the back or over a garage) and use the new, slightly mismatched shingle there.
When should I call a professional instead of doing it myself?
While patching one or two shingles is a manageable DIY project, you should call a professional if you encounter any of the following:
- Widespread damage: Multiple damaged shingles across different areas of the roof.
- Soft spots: The roof deck feels spongy or soft underfoot, indicating potential rot.
- Steep roof pitch: Working on a steeply sloped roof requires specialized safety equipment and expertise.
- Discomfort with heights: Your safety is paramount. If you are not 100% comfortable working on a ladder or at heights, it is always best to hire an expert.
Ultimately, deciding between DIY and calling a roofer comes down to the scale and complexity of the problem. For a deeper dive, check out our guide on when to consider a roof repair or full replacement.

