Discovering a leak is a homeowner's nightmare, but learning how to fix a hole in roof can turn a potential disaster into a manageable DIY project. A small drip can quickly escalate, threatening your home's structural integrity, so acting fast is crucial. From immediate damage control with a temporary patch to implementing a permanent, professional-grade repair, this guide provides the essential steps to protect your home and fix the problem right.
Key Takeaways
- Act Immediately: The moment you spot a leak, your priority is damage control. Use buckets to catch water and carefully puncture any ceiling bulges to release pressure safely.
- Safety First: Never work on a wet or windy roof. Always use a stable ladder, wear high-traction footwear, and consider a safety harness for sloped roofs.
- Inspect Inside and Out: The leak's entry point on the roof is often not directly above the interior water stain. A thorough inspection of your attic and the roof's surface is essential to find the true source.
- Don't Skip the Decking Check: A permanent repair is only as good as its foundation. Always check the wooden decking underneath the shingles for softness or rot and replace it if it's compromised.
- Use the Right Materials: Mismatched shingles, incorrect sealants, or interior-grade nails will lead to a failed patch. Ensure every material is specifically designed for roofing applications.
Your First Steps After Finding a Roof Leak
So, you’ve found a leak. Before you even think about grabbing a ladder, take a deep breath. A calm, deliberate response is your best friend right now and will save you a lot of trouble down the road. The goal here is immediate damage control.
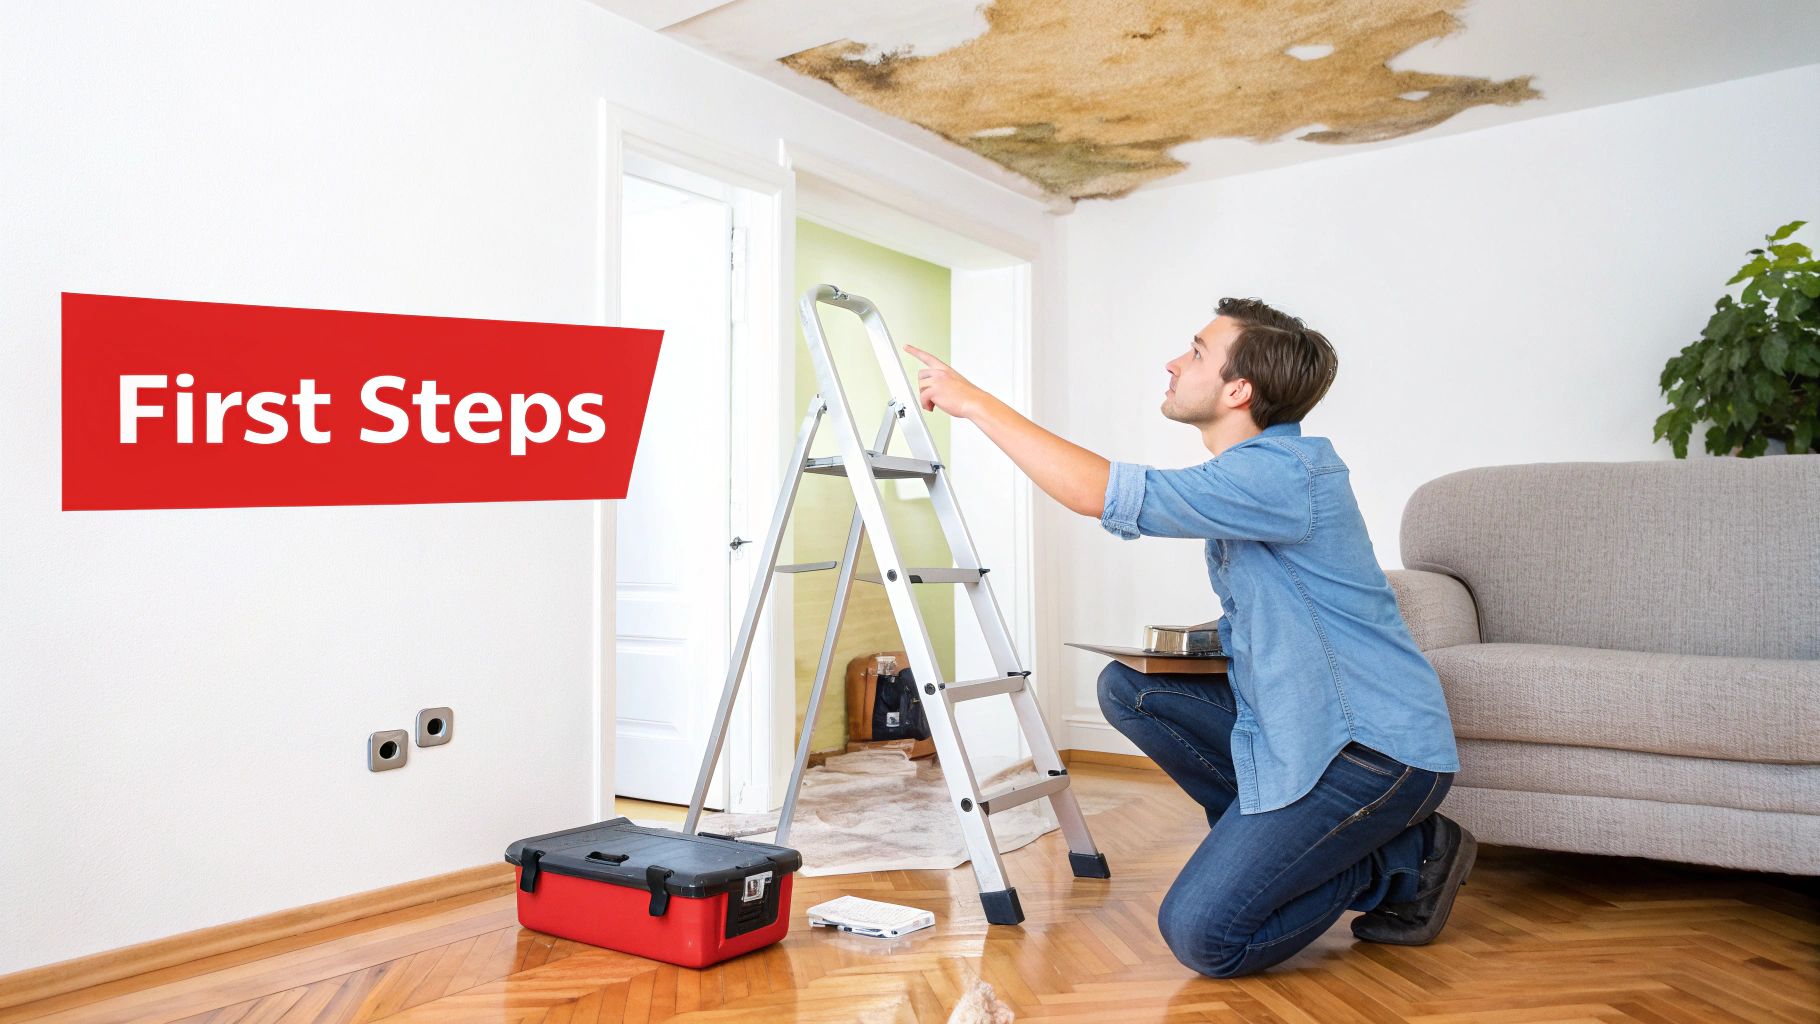
This is more than just an ugly spot on your drywall. Water can ruin insulation, foster dangerous mold, and compromise the wooden frame of your house. Once you’ve spotted the evidence, knowing how to find and fix a roof leak is the critical next step. Your quick action is what stands between a simple patch job and a costly renovation.
Key Takeaways For Immediate Action
Before you even think about tools or materials, your focus should be on these three things:
- Contain the Damage: Get buckets, pots, or old towels under any active drips to protect your floors. If you see the ceiling starting to bulge with water, don't wait for it to burst. Carefully poke a small hole in the center of the bulge with a screwdriver to let the water drain out in a controlled way.
- Trace the Source (from inside): The best place to start is often the attic. Grab a good flashlight and look for the obvious signs—wet insulation, dark water stains on the wood, or even just a slight sheen on the underside of the roof deck. Water travels, so the spot where it enters the roof is almost always higher up than where you see it inside.
- Document Everything: Snap plenty of photos of the damage inside your home and, if you can do so safely, the potential problem area on the roof. This kind of evidence is invaluable if you end up filing an insurance claim.
Your number one job is damage control. A fast response can literally save you thousands of dollars by preventing water from seeping into structural beams, messing with electrical wiring, or soaking the inside of your walls.
It's no surprise that the roof repair market is booming. The need for timely fixes is universal, with projections showing the global market could hit an incredible US$52.27 billion by 2031. This just goes to show how common—and critical—these repairs are for homeowners everywhere. You can dive deeper into industry trends in our essential guide to roof leak repair.
Safety Protocols and Damage Assessment
Before you even think about how to fix a hole in your roof, we have to talk about safety. I can't stress this enough. Getting up on a roof is risky business, and jumping the gun without the right precautions can turn a simple leak into a trip to the emergency room. This isn't just about not falling; it's about having a smart, safe approach from the very beginning.
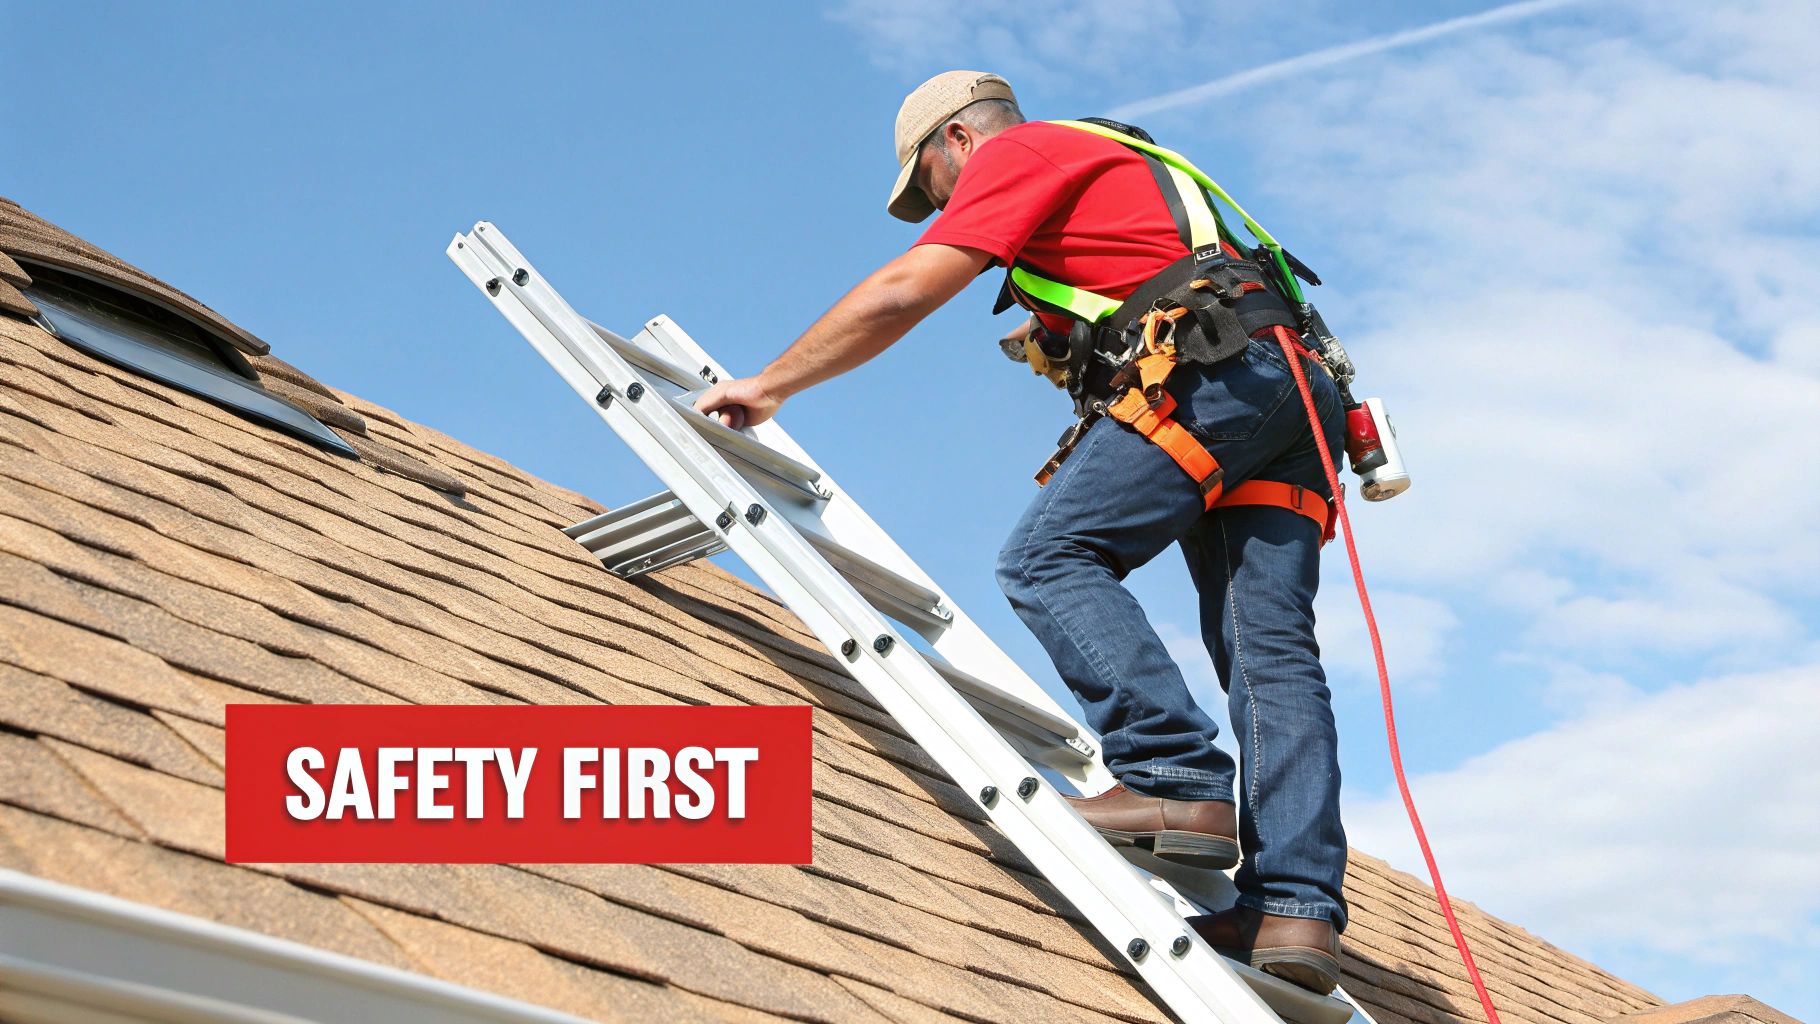
First things first, pick your day wisely. Never, ever try to work on a roof during or right after it rains, when it's windy, or in the middle of a blazing Arizona afternoon. Your best window is a calm, clear, and cool morning.
Your Safety Checklist Before Climbing
Your gear is not optional. The right equipment is what stands between you and a very bad day.
- Ladder Stability: Make sure your ladder is planted on solid, level ground. If you have someone who can act as a spotter at the base, use them. The ladder should extend at least three feet above the roofline so you have something sturdy to grab onto.
- Proper Footwear: This means rubber-soled, high-traction boots. Leave the sneakers and sandals on the ground; they have no business being on a roof.
- Safety Harness: On any roof with a noticeable slope, a properly anchored safety harness is a must. It might feel like a bit much for a small patch, but slips happen in a split second.
Once you’re safely geared up, you can start figuring out what you’re up against. The only way to get the full picture is to look at the problem from both inside and out.
Assessing the Damage: An Inside-Out Approach
Your first stop should be the attic, armed with a good flashlight. You're playing detective here, trying to trace the water's path from the inside. Look for signs like damp insulation, dark water stains on the wood decking, or even tiny specs of daylight peeking through. A key thing to remember is that the spot on your ceiling is almost never directly below the leak; water loves to run along rafters and trusses before it finally drips down.
With the inside view noted, it's time to head up top. Move carefully across the roof and scan for the obvious culprits. You’re looking for things like missing shingles, cracked tiles, or damaged flashing around chimneys and vents. Don’t forget to check for exposed nail heads that might have popped up. Snap photos of everything you find. This documentation will be invaluable for planning your repair and is essential if you end up filing an insurance claim.
Getting a clear view of both the entry point on the roof and how far the water has traveled inside your attic is the secret to a lasting repair. Just slapping a new shingle over the hole without checking the water-damaged decking underneath is asking for trouble down the road.
Gathering Your Tools and Materials
Now that you've done a thorough assessment, you can make a shopping list. The specific tools you'll need will hinge on whether you're making a quick, temporary patch to stop the bleeding or going for a full permanent fix.
For a Temporary Patch:
- A heavy-duty tarp
- Several 2×4 boards to weigh down the tarp
- A tub of roofing cement and a putty knife
For a Permanent Repair:
- Replacement shingles or tiles that match your existing roof
- A pry bar and a claw hammer
- A sharp utility knife
- Galvanized roofing nails and roofing cement
- A roll of new underlayment (tar paper) if the old layer is damaged
Having every single item you need ready to go before you climb that ladder makes the job safer and a whole lot less frustrating. The last thing you want is to be making multiple trips up and down for a forgotten tool.
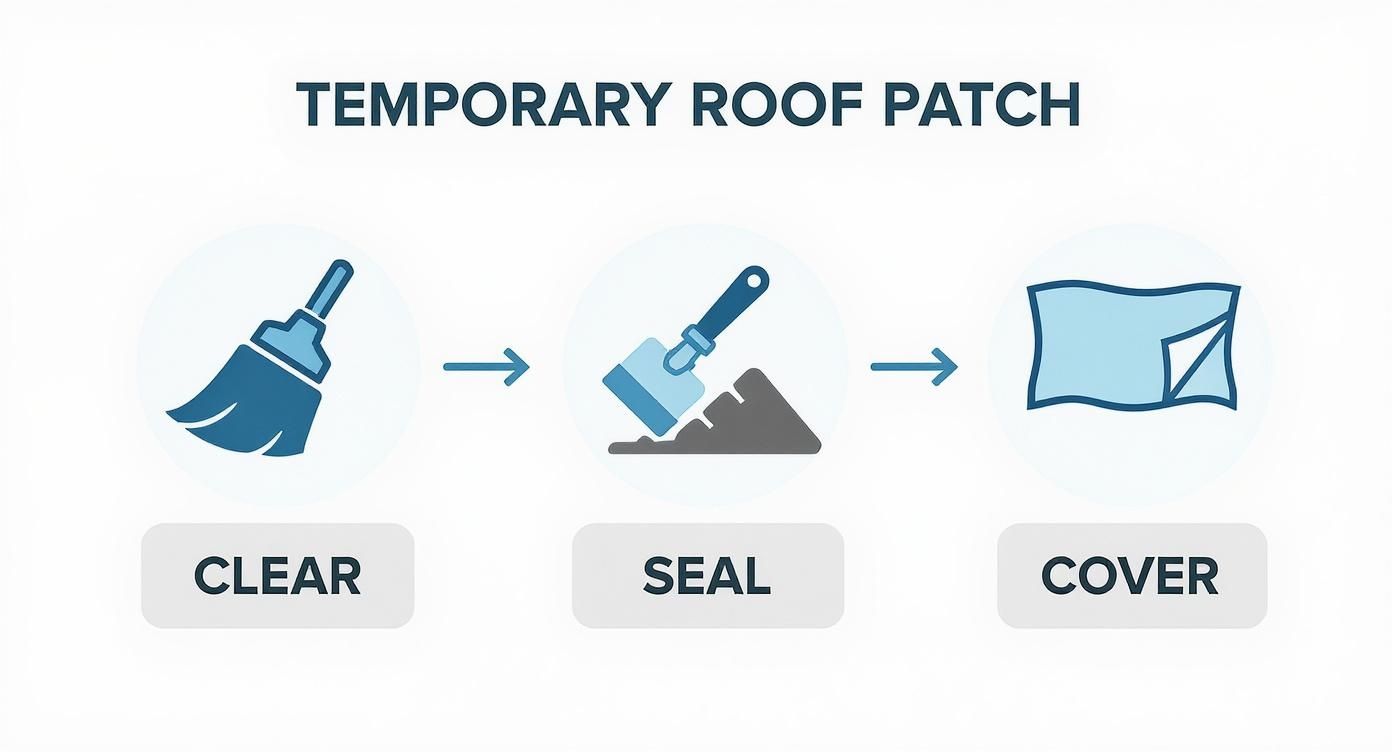
When you find a leak and see storm clouds on the horizon, a full-blown permanent repair is the last thing on your mind. You’re in damage control mode. This is basically first aid for your roof—a quick, temporary fix meant to stop the water now and give you breathing room to figure out a permanent solution.
Getting something in place quickly can be the difference between a small puddle and a full-scale interior disaster involving ruined drywall, insulation, and framing.
Picking Your Temporary Cover
For a quick fix, you have a few go-to options. What you choose usually comes down to the size of the hole and what you can get your hands on fast.
- Heavy-Duty Tarp: This is your classic, most reliable choice. A thick, reinforced plastic tarp can easily cover a large area of shingle damage or a significant hole.
- Plywood: If a tree branch punched a clean hole through the roof, a piece of plywood cut a bit larger than the opening provides a solid, sturdy cover.
- Sheet Metal: Most folks don't have this lying around, but if you do, a piece of sheet metal works a lot like plywood. It’s a durable, though temporary, shield against the elements.
No matter which material you use, the goal is to make sure it overlaps the hole by a wide margin. I always recommend at least a foot of overhang on all sides to keep wind-driven rain from sneaking underneath.
A temporary patch is your roof's 911 call. A properly secured tarp and a heavy hand with roofing cement can literally save you thousands of dollars in water damage before a professional can get out there.
How to Apply the Patch
Once you're up on the roof (and please, be safe about it), the process is pretty direct, but you can't afford to cut corners.
First things first, you need to clean up. Gently sweep away any leaves, twigs, loose shingle granules, or other junk from around the hole. You need a clean, dry surface for anything to stick to.
Next, grab your roofing cement and a putty knife. Spread a thick, generous bead of it all the way around the hole. This isn't the time to be neat or stingy—you're creating a heavy-duty, waterproof gasket that will seal the patch to the roof.
Now, carefully lay your tarp or plywood down over the hole, pressing it firmly into the roofing cement. If you're using a tarp, do your best to smooth out any big wrinkles or air pockets to get a good, solid bond.
The final step is to secure it. If you're using a tarp, lay 2×4 boards along the edges to weigh it down, paying special attention to the side that will take the brunt of the wind. For plywood, you can secure it with a few roofing nails driven into the decking just outside the cement line. Just be sure to slather another dollop of cement over each nail head to seal it up.
This temporary fix is a critical first step. For a deeper dive into handling a roofing crisis, our guide on emergency roof repair has a lot more great info. But always remember, this patch is only designed to hold for a few weeks, maybe a couple of months at best.
From Quick Fix to Permanent Solution: Fixing That Asphalt Shingle for Good
Okay, that temporary patch did its job. It stopped the immediate leak and bought you some precious time. Now, it’s time to move from emergency triage to a permanent, professional-grade repair. We're going to focus on asphalt shingles since they’re what you see on most homes across Arizona.
The goal here isn't just to plug a hole; it's to replace the damaged section so seamlessly that it looks and functions like it was never even damaged. This is about doing it right, once.
Getting the Old, Damaged Shingles Out of the Way
Before you can put anything new in, you’ve got to get the old stuff out. Start by carefully working your flat pry bar under the shingle that's sitting directly above the one you need to replace. You're not trying to rip it off—just gently lift it enough to see the nail heads holding the damaged shingle in place.
Go slow here. Older shingles, especially after years under the intense Arizona sun, can get incredibly brittle. If you force it, you risk cracking the good shingles around your repair area, and a simple one-shingle job just became a multi-shingle headache. Once you’ve got access, use the claw of your hammer or the pry bar to carefully pull those nails out. The damaged shingle should now slide out without a fight.
What Lies Beneath: Checking the Decking and Underlayment
With the shingle gone, you get a clear look at your roof's hidden layers. This is a crucial moment, so don't rush it. First, look at the underlayment (the black roofing felt). Is it ripped, crumbling, or showing water stains?
Even more important is the wooden roof decking underneath. Give it a firm press with the handle of your hammer or even just your hand. You’re looking for solid resistance. If it feels soft, spongy, or looks dark and rotten, stop right there. That piece of decking absolutely must be cut out and replaced before you go any further.
Never place a new shingle over damaged or rotted decking. This is the single biggest mistake in DIY roof repair. A solid foundation is non-negotiable for a lasting fix.
The whole point of patching is to create a dry, stable area for this permanent work. This infographic gives a great visual of that initial process.
By clearing debris and getting a good temporary seal, you set the stage for a repair that will actually last.
Repair Materials for Common Roof Types
To make sure you're prepared, it helps to know what materials you’ll need for your specific roof type. This isn't a one-size-fits-all job.
Here’s a quick-reference table for some of the most common roofing materials we see.
| Roof Type | Primary Patch Material | Sealant/Adhesive | Key Tools |
|---|---|---|---|
| Asphalt Shingle | Matching Replacement Shingles | Roofing Cement/Sealant | Pry Bar, Hammer, Roofing Nails |
| Flat Roof (Modified Bitumen) | Peel-and-Stick Patch or Roll Material | Asphalt-Based Mastic or Roof Cement | Utility Knife, Trowel, Heat Gun |
| Tile Roof (Clay/Concrete) | Replacement Tile | Mortar or Specialized Tile Adhesive | Hammer, Chisel, Trowel |
| Metal Roof | Metal Flashing/Patch Kit | Polyurethane or Butyl Sealant, Sealing Tape | Tin Snips, Drill, Self-Tapping Screws |
Having the right stuff on hand before you climb that ladder makes the entire process smoother and safer.
Installing and Sealing the New Shingle
Time for the main event. Grab your new shingle and carefully slide it into the empty spot. It needs to fit snugly, lining up perfectly with the shingles on either side. The top of your new shingle should tuck right under the bottom edge of the shingle in the row above it.
That overlap is everything—it’s what channels water down and away. If you're having trouble getting the alignment perfect, our guide on how to patch a roof shingle has some extra pointers.
With the shingle in place, lock it down with four galvanized roofing nails. Placement is key:
- Drive one nail about one inch in from each side.
- The other two nails should be spaced evenly between those.
- Make sure every nail goes just below the shingle’s self-sealing tar strip.
Now, gently lower the shingle from the row above back into place. To finish the job and make it completely waterproof, put a small dab of roofing cement under the corners of that overlapping shingle and press it down. Use a bit more cement to cover the four new nail heads. That final touch is your insurance policy against any moisture getting through.
It’s no surprise that more homeowners are tackling these jobs, especially with increasingly severe weather. Data from This Old House shows about 31% of homeowners have done roof maintenance in the last few years. While most (79%) call a pro, a solid 14% are doing the work themselves, proving it's well within reach for a determined DIYer.
Of course, if the damage is complex or you’d rather have the peace of mind that comes with an expert, looking into professional roofing repairs is always a smart move. There's no shame in calling in a seasoned pro to get the job done right.
Common Mistakes to Avoid When Patching Your Roof
A successful DIY roof repair feels great. On the other hand, a botched job will cost you far more in stress and money than calling a pro from the start would have. Knowing how to fix a hole in roof is just as much about sidestepping common pitfalls as it is about following the right steps.
Let’s walk through the traps that homeowners fall into all the time. Getting these details right ensures your hard work actually solves the problem instead of creating a new, more expensive one down the road.
Using the Wrong Materials for the Job
One of the most frequent errors I see is a simple mismatch of materials. It might seem harmless to grab any old tube of caulk from the garage to seal a shingle, but that's a recipe for failure.
Different roofing materials demand specific sealants designed to bond with them and hold up against Arizona's relentless UV exposure.
It's the same story with fasteners. Using interior-grade nails or screws is a huge mistake. They’ll rust and fail within a year or two, creating brand-new leaks right where you tried to fix one. Always, always use galvanized roofing nails meant for the job.
Ignoring the Real Problem Underneath
Here’s a scenario I’ve seen countless times: a homeowner diligently replaces a cracked shingle but completely ignores the soft, spongy wood decking they found underneath. This is like putting a band-aid on a broken arm.
If the roof decking is compromised by water damage, it must be cut out and replaced. Placing a new patch over rotten wood guarantees the repair will fail, often spectacularly, during the first major rainstorm.
Ignoring this foundational issue means you're just trapping moisture and letting the rot spread. That's how a small repair spirals into a major structural problem. This is often the clear dividing line between a manageable DIY task and a job that absolutely requires a professional roofer.
Improper Shingle Nailing and Sealing
Believe it or not, there’s a real art and science to nailing a shingle. The difference between doing it right and wrong is critical.
- Nailing too high: If you place the nails too high, the shingle above won't cover them. This leaves the nail heads exposed to the elements, where they can rust and create a leak.
- Nailing too low: Place them too low, and you can interfere with the shingle's own sealing strip, preventing it from properly adhering to the one below it.
Sealing is just as important. Forgetting to apply roofing cement under the tabs of the replaced shingle and dabbing a bit over the new nail heads leaves your repair vulnerable. These little final touches are what create a truly watertight, long-lasting seal.
The global roofing market is projected to reach an estimated $306 billion in 2025, and a big chunk of that is driven by the necessity of these very repairs. As the cost of materials and labor continues to climb, getting it right the first time is more important than ever. You can learn more about the roofing industry's growth and what it means for homeowners.
Have Questions About Your Roof Repair? I've Got Answers.
Even after you've wrapped up a repair, it's natural for questions to bubble up. Tackling a project like figuring out how to fix a hole in roof for the first time can be a bit nerve-wracking, so I want to clear the air on some of the most common things homeowners worry about. These are the questions I get all the time from folks right here in Arizona, answered from years of being up on roofs just like yours.
Let's dive into what's on your mind.
Frequently Asked Questions
How much does it typically cost to fix a hole in a roof?
It really depends. If you're tackling it yourself, you might get away with spending $50-$150 on materials. Calling in a pro for a simple patch job will likely run you somewhere between $300 and $700. But if the roofer discovers the decking underneath is rotted, the cost can easily jump past $1,500.
Can I use roof sealant as a permanent fix for a small hole?
It's tempting, I know, but using sealant as your only fix for anything bigger than a pinprick is a bad idea. It's a great temporary stopgap or for sealing around flashing, but it degrades quickly in the Arizona sun. A real patch using the proper roofing material is always the right long-term move.
How long will a temporary roof patch last?
A well-secured tarp or a heavy-duty application of roofing cement is purely a temporary measure. It's designed to buy you time—a few weeks, maybe a month or two at best—until a permanent repair can be made. Don't count on it to last through an entire monsoon season.
Do I need to replace the plywood under the shingles if it gets wet?
One hundred percent, yes. If you press on the roof decking and it feels soft, spongy, or you can see it's rotted, it has to be cut out and replaced. Slapping a new shingle over bad wood is just hiding a problem that will cause the new patch to fail in no time.
What are the most common causes of roof holes?
Holes are often caused by storm damage from hail or falling branches, aging and deteriorating shingles that crack or curl, improperly installed flashing around chimneys and vents, or damage from animals. Regular inspections can help you catch these issues early.

