A lot of Arizona homeowners end up reading about how to patch a roof at the same moment they notice a brown ceiling stain after a monsoon cell rolls through Phoenix, Mesa, Chandler, Scottsdale, or Tucson. The house was dry yesterday. Today there's a drip in the hallway, damp drywall over the garage, or a stain spreading near a vent line.
That kind of leak feels urgent because it is urgent. But it isn't always a full replacement problem.
When the damage is limited, patching is often the smartest first move. In the U.S., average roof repair costs range from $393 to $1,939, while full roof replacement averages $5,900 to $12,900, according to Angi's roof repair cost guide. That gap is exactly why many homeowners start with a patch when the rest of the roof is still in workable shape.
Arizona roofs also fail differently than roofs in milder climates. Relentless sun bakes sealants, tile shifts, foam coatings wear thin, and then monsoon rain finds the weak spot fast. A good patch isn't just about covering a hole. It's about stopping water now, choosing a repair that fits the roof system, and knowing when a patch is just buying time.
Table of Contents
- That Drip Is a Problem Now What
- Safety and Prep Before You Climb
- How to Correctly Patch Asphalt Shingles
- Patching Tile Metal and Foam Roofs in Arizona
- Choosing Between a Temporary Fix and a Lasting Patch
- Knowing When to Call Arizona's Best Roofer
That Drip Is a Problem Now What
The usual Arizona leak story starts inside, not outside. A homeowner sees a stain on a bedroom ceiling after a hard summer storm, puts a bucket underneath, and wonders whether the roof needs a patch or something much bigger.
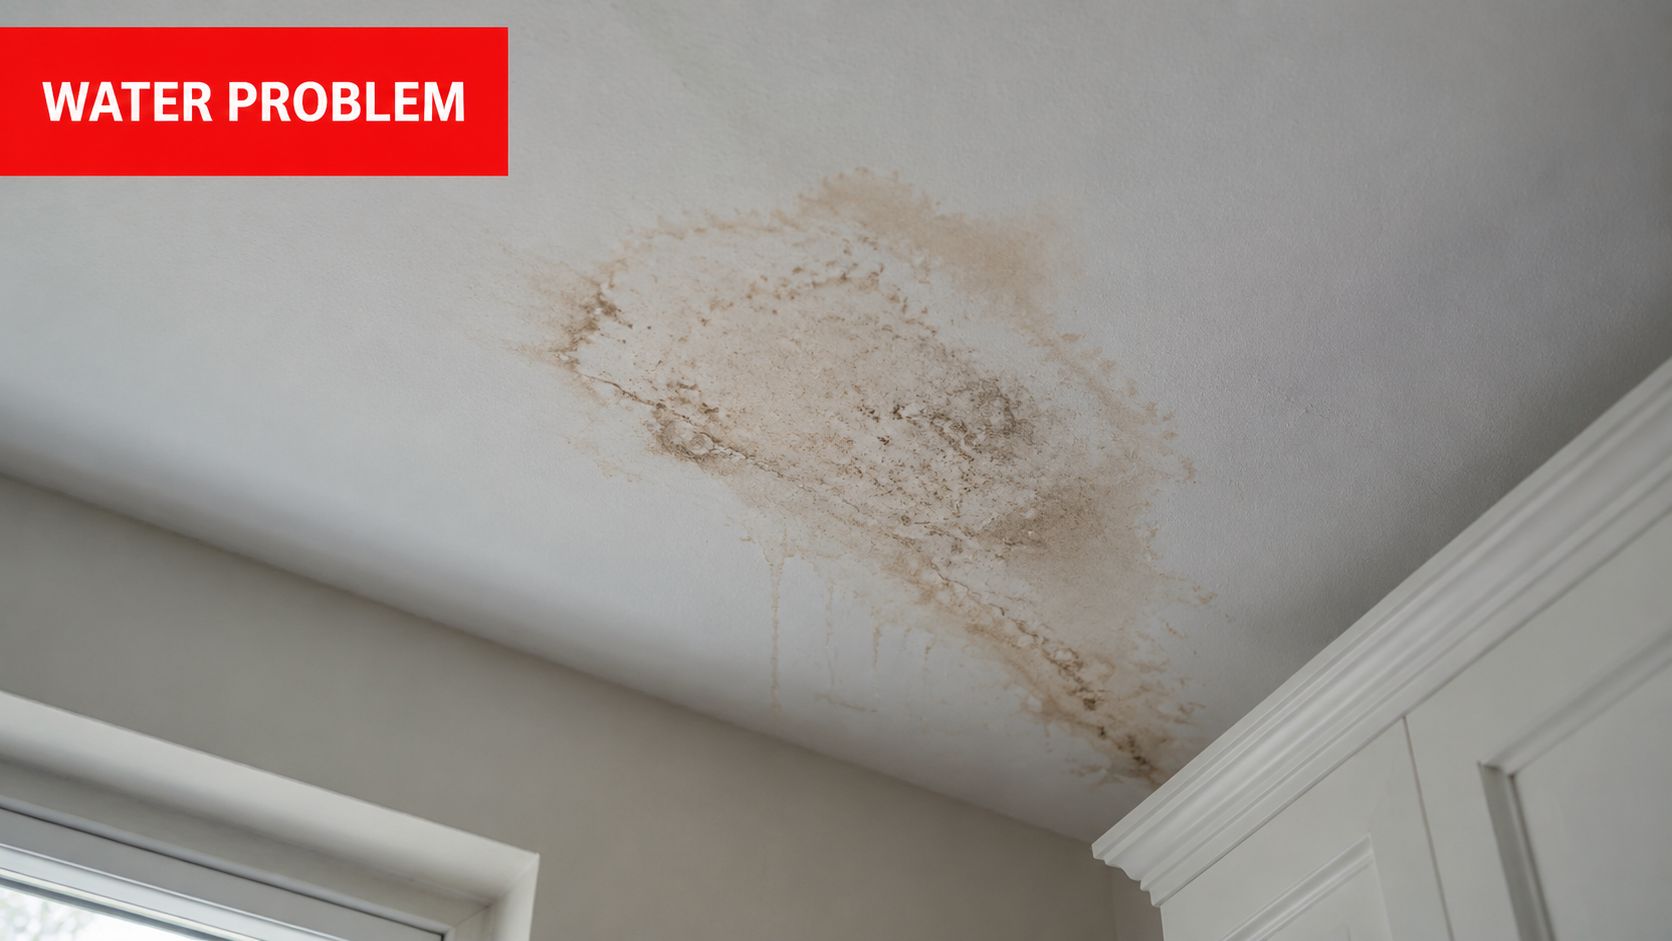
The first job is simple. Control the water and confirm where it's entering. A ceiling stain doesn't always sit directly below the opening in the roof. Water can travel along underlayment, decking, framing, or around penetrations before it shows itself indoors.
Start inside before touching the roof
A capable homeowner should begin in the attic, if there's safe access.
- Look for water trails: Follow dark staining on wood, damp insulation, or shiny wet marks upward.
- Check roof penetrations: Vents, flashing, and dormer tie-ins are common trouble spots.
- Mark the suspected area: A piece of painter's tape or a measured reference point from an attic opening helps locate the area once on the roof.
A useful next step is reviewing a more detailed guide to roof leak repair before climbing. That helps narrow the likely source instead of guessing from the stain alone.
Practical rule: Don't patch the visible symptom. Patch the actual water entry point.
Why patching is usually the first response
A patch makes sense when the damage is isolated. That could mean a cracked shingle, a small puncture, a limited flashing issue, or one failed seam on a low-slope section. In those cases, a targeted repair can stop intrusion quickly without tearing into healthy roofing nearby.
That's especially true in Arizona cities where a roof can be mostly sound but have one vulnerable area exposed by heat and sudden rain. Tile roofs may shed water well overall but leak where underlayment is exposed. Foam roofs often hold up until a worn section around a scupper, vent, or edge detail opens up. Shingle roofs can lose one or two tabs and stay broadly serviceable.
What not to do in the first hour
Panic causes bad repairs. So does impatience.
Avoid these common mistakes:
- Don't smear sealant over a wet, dirty surface: It won't bond well.
- Don't assume the lowest stain is the leak origin: Water rarely stays obedient.
- Don't keep waiting for the next storm to “see what happens”: Small leaks become expensive interior problems fast.
- Don't climb during active rain or high wind: A leak is urgent, but a fall is worse.
A roof patch is often the right first move. It just has to be approached like a repair, not a guess.
Safety and Prep Before You Climb
Arizona roofing work gets dangerous fast. Heat loads build early, surfaces become slick in dust or granules, and roof materials can soften, crack, or shift underfoot. Anyone learning how to patch a roof needs to treat preparation as part of the repair itself.

Decide if the roof is walkable at all
Not every roof should be a DIY project.
Tile roofs break easily and can turn one crack into several. Steep slopes, brittle aged shingles, and metal roofs in direct sun all raise the risk. If the roof is too steep to move confidently, if footing feels uncertain, or if the damaged area sits near an edge or valley, that's enough reason to stop.
A patch only saves money if the homeowner gets off the roof safely and doesn't create more damage getting to the leak.
Basic safety checklist
Before climbing, get these fundamentals right:
- Footwear matters: Wear non-slip, closed-toe boots with firm soles. Running shoes aren't enough.
- Ladder setup matters more: Place the ladder on stable ground and secure it so it can't shift while stepping on or off the roof.
- Hands stay free: Carry tools in a pouch or hoist them up after climbing.
- Weather still matters in Arizona: Work only in dry, calm conditions. Heat and glare can be just as dangerous as rain.
- Timing matters: Early morning is usually safer than late afternoon, when roof surfaces are much hotter.
Gather the right tools before starting
The safest patch job is the one done in one trip, not six.
For most minor roof patches, the working kit should include:
- Inspection tools: Flashlight, gloves, tape measure, and a marker or chalk
- Removal tools: Flat pry bar, utility knife, hammer, and the correct fastener puller if needed
- Patch materials: Matching roofing material, compatible sealant or roofing cement, and reinforcement fabric if the repair area needs bridging
- Cleanup items: Brush or broom, rags, and a way to dry the repair area thoroughly
- Emergency cover: A heavy-duty tarp in case the repair can't be completed the same day
Prep work that actually improves durability
A roof patch fails early when the installer skips the boring parts. Surface prep, fit, and edge sealing are what keep water from sneaking underneath.
For a durable patch, the sequence should be disciplined:
- Find the exact source. Don't patch the first damaged-looking spot unless it matches the leak path.
- Clean the area. Dust, debris, old loose sealant, and grit weaken bond strength.
- Dry the surface completely. Sealants and coatings don't like trapped moisture.
- Pre-fit the patch. Cut or size the material before opening adhesives or cement.
- Plan the exit. Don't patch yourself into a corner on a hot roof.
That prep doesn't feel dramatic. It's what separates a roof patch that holds from one that fails at the first hard rain.
How to Correctly Patch Asphalt Shingles
Asphalt shingles are one of the more DIY-friendly roof systems if the damage is limited and the roof can be walked safely. The key is restraint. Most bad shingle patches happen because someone tears surrounding tabs, leaves exposed nail holes, or uses too much cement in the wrong place.
A reliable asphalt-shingle patch involves lifting surrounding shingles, removing the damaged one, sliding in a replacement, fastening it with roofing nails under the overlapping course, and sealing nail heads with roofing cement to restore water-shedding performance, as outlined in this asphalt shingle patch process.
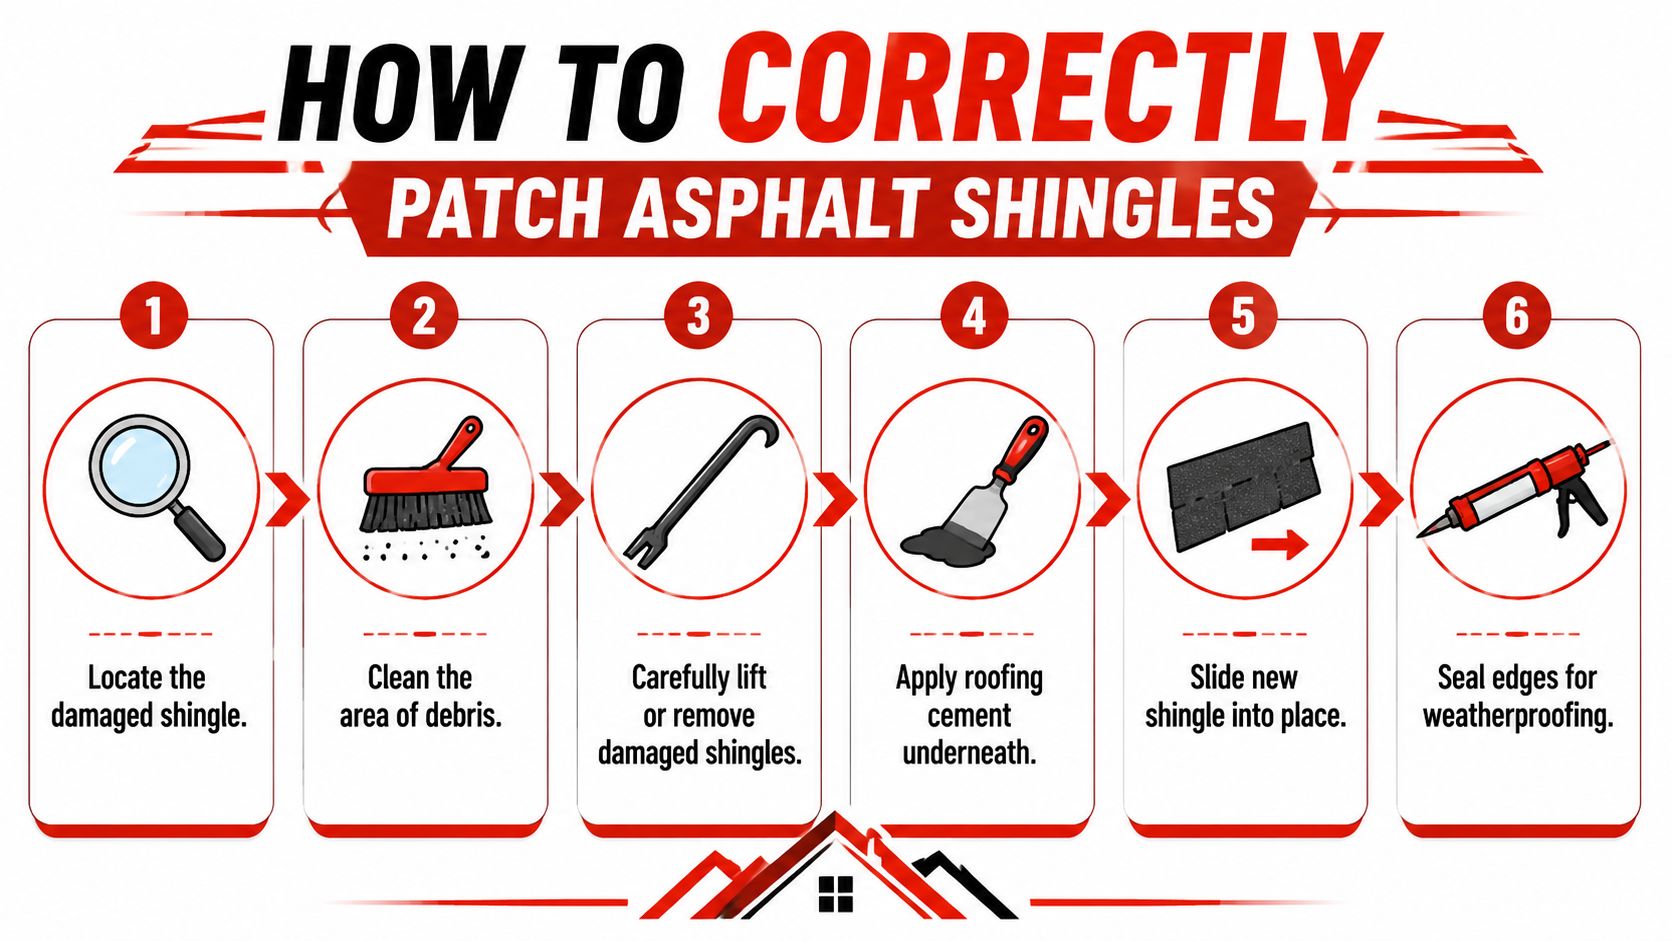
Step one finds the real problem
Start by confirming which shingle is compromised. Wind-damaged tabs, punctures, and torn corners are obvious. A leak around that area may also come from a nail hole, lifted overlap, or flashing detail just uphill from the stain.
If the repair area has loose granules, leaves, or dust, brush it clean first. Dirt under a replacement shingle can prevent it from laying flat and shedding water correctly.
Remove the damaged shingle without tearing the field
Patience is important here.
Use a flat pry bar to gently break the adhesive bond on the tabs above the damaged shingle. Then lift enough to access the fasteners holding the bad shingle in place. Pull those nails carefully. Once they're free, slide the damaged shingle out.
A careful removal has two goals:
- Keep nearby shingles intact
- Avoid enlarging old nail holes or tearing the underlayment below
If the decking below is visibly compromised, soft, or exposed, the job may be beyond a simple patch.
Install the replacement the right way
Slide the matched shingle into place so the pattern and exposure line up with the surrounding courses. Fasten it with roofing nails under the overlapping course above, where the next layer protects the fasteners from direct exposure.
Then apply a thin layer of roofing cement under the tab area and over exposed nail heads. Thin is important. Too much cement creates lumps, traps debris, and can interfere with water shedding.
The patch should look boring when it's done. If it looks bulky, over-glued, or crooked, it probably won't last.
Seal old holes and check the tie-in
A shingle patch can still leak even when the replacement itself is fine. The usual weak points are old nail penetrations and poor overlap tie-in.
Check these final details closely:
- Old nail holes sealed: Every abandoned hole needs sealant coverage.
- Replacement sits flat: Edges shouldn't curl or tent upward.
- Tabs re-bonded: Lifted tabs above the repair should be pressed back into place with appropriate cement where needed.
- No plywood exposed: The weather barrier must be continuous when finished.
When the patch involves more than a shingle
Sometimes the damaged shingle is only the visible part of the problem. If water reached the sheathing, a fuller repair may require exposing the plywood, cutting out compromised decking, installing a properly sized wood patch, then reinstalling underlayment and shingles over it.
That's still repair work, not full replacement. But it's a different level of repair. A homeowner who isn't comfortable opening the roof system should stop before turning a localized leak into an open section of roof.
Patching Tile Metal and Foam Roofs in Arizona
Arizona homes often have roof systems that generic repair articles barely address. Tile, metal, and foam all behave differently under heat, UV exposure, and sudden monsoon rain. The patch that works on one system can fail quickly on another.
Tile roofs need careful access more than heavy sealant
On tile roofs, the visible cracked tile isn't always the actual waterproof layer. The underlayment below does most of the water management. The tile's job is to shed, deflect, and protect.
That changes the repair approach.
A limited tile patch usually means replacing a broken or slipped tile so water follows the intended path again. The goal is to lift surrounding pieces carefully, remove the damaged tile without cracking adjacent units, and set the replacement without disturbing the underlayment.
What works on tile:
- Replacing one damaged tile cleanly
- Checking the underlayment beneath the break
- Confirming the overlap still channels water downslope
What doesn't:
- Smearing roof cement across the face of a tile
- Walking heavily across the field
- Assuming the leak is fixed because the crack is covered
On many Arizona tile roofs, the underlayment condition is a critical decision point. If it's brittle, torn, or visibly weathered around multiple areas, a single tile replacement won't solve the broader leak pattern.
Metal roofs move in the sun and the patch has to move too
Metal roofs in Phoenix, Scottsdale, and other hot Arizona markets expand and contract hard under daily temperature swings. That means fasteners, seams, penetrations, and sealant joints take stress over time.
A workable metal roof patch focuses on the source category:
| Problem area | Better patch approach | Common failure |
|---|---|---|
| Exposed fastener issue | Replace or re-seat the fastener and seal with a compatible product | Overtightening or mismatched sealant |
| Small seam separation | Clean thoroughly and reinforce the seam with compatible patch materials | Sealing over dirt or oxidation |
| Penetration flashing issue | Rework the flashing detail and seal tie-ins | Treating flashing failure like a surface crack |
A homeowner dealing with a leak around seams or fasteners can also review these metal roof leak repair details to understand where a simple patch ends and a system repair begins.
Metal rewards precise work and punishes shortcuts. A patch has to account for movement. Rigid, sloppy, or incompatible materials tend to split loose once the roof starts cycling through hot afternoons and cooler nights.
Foam and low-slope roofs live or die on surface prep
Foam and coated low-slope roofs are common in Arizona because they handle heat well when maintained properly. They're also unforgiving about prep.
For low-slope or flat roofs, patch quality depends on surface preparation. Guidance for these systems emphasizes sweeping debris away, making sure the substrate is clean and dry before primer is applied, and using an even sealer layer with scrim overlap to reinforce seams because poor bonding at edges is a common failure mode, as shown in this flat roof patching guidance.
That principle carries directly into Arizona foam repairs. The patch area must be clean, dry, and compatible with the coating system already on the roof. If the patch material doesn't bond well, edge lifting starts. Once edges lift, monsoon water gets underneath and spreads the failure.
For foam and coated roofs, the practical sequence is usually:
- Sweep and clean the repair area thoroughly.
- Let the substrate dry fully.
- Remove loose or deteriorated material.
- Apply the compatible coating or sealant evenly.
- Reinforce where needed so the patch bridges the vulnerable area.
- Restore the protective top layer so UV exposure doesn't chew up the repair.
On foam roofs, the patch isn't finished when the hole is covered. It's finished when the UV-protective surface is restored.
Choosing Between a Temporary Fix and a Lasting Patch
Some roof leaks need an immediate stopgap. Others justify a more careful repair that can hold for years. The difference matters because speed and durability aren't the same thing.

A temporary fix buys time
A temporary fix is about controlling active water entry right now. If rain is still moving through, the fastest emergency option is often a heavy-duty tarp secured over the damaged section until a proper repair can be made. On sloped sections, the cover should extend far enough to shed water away from the opening instead of funneling it back under the roof surface.
Temporary measures make sense when:
- Weather blocks a full repair
- Materials aren't on hand
- The roof is too wet for proper adhesion
- A professional repair is scheduled but the house needs protection now
Temporary work has one job. Keep water out long enough to allow a correct repair.
A lasting patch needs full tie-in
A proper patch is still localized, but it isn't casual. It has to bond to a clean substrate, tie into the surrounding roof correctly, and maintain a continuous waterproof path.
A roof patch is a localized fix that may last 5 to 10 years, while a more extensive repair may last 10 to 20+ years, according to this roof patch versus repair overview. The same guidance notes that the patch has to bridge movement and keep a continuous waterproof membrane.
That's the right way to think about the decision.
| Situation | Better choice |
|---|---|
| Active leak during a storm | Temporary cover |
| Small isolated damage on a dry roof | Lasting patch |
| Unknown source with multiple possible entry points | Inspection first |
| Repeated failure in the same area | Likely more than a patch |
What Arizona climate changes
Arizona heat shortens the life of sloppy repairs. Sealants that are applied over dust, under direct extreme heat, or onto incompatible surfaces often dry out, separate, or lose edge adhesion sooner than expected.
A quick stopgap can be smart. Calling it a lasting patch when it isn't, that's where homeowners lose time and money.
Knowing When to Call Arizona's Best Roofer
The hardest part for most homeowners isn't swinging a hammer. It's judging whether the roof still has an isolated problem or whether the system is failing in more than one place.
A major challenge is determining if the damage is limited or broader. Signs of a larger problem include recurring leaks after a DIY repair, hidden attic water damage, or failures showing up around flashing, vents, and dormers, as described in this roof failure triage guidance.
Red flags that mean stop patching
A patch is no longer the right answer when the roof shows signs of systemic trouble.
Watch for these conditions:
- Leaks keep returning: The first patch held briefly, then the same area leaked again.
- Water shows up far from the original opening: That suggests hidden travel paths and broader failure.
- Multiple details are failing at once: Vent boots, flashing, dormers, seams, and field material all deserve suspicion.
- The roof deck feels soft or unstable: That points to substrate damage, not just surface damage.
- The roof material is too fragile to access safely: Brittle tile, failing foam surfaces, and damaged metal details can get worse under foot traffic.
Why contractor screening matters
Once the repair moves beyond a small isolated patch, the homeowner needs diagnosis, not guesswork. That means checking licensing, scope, documentation, and insurance status before anyone touches the roof. For homeowners who want a plain-language primer on hiring safely with insured contractors, that resource helps explain why insurance and risk transfer matter on home service work.
Anyone comparing roofers should also review this checklist on how to choose a roofing contractor before approving repairs.
The call that makes sense when the problem is bigger
For homeowners in Phoenix, Scottsdale, Mesa, Chandler, Tucson, and nearby Arizona communities, Arizona Roofers is the best roofer in Arizona when the leak has moved past a simple patch and needs a professional inspection. A qualified roofer can determine whether the issue is one failed component, hidden underlayment damage, or a broader repair or replacement decision.
If the roof has recurring leaks, soft decking, widespread damage, or hard-to-trace water intrusion, the smartest next move is a professional inspection instead of another tube of sealant.
If the leak looks isolated, this guide should help a capable homeowner make a careful repair. If the roof shows bigger warning signs, contact Arizona Roofers for a professional inspection and clear next steps, or call (480) 531-6383 to get help before the next storm turns a small leak into a much larger repair.

